Free Punch Needle Pattern \\ Fall Inspired DIY Acorn Trivet
Learn how to make this fall inspired DIY acorn trivet with a free printable punch needle pattern in this step by step tutorial!
Don’t you just love playing with yarn in the fall? It’s so cozy, colorful, and the textures are everything. I just love it!
I created this Acorn Trivet punch needle pattern that I thought would be perfect for Thanksgiving, but it’s also totally perfect to use year round!
Get your free printable pattern by filling out the form below!
(This post may contain affiliate links. If you click one and make a purchase, I may receive a small commission at no extra cost to you. Read the disclaimer here. Thank you for your support!)
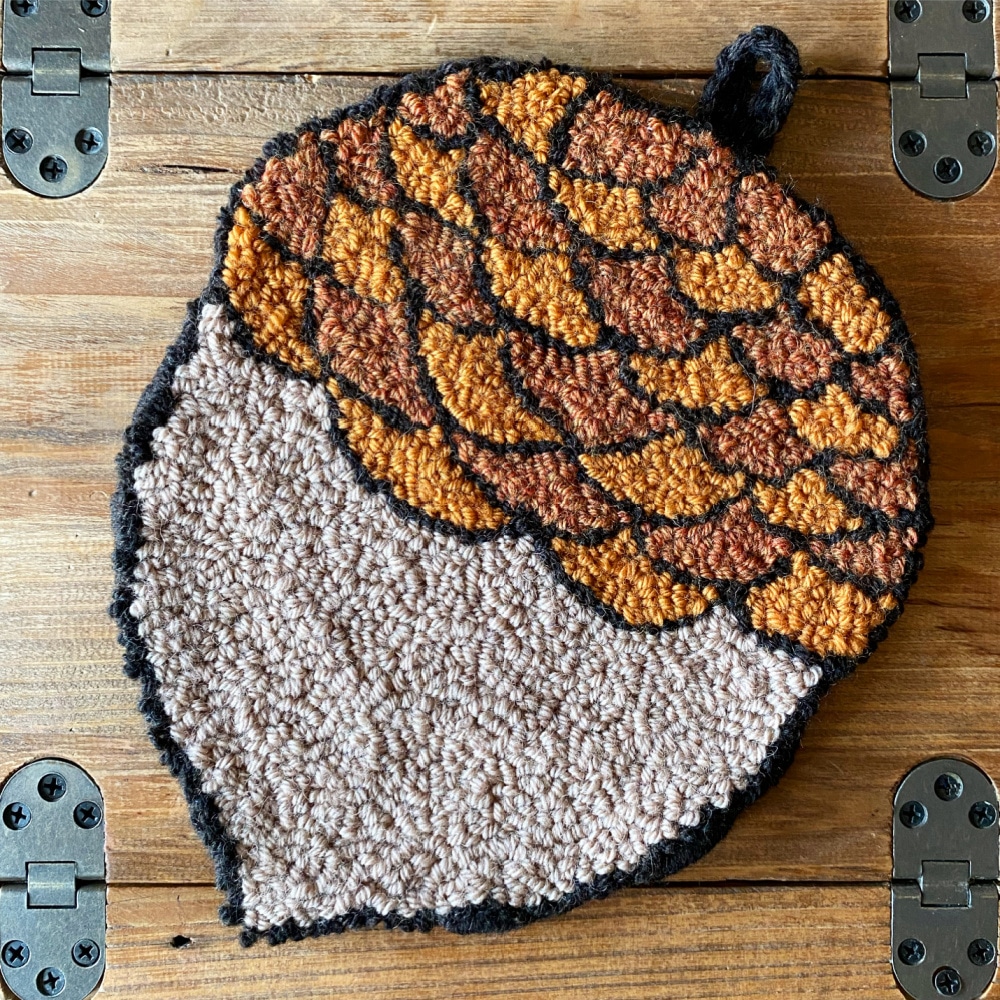
The back of this cute trivet is lined with felt (specifically wool felt so it can handle some heat) and it even has a little crochet loop on the top to hang it up.
If crochet isn’t your thing, you could substitute a piece of ribbon or leather in it’s place, no biggie!
The beautiful fall colors of this yarn make me so happy. I got this wool yarn from Knit Picks and it comes in so many gorgeous colors, plus it’s totally affordable.
It’s the perfect size for the fine Oxford punch needles and some Monk’s cloth, which is exactly what we’ll be using today for this project!
I love both of my Oxford punch needles, the #10 regular and the #10 fine, but I’m really loving the fine one lately because it works so well with worsted weight yarn.
As a yarn hoarder, I have a TON of worsted weight yarn in my stash from all my past crochet projects and whatnot. If you have a similar issue, the Oxford fine punch needles are great to use it all up!
WANT TO REMEMBER THIS? SAVE THIS PUNCH NEEDLE ACORN TRIVET TUTORIAL TO YOUR FAVORITE DIY PINTEREST BOARD!
Supplies You’ll Need for this Acorn Punch Needle Trivet
- 18″ x 18″ piece of Monk’s cloth
- Worsted weight wool yarn (I used the colors Bittersweet Heather, Almond, Pumpkin, and Persimmon)
- Oxford #10 fine punch needle
- 14″ Morgan no-slip embroidery hoop
- Large eye needle
- Sharp scissors
- Wool felt sheet
- Washable fabric glue
- Hand-held steamer or iron with steam setting
- Pen
- Free printable pattern (available in the Free Resource Library)
How to Make an Acorn Punch Needle Trivet Tutorial
Step 1: Trace the pattern

If you haven’t already, grab your free pattern from the free resource library (or signup in the box above if you aren’t a subscriber yet and want to be).
Put your monk’s cloth into a no-slip embroidery hoop and tape the pattern on the back of the fabric.
Then you can hold it up to a window or a bright light (or a light box if you have one) and trace the outlines of the acorn. I just used a ballpoint pen to trace mine.
Once you get it all traced, remove the pattern from the back and it’s time to start punching!
Step 2: Punch the outlines
Start by punching all the outlines of the acorn.
I used the color Bittersweet Heather for this. Keep the stitches pretty close together so there aren’t any gaps.
If you’re new to punch needle and aren’t sure how it all works, check out my beginner punch needle tutorial right here (it has videos too!)
Step 3: Punch the inside sections
Now that the outlines are done, it’s time to fill it all in.
I started with the large bottom section of the acorn and filled it in with the color Almond.
When you’re punching the inside sections, you’ll need to find a balance between punching too close together and punching too far apart.
The best way to do this is to flip your work over frequently and see how things are looking. If it’s starting to mound up, you need to punch further apart or leave a bit more space between your rows. If there are holes, you need to punch closer together.
Step 4: Tidying up your punch needle loops
This step is so so important. Once you get done punching, you need to “park” your loops.
Basically, this is where you take the end of your punch needle (or some other pointy implement) and move the loops around to their correct positions.
Sometimes you’ll find different colored loops stuck inside each other that need to be separated. You’ll definitely see that the lines look like a hot mess before you poke them into place.
It takes a little extra time for this part, but it’s the difference between a good looking end product or a confusing mess. Don’t skip this step!
It’s a good idea to give your trivet a quick steaming now to set the loops in place. Either use a handheld steamer or your steam iron. If you go with the iron, put a tea towel or press cloth between the iron and the loops and don’t press too hard.
Step 5: Glue on the felt backing
Now it’s time to add the felt backing.
Apply a decent amount of washable fabric glue to the back of the trivet and spread it around evenly.
Then, press the piece of wool felt onto the back, put a heavy book on top, and let it dry several hours or over night.
Once it’s fully dried, trim the fabric all the way around leaving about a 3/4″ boarder, and then trim the felt a little further in so it’s easier to roll when we whip stitch the edges.
Step 6: Make the hanging loop
I decided to make a crochet hanging loop out of the same yarn I used to outline the trivet. If you want to do that too, here’s the quick pattern.
Using a 5mm crochet hook, chain 11. Then turn and single crochet into the back bump of each chain all the way across (10 sts total).
That’s it, super simple!
Now to make it into a loop, fold it in half and pull the ends through the first stitch and tie a knot to secure it.
If you don’t want to crochet your loop, just use a piece of ribbon, fabric, leather, or whatever you prefer and make a little hanging loop. We’ll sew it into place when we whip stitch the edges in the next step.
Step 7: Whip stitching the edges
To whip stitch the edges, thread your outline color onto a large eye needle.
Then, starting a few inches to the right of where the hanging loop will go, roll down the raw edge and insert the needle from the back to the front.
Make sure you’re going through the edge of the felt and coming out right next to the row of punch needle loops so you don’t have fabric showing through.
Leave a tail a couple of inches long and stitch over it with the next several stitches so it is hidden and secure.
Keep your stitches close enough together that there aren’t any gaps, and keep stitching until you get to the top center. Then it’s time to sew the hanging loop in place.
To sew on the loop, I held it against the back of the rolled up fabric and made the next several whip stitches go through the loop to secure it in place.
If you opt to use fabric or ribbon, do the same thing but you’ll need to make sure you have a sharp large eye needle and not a blunt one.
Once your hanging loop is secured, keep whip stitching around until you run out of yarn and need to add some more.
Adding more yarn is easy! When you notice your yarn is getting pretty short, feed your needle through the last 6 or 7 stitches and trim it off flush.
Then thread new yarn onto your needle and make your first stitch right next to where you left off. Hold your ends down and make the next stitches over the ends (like you did at the beginning), and just keep going!
Continue whip stitching all the way around the acorn trivet, and when you meet up with where you started run the needle under the first stitches and cut your yarn off flush.
Once you get it all stitched, give it a quick steam with either a handheld steamer or your iron and you’re finished!
Done!
I hope you enjoyed this acorn trivet punch needle pattern! This would look so nice on your table for Thanksgiving or year round.
If you make this project, please take a moment to share a pic on Instagram and tag me @marchingnorth. I love to see your creations!
Related Posts
- Maple Leaf Free Punch Needle Pattern!
- Quick and Easy Punch Needle Coasters // Tutorial + Video
- Must Have Punch Needle Supplies (and Where to Find Them!)
- Captivating Punch Needle Portraits That Speak Volumes
- How to Make a Mirror Rug {DIY Punch Needle Mirror} Full Tutorial & Video!
- Punch Needle Class (Online!) | Modern Punch Needle with Yarn
- Punch Needle Embroidery (Ultimate Beginner’s Guide!)
- Punch Needle with Yarn (Ultimate Beginner’s Guide!)
- The BEST Scissors for Macrame Cord, Yarn and Fabric | Fiskers vs. Proshear vs. Kai vs. Gingher