Sea Glass & Sand Granny Square Blanket (Free Pattern & Video)
Want to make a granny square blanket that’s as easy as it is beautiful? Well, you came to the right place.
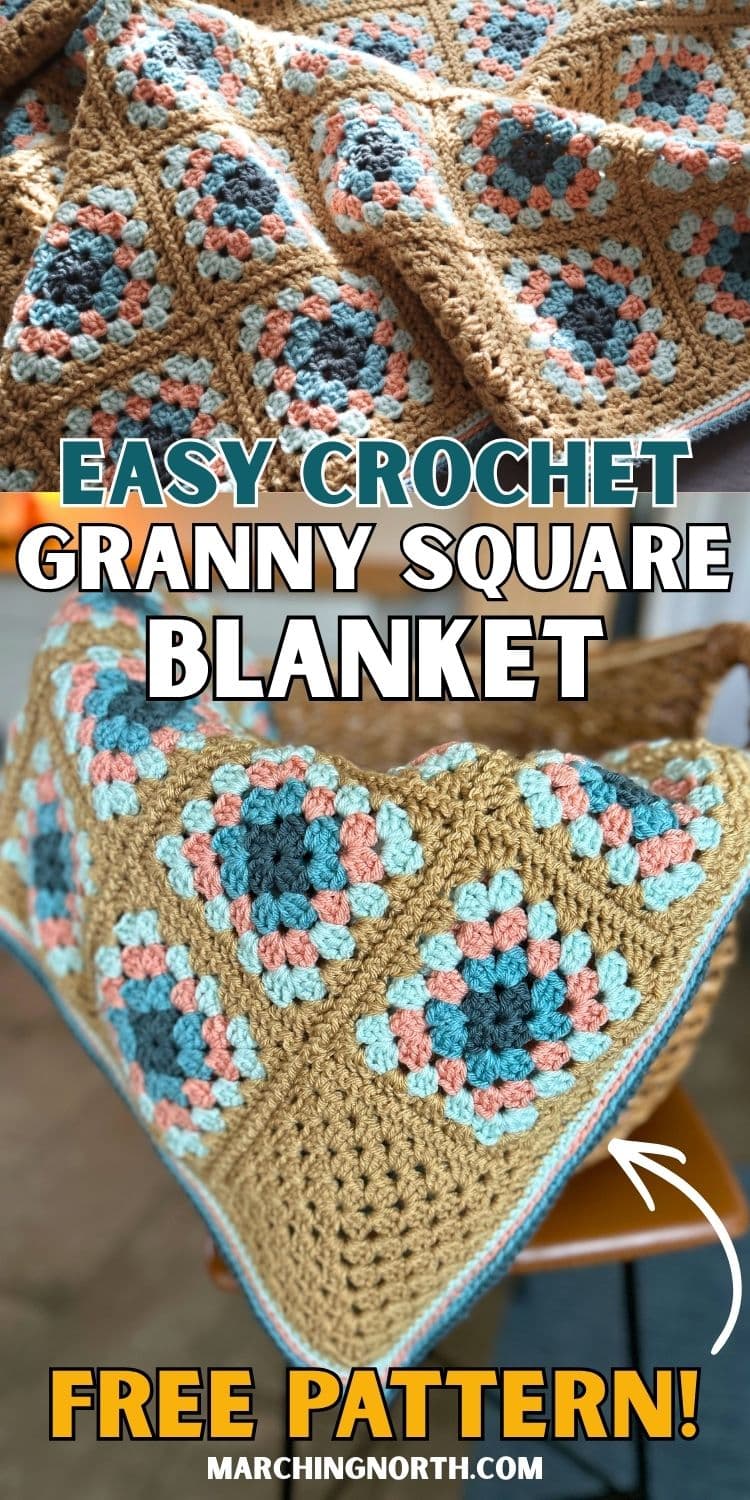
This gorgeous blanket is made with 99 granny squares in five colors, joined with a super easy slip stitch zigzag join and finished with a simple six round border.
It’s made with worsted weight acrylic yarn, so it is soft, washable, and affordable.
Don’t forget to pin this for later!
(This post may contain affiliate links. If you click one and make a purchase, I may receive a small commission at no extra cost to you. Read the disclaimer here. Thank you for your support!)
Fun fact: This is the first throw-sized crochet blanket I have ever finished that was not made with giant, chunky yarn. Yay!
I just tend to be a little impatient, and I have a bad habit of starting projects, getting bored and moving on to another one. So this was kind of a big deal for me.
Embracing granny squares is what finally got me across the line, because you get a little finish every fifteen minutes instead of one enormous finish at some distant point in the future that never arrives.
And it was easy to mentally divide up and say if I make X amount of squares each day, I’ll be finished on Y day. Which makes my brain happy.
The colors were inspired by the idea of sea glass that’s washed up on the sand, which is where the name came from.

Sand is the majority color and the thing that ties the whole blanket together.
I was planning a beach vacation when I came up with the design, and we didn’t actually end up going on said vacation, but the blanket still happened anyway. But hopefully we’ll actually do that next year!
Keep scrolling down for the free pattern, but if you want the printable, ad-free PDF pattern with all the sizes, it’s available in my shop!
Buy the PRINTABLE copy
Sea Glass & Sand Granny Square Blanket – Printable PDF Pattern!
Reference this pattern any time you want with the printable PDF version!
It’s ad-free, and includes the written pattern with step by step photo tutorial, plus size charts for all 8 sizes!
Pattern Information
- Skill Level: Confident beginners
- Pattern written in US terms
- Finished Size: The blanket in these photos is a medium throw, 51 by 62 inches. That is 9 squares across and 11 squares down, so 99 squares total.
- Of those 99, 84 are the five color squares and 15 are solid sand squares scattered through in a diagonal pattern. I will show you exactly where those go in a minute.
- If you want this blanket in a different size, the printable pattern has it graded to eight sizes from baby through king/cal king, with a full yarn shopping list for each one so you are not doing the math yourself.
Supplies & Materials
- Yarn: worsted weight (size 4) yarn in 5 colors (or however many colors you wish)
- Color A: Blue Spruce
- Color B: Sea Blue
- Color C: Cherry Blossom
- Color D: Glacier
- Color E: Light Taupe
- Hook: 5.5 mm crochet hook
- Notions:
- yarn needle (linked ones are nickel free and include a bunch of needle sizes!)
- scissors (these thread snips are titanium coated, so if you have a nickel allergy like me, these are awesome and don’t make you break out!)
- stitch markers (optional) – you can use these to mark the corners, which is helpful for beginners
Yarn Specifics
You’ll need 13 skeins total for the size I made (if you use the same yarn I did).
Buy the full amount all at once if you can, because dye lots shift and it’s just not fun to discover that halfway through.
| Color | Where it goes | # of Skeins |
|---|---|---|
| Light Taupe (sand) | Round 5 of every square, all the joins, border rounds 1 and 2 | 6 |
| Glacier (light blue) | Round 4 of every square, border round 3 | 2 |
| Cherry Blossom (pink) | Round 3 of every square, border round 4 | 2 |
| Sea Blue (medium blue) | Round 2 of every square, border round 5 | 2 |
| Blue Spruce (dark blue) | Round 1 of every square, border round 6 | 1 |
Note: Any five colors work. You do not have to use mine.
The only thing that matters is that one of your colors is the outer round of every square, because that color is what your joins and your first two border rounds are made from, and it is what makes the blanket read as one cohesive thing instead of 99 things stuck together.
Gauge
One finished square measures about 5 inches across, worked in worsted weight with a 5.5 mm hook.
Gauge matters less here than it does in a garment. If your squares come out a little bigger or a little smaller, your blanket just comes out a little bigger or a little smaller.
What does matter is that all of your squares match each other, so make your first two or three and check them against one another before you settle in.
Abbreviations
- ch(s): chain(s)
- st(s): stitch(es)
- sl st: slip stitch
- sc single crochet
- dc double crochet
- standing sc: standing single crochet
- standing dc: standing double crochet
- sp(s): space
- BLO back loop only
- rep: repeat
- FO: finish off
- IJ invisible join
- LIJ: last invisible join (it’s slightly different)
The squares
There are two squares in this blanket.
84 multicolor squares in all five colors, and 15 solid sand squares scattered through in a diagonal. Both are five rounds and both finish at about 5 inches, so they sit together without any fussing.
Both use a starting ring rather than a magic ring. No magic ring, no wonky center, no fighting with a loop that won’t stay tight, and nothing coming undone in the wash.
Special Stitches
Standing Double Crochet
A standing double crochet lets you join a new color and start crocheting without needing to chain up first. It creates a neater join that blends right in.
How to do it: Holding the yarn tail against the handle of your crochet hook, wrap the working yarn around the hook twice, coming up and over the top of the hook toward you…
hold those 2 loops in place by resting your finger on top of them, insert hook into indicated space…
yarn over and pull up a loop, place your finger over all loops…
yarn over and pull through two loops, yarn over and pull through remaining two loops.
Invisible Join
The invisible join is used at the end of each round to close your work without the visible bump of a slip stitch join. It’s done with a yarn needle after you finish off.
How to do it: Cut your yarn, leaving a tail of about 6 inches. Pull the last loop on your hook all the way out to “lock” your stitch.
Thread the tail onto a yarn needle. Insert the needle under both loops of the second dc of the round going from front to back. (Depending on which round you’re doing, the ch-3 or standing double crochet counts as the first dc, so insert under the two loops at the top of the stitch just to the left of that).
Pull yarn through. Then insert the needle down through the center of the last dc you made, where the yarn tail is coming out.
Pull through and adjust the tension to match your stitches. Weave in the tail really well on the back side of the square to secure.
(You might want to watch this part in the video – it’s one of those things that’s way easier to see than to read!)
Last Invisible Join (LIJ)
Mostly the same as Invisible Join, but a smidge different.
Cut your yarn, leaving a tail of about 6 inches. Pull the last loop on your hook all the way out to lock your stitch.
Thread the tail onto a yarn needle. Insert the needle under both loops of the first sl st of the round going from front to back. Pull yarn through.
Then insert the needle down through the center of the last ch 1 of the round, where the yarn tail is coming out. Pull through and adjust the tension to match your stitches. It should blend in with the zig zags.
Weave in the tail really well on the back side to secure, going back and forth a couple of times. Cut excess yarn.
Weaving In Ends As You Go
I highly recommend weaving in your yarn tails at the end of each round rather than waiting until all your squares are done.
Trust me on this one. If you save them all for the end you will have built yourself a second project that is nowhere near as fun as the first one.
Here’s what I do. Work round 1 on ten squares, then weave in the tails for all ten.
Then work round 2 on all ten, weave those in, and keep going that way.
You stay in a rhythm instead of switching tasks every couple of minutes, and you never end up with a basket of unfinished squares glaring at you.
The Multicolor Square (Make 84)
If you want to watch the video tutorial for this square, check it out below, and be sure to subscribe to my YouTube channel so you don’t miss any new videos!
This is the square you’ll make the most of, 84 of them for the throw.
Each one takes about 25 to 30 yards of yarn and works up in around fifteen minutes once you get going. Five rounds, a new color each round, and you finish off at the end of every round.
Here are the five colors in the order they’re used:
- Color A: Blue Spruce (dark blue)
- Color B: Sea Blue (medium blue)
- Color C: Cherry Blossom (pink)
- Color D: Glacier (light blue)
- Color E: Light Taupe (sand)
Instructions
Starting Ring: Make a slip knot with Color A and place it on your hook, ch 4, sl st into the first ch to form a ring.
Round 1: Ch 3 (counts as first dc), 2 dc into the ring, *ch 2, 3 dc into the ring*, rep from * to * 2 more times, ch 2, finish off with an IJ, weave in your ends. [4 clusters, 4 ch 2 corner sps]
Round 2: Join Color B with a standing dc into any corner sp, (2 dc, ch 2, 3 dc) into that same sp (first corner made), *(3 dc, ch 2, 3 dc) into the next corner sp*, rep from * to * 2 more times, finish off with an IJ, weave in your ends. [8 clusters, 4 corner sps, 4 side sps]
Round 3: Join Color C with a standing dc into any corner sp, (2 dc, ch 2, 3 dc) into that same corner sp (first corner made), *3 dc into the next side sp, (3 dc, ch 2, 3 dc) into the next corner sp*, rep from * to * 2 more times, 3 dc into the last side sp, finish off with an IJ, weave in your ends. [12 clusters, 4 corner sps, 8 side sps]
Round 4: Join Color D with a standing dc into any corner sp, (2 dc, ch 2, 3 dc) into that same corner sp (first corner made), *3 dc into the next 2 side sps, (3 dc, ch 2, 3 dc) into the next corner sp*, rep from * to * 2 more times, 3 dc into each of the last 2 side sps, finish off with an IJ, weave in your ends. [16 clusters, 4 corner sps, 12 side sps]
Round 5: Join Color E with a standing dc into any corner sp, (2 dc, ch 2, 3 dc) into that same corner sp (first corner made), *3 dc into the next 3 side sps, (3 dc, ch 2, 3 dc) into the next corner sp*, rep from * to * 2 more times, 3 dc into each of the last 3 side sps, finish off with an IJ, weave in your ends. [20 clusters, 4 corner sps, 16 side sps]
Your finished square should measure about 5 inches across.
The Solid Sand Square (Make 15)
If you want to watch the video tutorial for this square, check it out below!
You need 15 of these one color granny squares, and they’re the same size and the same five rounds as the multicolor square.
The only difference is that every round is worked in Color E, Light Taupe, so there’s no cutting and rejoining between rounds. About 25 to 30 yards each.
Starting ring: Make a slip knot with Color E and place it on your hook, ch 4, sl st into the first ch to form a ring.
Round 1: Ch 3 (counts as first dc), (1 dc, ch 2, 3 dc) into the ring (starting partial corner made), *(ch 2, 3 dc) into the ring*, rep from * to * 1 more time, ch 2, 1 dc into the ring (finishes the starting corner), sl st to the 2nd dc of the round to join. [4 clusters, 4 ch 2 corner sps]
Round 2: Sl st into the corner sp, (ch 3, 1 dc, ch 2, 3 dc) into that same corner sp, *(3 dc, ch 2, 3 dc) into the next corner sp*, rep from * to * 2 more times, 1 dc into the starting corner sp, sl st to the 2nd dc of the round to join. [8 clusters, 4 corner sps, 4 side sps]
Round 3: Sl st into the corner sp, (ch 3, 1 dc, ch 2, 3 dc) into that same corner sp, *3 dc into the next side sp, (3 dc, ch 2, 3 dc) into the next corner sp*, rep from * to * 2 more times, 3 dc into the last side sp, 1 dc into the starting corner sp, sl st to the 2nd dc of the round to join. [12 clusters, 4 corner sps, 8 side sps]
Round 4: Sl st into the corner sp, (ch 3, 1 dc, ch 2, 3 dc) into that same corner sp, *3 dc into the next 2 side sps, (3 dc, ch 2, 3 dc) into the next corner sp*, rep from * to * 2 more times, 3 dc into the next 2 side sps, 1 dc into the starting corner sp, sl st to the 2nd dc of the round to join. [16 clusters, 4 corner sps, 12 side sps]
Round 5: Sl st into the corner sp, (ch 3, 1 dc, ch 2, 3 dc) into that same corner sp, *3 dc into the next 3 side sps, (3 dc, ch 2, 3 dc) into the next corner sp*, rep from * to * 2 more times, 3 dc into the next 3 side sps, 1 dc into the starting corner sp, finish off and do an IJ to join. [20 clusters, 4 corner sps, 16 side sps]
At this point you should have your whole square count done: 84 multicolor and 15 sand, 99 squares total.
Laying Out the Squares
Before you join anything, lay all 99 squares out on the floor in a grid 9 across and 11 down.
The sand squares are the only thing you have to be deliberate about, and they go in the same spots every time.
Counting rows from the top and columns from the left:
- Rows 1, 5 and 9: sand squares in columns 1, 5 and 9
- Rows 3, 7 and 11: sand squares in columns 3 and 7
- Every even row is all multicolor
That’s 15 sand squares, and everything else in the grid is a multicolor square.
How do you keep your place when you lose count? The sand squares run in diagonal lines. From any sand square, the next one is two rows down and two columns over, going either direction.
If you lose track, find the last sand square you laid down and count from there instead of starting over at the top.
Placement is a suggestion, not a rule. Scatter them however you like, or make all 99 multicolor if you’d rather. The yarn totals stay about the same either way.
Once your grid is laid out, leave it there. The join goes square by square across the rows and it’s much easier when everything is already in position.
Joining the Squares
If you want to watch the video tutorial for this join, it’s down below! (This video shows 4 joins, we’re just using the zig zag slip stitch join.)
This is the zigzag slip stitch join, worked in Color E, Light Taupe.
It leaves a visible zigzag ridge sitting on the front of the blanket, and that ridge is a design feature.
It gives the whole thing a quilted, sectioned look and it’s a big part of why the sand colored grid reads so strongly.
The order you’ll work in
All the horizontal seams first, then all the vertical ones.
Horizontal seams: start at the top right. Join row 1 to row 2 all the way across, then cut your yarn. Then row 2 to row 3, then row 3 to row 4, working your way down. That’s 10 horizontal seams for this size.
Vertical seams: start at the seam on the far right and work your way across until every column is joined. That’s 8 vertical seams.
Working every horizontal seam first leaves you with a set of vertical strips that aren’t attached to each other yet. The vertical seams pull those strips together.
That means your vertical seams will run straight into the horizontal ones. Every time you reach one, skip over it without stitching into it and go straight on into the corner spaces of the next pair of squares.
Horizontal seams
Step 1: With Color E, make a slip knot with your yarn and place it on your hook. Starting with the two squares at the far right of your layout and working to the left, sl st into the top right corner sp of the bottom square.
Step 2: Sl st into the bottom right corner sp of the top square.
Step 3: Sl st into the next st to the left on the bottom square.
Step 4: Sl st into the next st to the left on the top square.
Step 5: Repeat steps 3 and 4 all the way across, going back and forth between the two squares. Your last two sl sts of the pair go into the left corner sp of the bottom square, then the left corner sp of the top square.
Step 6: Move to the next pair of squares to the left. Sl st into the right corner sp of the bottom square, then the right corner sp of the top square. Then continue exactly as you did in steps 3 and 4.
Step 7: Keep going that way until every pair of squares in the seam is joined. Cut your yarn and fasten off by pulling the tail through the loop on your hook, leaving a tail at least 5 inches long to weave in later.
Repeat for each horizontal seam.
Vertical seams
Same steps, with one change: hold your working yarn behind the squares as you go.
Each time you reach a horizontal seam, skip over it without stitching into it, and go straight into the corner spaces of the next pair of squares.
Once you finish all the seams, weave in your yarn tails.
The Border
I don’t have a video for this section, but there’s a full step by step photo tutorial below.
It starts with two granny stitch rounds in sand, moves through three single crochet rounds, and finishes with a slip stitch zigzag that echoes the join.
A note about corners before you start. When I say square corner, I’m talking about the corners of the squares that are joined to their neighboring square with a seam in between.
When I say blanket corner, I’m talking about the 4 corners of the blanket itself. Those are two different things and the border treats them differently.
Round 1, granny stitch, Color E (Light Taupe):
Join Color E with a standing dc in any side sp of a square (not in a square corner or a blanket corner), 2 dc in same sp, *3 dc in each side sp of the squares, when you get to a pair of square corners, do 2 dc in each of those corner sps, then go back to doing 3 dc in the side sps, continue that all the way down the side, when you reach the blanket corner do (3 dc, ch 2, 3 dc) in the corner sp*, rep from * to * all the way around the blanket, join to the top of the standing dc with a sl st to finish the round.
Don’t cut your yarn. Round 2 carries straight on in the same color.
Round 2, granny stitch, Color E (Light Taupe)
Sl st across to the next sp, ch 3 (counts as first dc), 2 dc in same sp, then do 3 dc in every side sp around the blanket and do (3 dc, ch 2, 3 dc) in the 4 corners of the blanket, finish off with an IJ and weave in your yarn tail.
Note about those inner joined corners: In round 1 you did only 2 dc in those spaces where two squares meet. That was a one time thing. In round 2, every space gets 3 dc, including the ones before, in the middle of, and after those narrow spots. So you don’t carry the 2 dc rule forward.
Round 3, single crochet, Color D (Glacier)
Join Color D to any side st (not a sp, we’re working in sts now) with a standing sc, *make 1 sc in the next st and all remaining sts along the edge, when you reach the blanket corners, make 3 sc in the corner sp*, rep from * to * around, finish off with an IJ and weave in your yarn tail.
Round 4, single crochet in BLO, Color C (Cherry Blossom)
Join Color C to any side st with a standing sc in the BLO, *make 1 sc in the BLO of the next st and all remaining sts along the edge, when you reach the corners of the blanket, sc in the BLO of the first corner st, make 3 sc in the BLO of the 2nd (center) corner st, make 1 sc in the BLO of the 3rd corner st*, rep from * to * all the way around the blanket, finish off with an IJ and weave in your yarn tail.
Working in the back loop only leaves a ridge of front loops sitting on the surface. That’s what gives the border its stacked, striped look instead of a flat band of color.
Round 5, single crochet in BLO, Color B (Sea Blue)
Repeat round 4 with Color B, exactly the same as round 4 in every way except the color.
Round 6, zigzag border stitch, Color A (Blue Spruce)
Join Color A to your hook with a slip knot and sl st in the BLO of any side st, ch 1, *sl st into the BLO of the next st, ch 1*, rep from * to * in each st all the way around. No extra stitches are made in the corners for this round. Finish off with an LIJ and weave in your yarn tail.
The sl st and ch 1 alternating is what creates the little zigzag along the outer edge, and it ties back to the zigzag join running through the middle of the blanket.
Finishing
Weave in your last tails really well, going back and forth a couple of times on the back side, then trim the excess. The border tails especially, since the outer edge takes the most handling.
Do you need to block it? I didn’t. This is an acrylic blanket that’s going to get dragged around a couch and washed regularly, and it won’t hold a block anyway. Feel free to skip it.
One thing worth knowing: granny square blankets in acrylic relax and grow a little with use, especially in the direction they hang. Expect an inch or two of change over time. That’s normal and nothing has gone wrong.
Care Instructions
Speaking of washing regularly, how do you wash this thing, anyway?
Here’s my laid back washing recommendations coming from a busy mom who regularly does the bare minimum when it comes to laundry.
Machine wash cold on a gentle cycle and tumble dry low.
Acrylic yarn is basically made of plastic, so heat is the only thing that will really hurt it. A hot dryer leaves the fabric limp, stretched out and shiny… and it will never be the same.
Wash it on its own or with soft things, since zippers and hooks catch and snag your stitches.
If you’d rather take it out damp and let it finish drying on its own, lay it flat instead of hanging it. A wet blanket this size is heavy and hanging it stretches it longer.
Want the Printable Version?
This free pattern covers the throw size, 9 squares across by 11 down.
The printable PDF has the same pattern in 8 sizes, from baby all the way up to king, with the yarn amounts worked out for each one, a yarn shopping list you can print by itself and take to the store, a placement chart for every size, and the full border photo tutorial laid out for paper.
In Conclusion
I hope you enjoyed this free crochet granny square blanket pattern!
The invisible join and standing double crochet take a minute to wrap your mind around, but once they click, you’ll never want to go back to the regular old granny square method. It just makes everything look so much cleaner.
If you make one of these I would love to see it-
Tag me on social media or share a picture of your makes in the Yarn Stash Facebook community!
Looking for more crochet fun? Check out these recent posts!