Free Macrame Hanging Storage Basket Pattern (DIY Makeover!)
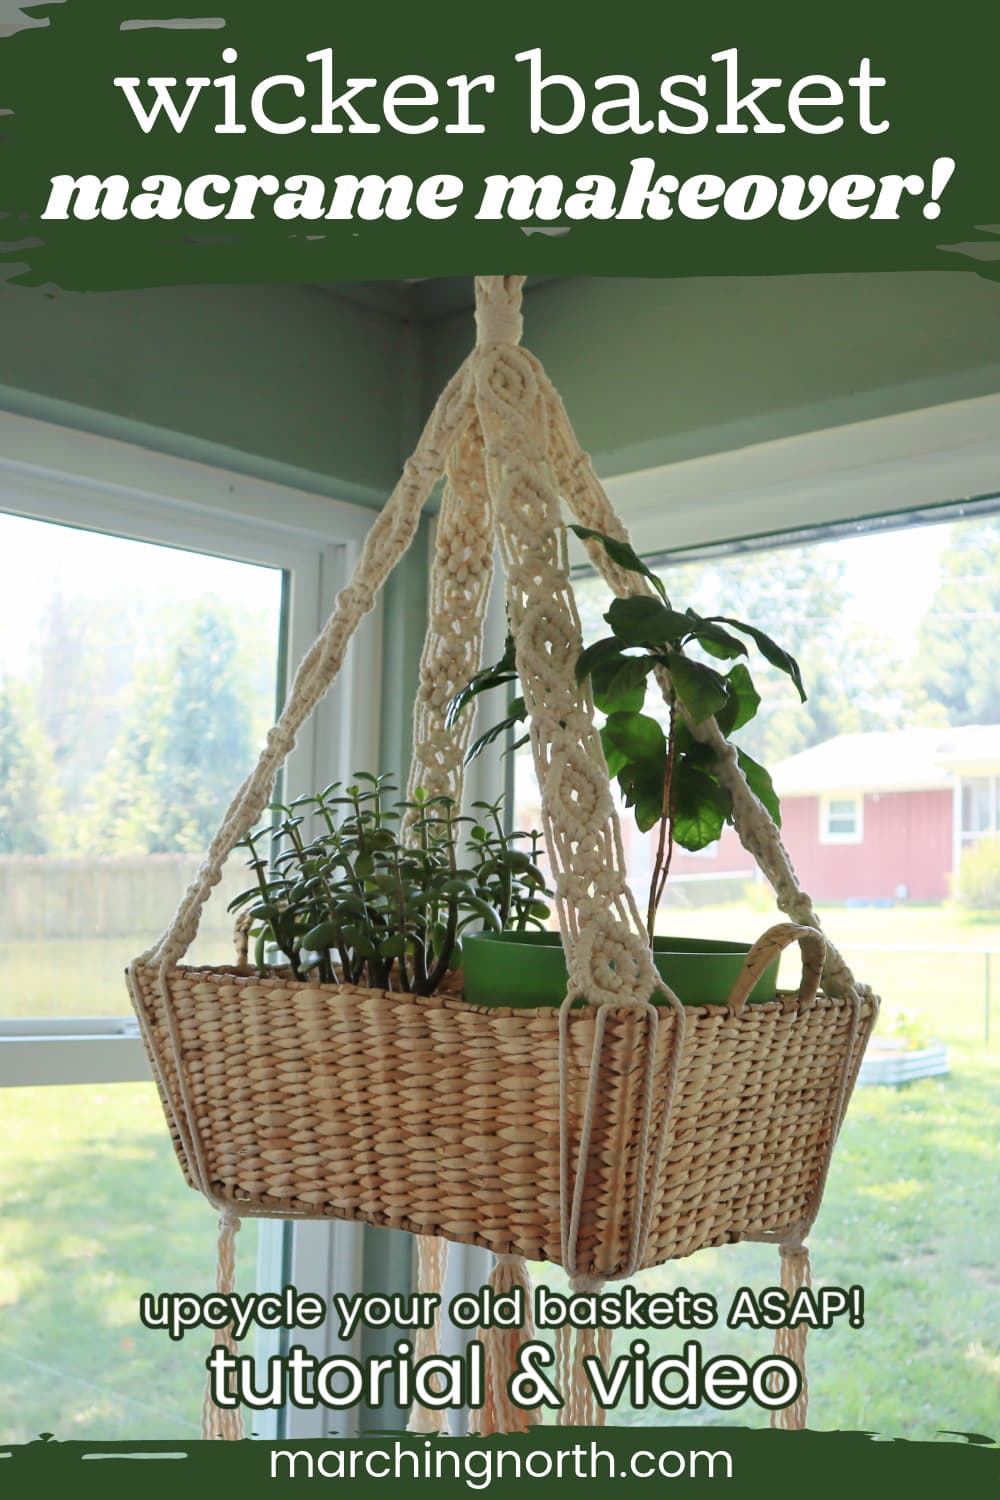
Are you ready to give your old wicker basket a fresh new look? In this tutorial, I’ll show you how to transform a plain old wicker basket you’ve probably had laying around for years into a beautiful hanging planter using macrame!
With some cotton macrame cord and basic knotting techniques, you can create a stunning piece of decor that will add a touch of boho charm to any room.
Want to remember this? Post this Macrame Hanging Basket tutorial to your favorite DIY Pinterest board!
(This post may contain affiliate links. If you click one and make a purchase, I may receive a small commission at no extra cost to you. Read the disclaimer here. Thank you for your support!)
I’ll also show you how to estimate your cord lengths for different sizes of baskets, so you can make macrame storage baskets in all sorts of shapes and sizes!
You can use different colors of cord to complement your decor, and the unique texture of the macrame cord mixed with the textured look of the basket is just so pretty.
This is a great option to add extra home storage to your space using what you already have on hand. The only extra cost is for the macrame cord, and if you’re like me you probably already have that on hand in your stash of craft supplies!
So grab your wicker basket and let’s get started with this fun DIY macrame project!
NOTE: In the supply list for this project, I’ll give you the cord lengths I used to fit my basket size. If your basket is a different shape or size, I’ll show you how to come up with the proper lengths down below.
Macrame Knots
For this project, we’ll only be using a few different macrame knots: square knots, double half hitch, wrapping knots, and a 4 strand braid.
Are you new to macrame? If so, I recommend checking out my beginner basic macrame knots tutorial first so you can get a good grasp of those knots.
You’ll also learn the lark’s head knot, spiral knot, and several more that will help you along on your macrame journey!

How to customize your cord lengths to fit your basket
If your basket is a different size or shape than mine, that’s OK! We can still make this work.
I’m going to show you how I figured out the cord lengths to use for my basket, and you can apply the same process and get pretty accurate cord measurements.
Take the cord you’re going to use, and decide approximately how long you want the fringe at the bottom of the basket to be. Hold the cord against your basket, leaving that much at the bottom for fringe.
Then, run the cord up the side of the basket and hold it all in place. If you have a clip or something, that would be helpful to hold the cord on the top of the basket.
Now, bring the piece of cord up to about the length that you want one of the arms to be and all the way up to about the height of the hanging loop.
Measure the distance between the top of the basket and where you want the hanging loop to be. This section will be knotted so it’s the most important part to know the length of.
OK, now pinch the cord at that top point (where the hanging loop would be) and fold it in half right there and double the cord up so it’s twice that length.
This is the base length of the cord before you take any knots into consideration.
Alright, now we have to calculate a bit.
Figuring out your estimations
This isn’t an exact calculation, but it’s what I did and it worked pretty well. I didn’t have a lot of cord left over. I just wasn’t feeling very mathematical that day, lol.
If you want to get really exact with your calculations, check out my Accurate Macrame Cord Length Calculator!
First, take the measurement of the arm section (the part from the top of the basket to the bottom of the hanging loop). To account for the knots, we’re going to multiply the length of that times 3.
My arm section was 18″ long, so I multiplied that times 3 to get 54″. Then you’ll need to double that number since the cords will be folded in half.
So now we’re at 108″ that we need for the knotted section.
Then for the braided hanging loop, I doubled the length just to be safe.
That’s probably a bit of an overestimation because braids don’t take up a lot of cord, but I don’t like running out of cord during a project.
It’s going to be about 8″ long, so let’s say 16″.
That’s the bulk of the knotted parts, now we need to account for the square knot at the bottom that holds the basket in place.
I’m going to say 10″ for that because it’s a bulky square knot, so we’ll multiply that times 2 to get 20″.
The fringe is about 6″ long, and the part that goes up the side of the basket is about 7″ long.
And then there are the two wrapping knots which take up about 3″ each. So if we add those numbers up and multiply times 2 we get 38″.
Time to add it up!
108 + 20 + 16 + 38 = 182″
And since we’re estimating, it’s always good to add a little extra just to be safe, at least an extra 10% is a good safe bet.
I rounded up a bit and cut my cords at about 201″ long, because that’s the length of 3 of my arm spans.
My arm span is 67″ long, so I know that 3 arm spans equals 201″. And it’s just easier to measure out my cords using my arm span than using a tape measure for each piece of cord. 🙂
I hope that makes sense!
Now that we’ve figured out our cord lengths, let’s get started.
Supplies You’ll Need
- wicker basket – mine is a rectangle shape and about 16″ long by 12″ wide and 7″ inches tall
- NOTE: the amount of cord you use might vary based on the size and shape of your basket, see the section above this to estimate your cord lengths if you need to!
- 4mm 3 ply twisted cotton macrame rope
- 16 pieces @ 201″ long
- 2 pieces @ 36″ long (for wrapping knots)
- sharp scissors
- tape measure
Video Tutorial
Check out the video tutorial over on my YouTube channel, and don’t forget to subscribe!
Step 1: Making the hanging loop
Take the 16 piece of cord, line up the ends and fold them in half to find the center.
Grab your tape measure and hold the center of the cords in front of the 4″ mark. Your hanging loop section will be about 8 inches long, so slide your left hand 4 inches to the left and your right hand 4 inches to the right from the center point.
This is the section we’ll be braiding.
Keep ahold of the cord with your left hand (don’t move your fingers, they are marking the spot where the braid will start) and let go with your right hand.
Now you can either carefully lay the cords down and tape them to your desk at that spot, or just tie a big overhand knot at that spot which is what I did.
Divide the cords into 4 sections and we’re going to do a 4 strand braid until it’s 8″ long.
Imagine your sections are labeled 1, 2, 3, and 4 going from left to right.
You’ll do 4 over 3, 2 over 1, and then cross the left middle section over the right middle section.
Repeat that until the 4 strand braid is 8″ long.
(I stopped at 7″ and my hanging loop ended up a little bit small, but we calculated for 8″ so I recommend going ahead and doing 8″.)
Tie a small piece of scrap cord around the base of the braid (or you could use tape) so it doesn’t come undone. Then untie the large overhand knot we made to start (or untape your strands).
Just to be safe, I tied another small piece of scrap cord around the other side of the braid after I untied the knot.
Bend the braided section in half and line up the base of the braid on both sides. Once you have everything lined up and in place, grab a 36″ piece of cord for this first wrapping knot.
You can untie the scrap cord and set them aside now, and tie a wrapping knot around the base of the hanging loop. I wrapped the cord around 7 times.
Step 2: Making the arm sections
Separate the cords into 4 sections with 8 cords in each section. Each one of these sections will be one arm of the hanging basket.
Double Half Hitch Diamonds
Starting with one of the arms, find the center 2 cords, cross left over right and tie a half hitch knot. This will be the point of our diamond motif.
The cords you just used to tie that first half hitch will be the filler cords for the rest of the double half hitch knots on the outside part of the diamond.
The left one will be used for the knots on the left side, and the right one for the knots on the right side.
Using the left filler cord, tie 3 double half hitch knots going down and to the left.
Using the right filler cord, tie 3 double half hitch knots going down and to the right.
Now we’re going to make a small diamond in the center of the larger diamond.
Take the two center cords and cross left over right, then tie 2 double half hitch knots going down and to the right.
Go back to the center and use the 4th cord from the left as the filler cord for one double half hitch knot going down and to the left.
Then use that same filler cord, but bend it toward the right and tie one double half hitch knot going down and to the right.
Go back over to the right side of the small diamond and use that filler cord to tie a double half hitch knot going down and to the left.
Then switch the two center cords so the left is going over the right and tie one last double half hitch knot going down and to the right to close the small diamond.
Now to complete the large diamond, go back over to the left side and grab that far left filler cord from before. Use it to tie 3 double half hitch knots going down and to the right.
Back over on the right side, grab the right most filler cord and tie 3 double half hitch knots going down and to the left.
Now switch the two center cords so the left is going over the right and tie one last double half hitch knot going down and to the right to close the large diamond.
Square Knot Diamonds
In between each double half hitch diamond, we’re going to make a square knot diamond.
Tie one square knot in the center using the middle 4 cords. It’ll be right under the diamond we just made.
For the next rows, tie one square knot on the left and one on the right.
Then for the last row, tie one more square knot in the center.
Repeat
You’ll keep repeating that motif until it’s as long as you wanted your arms to be. Mine needed to be 18″ long, so I did 5 double half hitch diamonds with square knot diamonds in between each one.
Do that for each of the arms of the hanging basket.
Step 3: Attaching the basket
To attach the basket, I used a crochet hook and threaded 4 of the cords (2 on the left and 2 on the right) down through the corner of the basket, and 4 cords around the outside of the corner of the basket.
Then I used the 2 left outer cords and the 2 right outer cords as working cords to tie a square knot around the inner cords that were running through the basket.
That held the basket in place. I repeated that for each corner.
To make it even more secure, I took the longer cords hanging down from each corner (it’ll be the ones we used as working cords for the square knots we just tied) and bundled them together in the middle right underneath the basket.
Then I tied a wrapping knot to hold them in place. After the wrapping knot was tied, I pulled on each individual cord to get rid of the slack.
Step 4: Cutting the fringe
All that’s left to do at this point is cut the fringe and you’re done!
If you want to brush out the fringe you can, I didn’t because I prefer low maintenance fringe. I did untwist it though to get that pretty, wavy look.
Done!
I hope you enjoyed this macrame wicker basket makeover tutorial! It’s fun to make projects like this using your own macrame skills to upgrade some old rectangle baskets into high quality decor!
If you make one of these, please share a pic over on Instagram and tag me @marchingnorth so I can take a look. I love seeing all of your awesome creations!
Is there a PDF that we can print out of this?