How to Crochet an Amigurumi Ball (Easy Free Pattern!)
Learn how to crochet a perfectly round ball in today’s step by step crochet tutorial and free pattern!
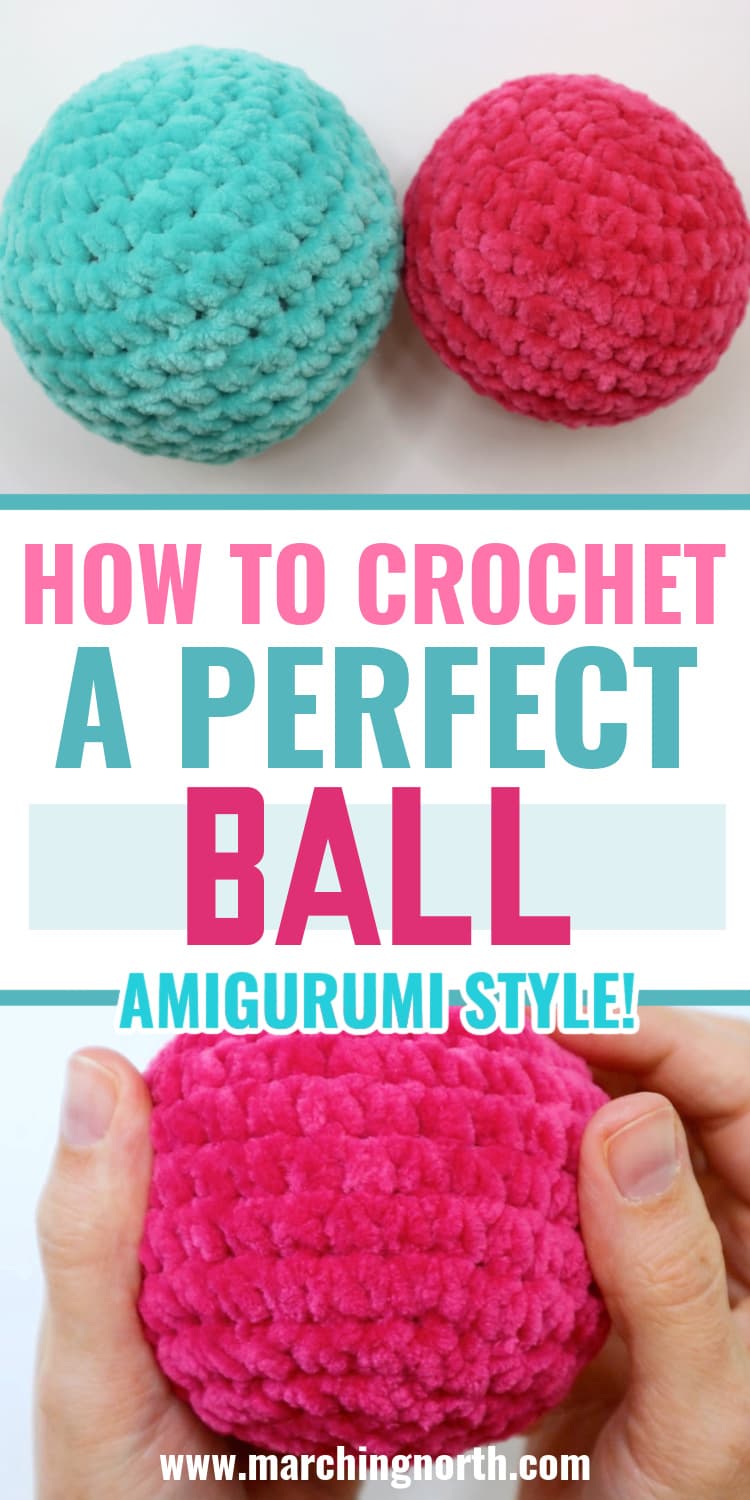
This crochet ball pattern is done in amigurumi style, but you can use it for whatever project you want.
Want to remember this? Post this Free Crochet Ball Pattern to your favorite DIY Pinterest board!
(This post may contain affiliate links. If you click one and make a purchase, I may receive a small commission at no extra cost to you. Read the disclaimer here. Thank you for your support!)
By amigurumi style, I mean it’s started with a magic loop, worked in continuous rounds (no joining seam!), and we’ll be using a smaller hook than you normally would use to prevent the stuffing from showing through.
The whole ball is worked with single crochet stitches, which are commonly used for amigurumi.
We’ll be using thicker yarn for this perfect amigurumi ball, and it’s chenille yarn which is so soft and fluffy!
So, what is amigurumi, anyway?
Amigurumi is a really fun and cute way to crochet little stuffed animals or characters. The word “amigurumi” is Japanese and it means “crocheted or knitted stuffed toy”.

You can make all sorts of things with amigurumi, like animals, fruits, and even little people. It’s a great way to get creative and make something adorable!
This amigurumi style project is perfect for creating toys, plushies, or decorations.
Don’t worry if this is your first time attempting an amigurumi project, I’ve got plenty of tips, suggestions, and a step by step tutorial that will help you master this crochet ball pattern in no time.
There are a few important and simple rules to remember with amigurumi:
- You want to use a smaller hook than you normally would – whatever your yarn calls for, go down a few sizes. The exact hook size will depend on how tightly you crochet, you just don’t want to be able to see the stuffing once you’re finished.
- Instead of finishing off your round, chaining 1 and starting the next round, you’ll be working continuous rounds for amigurumi. This forms a spiral, and you’ll want to use a stitch marker to keep up with your starting stitch.
- If you have color changes you want to make, there is a special way to do that so you don’t have a super noticeable color jog due to the continuous rounds.
Amigurumi Projects to Make with these Crochet Balls
The amigurumi ball is one of the most basic and important shapes to learn. It can be used to make lots of fun crochet creations! Here are a few cool ideas:
- Stress balls – if you want to make a really satisfying stress ball, find a foam ball form that’s the same size and use it as your filling. But regular stuffing works too!
- Adorable animal faces – attach ears, eyes, and noses to create cute animal heads with faces.
- Christmas ornaments – add a loop of string or ribbon to the top of the ball, sew on some sequins or ribbon, and hang it on your Christmas tree!
- Hacky sacks – fill your crochet ball with beans and make a hacky sack! I would probably do this project with cotton worsted weight yarn.
- Indoor safe toys – crochet up a bunch of balls in different sizes for your kids to play with indoors. You can make golf ball sized all the way up to basketball sized!
- Snowmen – use white yarn to create a snowman with three different sized balls, and add a hat, scarf, and cute carrot nose.
- Halloween decorations – make spooky eyeballs or pumpkins with your crochet balls. You can tie yarn around the outside and pull it tight to create the ridges of the pumpkin like I did in this crochet pumpkin tutorial.
- Baby toys – make soft and safe toys for babies by stitching on faces and features. Always embroider on the details for baby toys, safety eyes aren’t safe and they can choke on them! (Which always made me wonder why they call them safety eyes, lol.)
- Dryer balls – if you use 100% wool or alpaca yarn and some wool or alpaca roving to stuff them, you can make your own dryer balls! This is a great eco friendly project and also great if you want to start living a more natural lifestyle without all the chemicals that dryer sheets or fabric softener contain.
Making Different Sizes of Crochet Balls
Once you get the basic pattern down for making a crochet ball, it’s easy to make them in whatever size you want!
My usual method for making sure it stays a nice, round, ball shape is to do the same number of rounds for the increase rows, middle rows, and decrease rows.
So, for example, in this pattern we’ll do 5 rows of increases, 5 rounds of single crochet, and 5 rows of decreases.
If you wanted a larger ball, you could do 7 rows of increases, 7 rows of regular single crochet, and 7 rows of decreases.
If you wanted a smaller ball, you could do 3 rows of increases, 3 rows of regular single crochet, and 3 decrease rounds.
You get the idea!
The number of stitches in each round increases by 6 for each increase row and decreases by 6 for each decrease row.
NOTE: If you want to make an oblong, oval shape, you could add extra regular crochet rows in between rounds of increases and decreases.
Safety Eyes and Other Ways to Add Cuteness to Your Amigurumi
To give your crochet ball or amigurumi character a little extra cuteness, you can add safety eyes and noses, embroider on some details, or sew (or glue) felt eyes and features.
Like I said earlier (a paragraph ago), if you’re making baby toys you’ll want to embroider the eyes or use felt that is securely sewn on.
Safety eyes aren’t so safe after all! Again, why are they named that?!
If you decide to go with safety eyes or embroidering/sewing, you’ll want to do that before you get too far into the decrease rows. Otherwise, it’s really hard to get up inside there!
Plan out where you’re going to want all your cute little details before you start, that way you don’t forget to add them at the right time.
I can’t tell you how many times I’ve been making an amigurumi and just start crocheting away and forget to put in eyeballs or something else. Then it’s frogging time, which is never any fun!
Besides basic safety eyes, here are some of my favorite ways to decorate amigurumi:
- Embroidery floss to sew on a cute mouth or nose – this works really well for animals
- Small buttons or beads to create eyes, cheeks or other facial features
- Yarn or felt to create hair, decorative accessories, or clothing
- Layer and glue together pieces of felt to create anime or kawaii style eyes – you know, those super cute eyes with all the shine spots in them
- If you have a Cricut machine that cuts felt (like the Cricut Maker) you can use it to cut out all your felt pieces and they’ll be super uniform! As long as they are too small, anything smaller than a pencil eraser won’t do well.
Crochet Techniques We’ll Use
The crochet techniques we’ll need for this project include:
- magic ring or magic circle
- single crochet
- single crochet increase
- invisible single crochet decrease
- sewing up the last few stitches with a tapestry needle
If you’re not familiar with the magic ring, check out my tutorial for it right here. It’s used pretty often in amigurumi, so it’s worth learning.
The magic circle is one of those crochet techniques that seems confusing and daunting at first, but I promise it really isn’t hard. It’s just a little confusing at first.
Once you get it down you’ll see why it’s so great!
Another technique from the list that’s a little different is the invisible decrease. It’s a method of decreasing that doesn’t leave a large hole, which is really important for amigurumi!
I’ll show you how to do that in the video and I’ll explain it in the tutorial below.
Supplies You’ll Need
- Honey Bunny Yarn (or any super bulky size 6 chenille yarn)
- size 4.25mm (or G) hook
- stitch marker
- tapestry needle or yarn needle
- scissors
- Polyfil stuffing
Abbreviations and Notes
- st(s) = stitch(es)
- sc = single crochet
- inc = single crochet increase (2 single crochet in the same stitch)
- dec = single crochet invisible decrease
Free Video Tutorial
Check out the video tutorial over on my yarny YouTube channel Yarn Stash with Marching North, and don’t forget to subscribe!
Free Chunky Amigurumi Crochet Ball Pattern
Magic Loop
To start your crochet ball, first, make a magic circle. (To see how to do the magic circle, watch the video above, or check out this tutorial right here!)
Here are the basic steps:
Wrap the yarn around your fingers, insert your hook, and pull up a loop.
Pinch the loop and bring your working yarn over to the left side.
Then, yarn over and pull through to create the first slip stitch closing your magic loop.
Now we’re ready to start round 1.
Round 1 – First Round
Make 6 sc into the magic loop.
Once finished, pull the yarn tail to tighten it up. Place a stitch marker in your first stitch to keep track of your position. (6 sts)
Round 2
Work inc in each st all the way around. (12 sts)
Round 3
(sc, inc) x 6. (18 sts)
Sc in the next stitch, then inc in the next st. Repeat that around 6 times.
Round 4
(inc, 2 sc) x 6. (24 sts)
Inc in the next st, then sc in the next 2 sts. Repeat that around 6 times.
Round 5
(inc, 3 sc) x 6. (30 sts)
Inc in the next st, then sc in the next 3 sts. Repeat that around 6 times.
Rounds 6-10
Up to this point, you’ve been making a flat circle. Now it’s time to turn it into a crochet sphere!
For the next five rounds, work one sc into each st around.
Use a stitch marker to keep track of your first stitch and make a tally mark on a piece of paper each time you complete a round. Trust me on that!
Oh also, before you continue, take a moment to flip your ball inside out and tie a knot in the magic loop tail so it doesn’t come undone later on.
Don’t worry about weaving in the end, you won’t see it.
Round 11
Time for the decrease rows!
(3 sc, dec) x 6. (24 sts)
Work a sc in the next 3 sts, then make an invisible dec over the next 2 sts. Let me show you how to work the invisible decrease.
Insert your hook under the front loop of the first st.
Then insert under the front loop of the second st.
Yarn over and pull through just those 2 loops.
Yarn over the OPPOSITE way…
…and pull through the last 2 loops.
That’s what you’ll do for each decrease, and it won’t leave a big hole!
Round 12
(2 sc, dec) x 6. (18 sts)
Sc in the next 2 sts, then dec over the next 2. Repeat that around 6 times.
Add Some Stuffing
At this point, it’s a good idea to add your stuffing before the hole gets too small. I like to remove my stitch marker and pull the loop out where my hook is so it doesn’t come undone, that way I can lay my hook down for a minute.
Stuff your crochet ball with whatever stuffing you like. I’m using Polyfil here, but you can also use yarn scraps, macrame cord scraps, or other little bits of material you have on hand.
Round 13
(1 sc, dec) x 6. (12 sts)
Sc in the next st, then dec over the next 2. Repeat that around 6 times.
Round 14 – Last Round
Dec around x 6. You’ll have 6 sts at the end of this round and the hole will be super small.
Finishing the Crochet Ball
Add More Stuffing
This is your last chance to add extra stuffing to your crochet ball!
I recommend putting some more in there and filling in any gaps. You want it to be nice and firm.
Take your time to carefully poke the stuffing into any gaps or empty spaces with your finger or you can use the end of your crochet hook to really get it in there.
Once you’re happy with the stuffing, it’s time to close the ball.
Closing the Ball
Grab your tapestry needle and a pair of scissors.
Cut the working yarn, leaving a tail several inches long.
Remove your stitch marker and your hook, and pull the loop that was on your hook out all the way. This will lock in that last stitch so nothing comes undone.
Thread the yarn tail that you just pulled out onto your tapestry needle.
Sew under each stitch going around clockwise. You have 6 stitches to sew under.
Pull the yarn tail (carefully, remember this yarn can shred a bit) to cinch up the hole. Then tie a knot to secure the yarn.
I usually tie two knots just to be extra safe.
Insert your needle into the bottom of the ball, close to where your yarn is coming out. Push it through to the other side of the ball and bring the needle out over there.
While pulling the yarn tail a little bit (you don’t have to go crazy, you just want a little bit of tension), cut the yarn right down by the crochet ball.
That way, the yarn tail will disappear into the center of the ball and you don’t have to worry about hiding it!
Done!
I hope you enjoyed this tutorial and free crochet ball pattern!
If you make one of these, please share a pic over on Instagram and tag me @marchingnorth so I can take a look. I love seeing all of your awesome creations!
I was making a stress ball so I only did the steps up to 18 sts. This pattern was very clear and easy to follow, would use again!