Large Macrame Flower Pattern DIY // Tutorial + Video
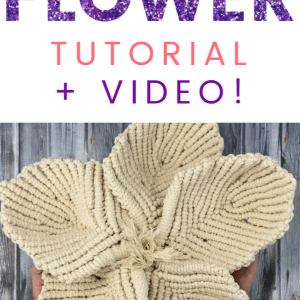
Looking for a new macrame pattern to try? Learn how to make a BIG boho Macrame Flower in this DIY tutorial & video!
Don’t forget to pin this for later!

(This post may contain affiliate links. If you click one and make a purchase, I may receive a small commission at no extra cost to you. Read the disclaimer here. Thank you for your support!)
Click here to get an ad free, printable, large print copy of this pattern in my shop!
Macrame flowers are the perfect touch for wall decor, weddings, and to add to your macrame wall hangings.
This macrame flower pattern is really quite easy to make (it’s just double half hitch knots), but a word of warning: it uses A LOT of rope!
480 feet (roughly) of 3 mm twisted cotton macrame rope is what you’ll need, for one flower!
The good news is you can buy decent quality macrame rope on Amazon that comes on a really big spool, and I recommend that for this project to keep costs down.
I love buying luxurious macrame rope that costs a little more for most projects (see my favorite ones here), but I’m also pretty frugal most of the time so yea, I used the cheap stuff for this.
If you like seeing these types of tutorials, be sure to subscribe to my YouTube channel where I post video tutorials about macrame, punch needle, and other crafts. That way you’ll get first dibs!
Supplies You’ll Need to Make a Large Macrame Flower
- 60 pieces of 3 mm twisted cotton macrame rope @ 8 feet long
- Corkboard or macrame board to work on
- T-pins
- Super sharp scissors
Large Macrame Flower Tutorial
Step 1: Attach the Outer Ropes to the Center Rope
Take one of the pieces of rope, fold it in half, and attach it to your work surface.
You’re going to attach the other 11 pieces of rope to the center cord using vertical double half hitch knots.
Tie a vertical double half hitch knot on the left side first, then tie one on the right side.
Make sure you pull it nice and tight so the knots are right new to each other. (If that’s confusing, watch the beginning of the video, it’s a lot easier to show than to explain.)
Step 2: Do a Row of Double Half Hitch Knots on Each Side
Next, make a row of double half hitch knots going down the left side of the petal.
Do the same thing on the right side.
At the end of the right side, make one last double half hitch knot pulling the two sides together.
Step 3: Tie a Row of Double Half Hitch Knots in the Opposite Direction
Flip your work around so the left side is facing down, find the 7th cord from the left, and tie a row of double half hitch knots in the opposite direction (to the left).
Repeat on the right side, this time using the 7th cord from the right, and make the knots going to the right.
Step 4: Tie Another Regular Row of Double Half Hitch Knots
Flip the petal back around and tie a regular row of double half hitch knots down both sides.
Step 5: Tie a Row of Double Half Hitch Knots in the Opposite Direction
Flip your work again and tie another short row of double half hitch knots in the opposite direction, starting with the 8th cord from the top.
(On the left it’s the 8th cord from the left, and on the right it’s the 8th cord from the right.)
Step 6: Do Four Rows of Regular Double Half Hitch Knots
Do four regular rows of double half hitch knots on both sides.
Step 7: Do Another Row of Double Half Hitch Knots in the Opposite Direction
Do one more row of double half hitch knots in the opposite direction on each side, this time starting with the 9th cord from the top.
Step 8: Do Three Rows of Normal Double Half Hitch Knots
Do three more regular rows of double half hitch knots on both sides.
Step 9: Finish Off the Last Row
For the last row, do one regular double half hitch knot.
Then, take the working cord from that knot and hold it with the filler cord. Do the next double half hitch knot around both cords.
Repeat that for each knot. Do this on both sides.
Now, repeat that whole process four more times!
Step 10: Attach the Petals Together
To make the flower, flip up two cords on each petal as shown in the photo below, and gather them all together.
Overlap the petals so it looks like a realistic flower.
Flip the petals over, and tie a wrapping knot to secure them at the base of the petals.
I tied an extra double knot with the two ends of the wrapping knot to make it extra secure. (Those petals are heavy!)
Flip the flower back over again and trim the center fringe.
Pull on all the cords under the wrapping knot to get the petals bunched together nice and tight.
Step 11: Fluff the Center Fringe and You’re Done!
Flip the flower back over one more time, fluff up the fringe in the center and trim it, and you’re done!
This flower is seriously big! It’s heavy and when you go to attach it to something, it’ll probably need some support. I’m thinking it would be a good idea to tie the individual petals to the backdrop so they sit right.
Just for size reference, here’s a picture of me holding it. It’s bigger than my head!
In Summary
I hope you enjoyed this tutorial and you try making your own gigantic macrame flower! If you do, please share it over on my Instagram page and tag me @marchingnorth! I love seeing your creations!
Related Posts
- Macrame Terrarium Plant Hanger DIY // Tutorial + Video
- DIY Macrame Market Bag // Tutorial + Video
- The Ultimate List of Must Have Macrame Supplies!