DIY Macrame Bag with Comfy Braided Handles // Tutorial + Video
Macrame everything is so in right now and I’m completely obsessed.
With some cotton rope and basic knots, you can make gorgeous boho-chic decor and accessories.
Don’t forget to pin this for later!

Today I’m going to show you how to make this adorable DIY macrame bag!
One of my goals with this bag was to make the straps as comfortable as possible. I wanted it to be functional while still looking super cute and trendy.
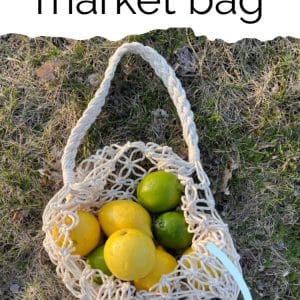
As a test, I filled it up with lemons and limes and carried it on my shoulder while taking a walk with my kids (and carrying my toddler part of the time). That’s a totally normal look, right?
It worked great and the straps didn’t hurt my shoulder at all! Even though I looked like a weirdo carrying a bag of citrus fruits on a walk around the block, I think it was a success!
Related: Ultimate Guide to Macrame for Beginners!
If you’re new to macrame, this DIY bag is a good project to try once you get the basic knots down.
The macrame techniques used for this bag are the square knot, the gathering knot, and a four-strand braid, plus some overhand knots at the bottom.
Be sure to check out my Basic Macrame Knots for Beginners post if you need to get those down first!
You’ll find the video tutorial below, as well as the written tutorial. Be sure to take a minute and subscribe to my YouTube channel for new tutorials and DIY projects!
Join the Macrame for Beginners and Beyond Facebook Group!
If you’re new to macrame or if you’ve been knotting for a while, connecting with other macrame lovers is always a great idea!
Come check out our Facebook group, Macrame for Beginners and Beyond. It’s a friendly community where you can ask questions, get inspiration, and share your awesome work with other macrame lovers! Come join the conversation today!
(This post may contain affiliate links. If you click one and make a purchase, I may receive a small commission at no extra cost to you. Read the disclaimer here. Thank you for your support!)
Supplies You’ll Need to make this DIY Macrame Bag:
- 32 – 8 foot long strands of 3mm single strand macrame cord – divided into 2 groups of 16
- 4 pieces of the same cord that are roughly 10” to 12” long each (this is a good way to use up scrap cord)
- Craft glue
- Masking tape
Related: The Ultimate List of Must-Have Macrame Supplies
DIY Macrame Bag // Tutorial
Step 1: Braid the handles
First, we have to mark where the handles are going to be. For my bag, I made the braided sections roughly 22” long.
My way of determining where to start braiding wasn’t very scientific. I had each group of 16 strands looped over a dowel and lined up the ends.
Then I measured 11” down from where the rope was hanging from the dowel and put a piece of masking tape on one side.
After that, I took the taped bundle of cords off the dowel and flipped it around. I secured them to the dowel with a loose knot
Next, I divided the cords into four groups of four and did a four-strand braid starting where the tape was, checking periodically if it was a long enough braid.
The four strand braid is really surprisingly simple. There are three steps, crossing the right two sections, crossing the left two sections, and then crossing the middle two sections.
Starting with the right two sections, you do right over left, then on the left two sections, you do right over left. Then, with the middle two sections, you do left over right.
Repeat that sequence until the braid is the length you want.
I actually ended up doing that, then taping at the end of the braid, flipping the bundle around, un-taping the other side and adding a bit more braid so it was even.
You just want to make sure your handle is the length you want and it’s centered so there’s an equal amount of rope hanging down on either side.
Repeat that process with the other handle and check to make sure they’re both the same.
Related: 10 Best Macrame Wall Hanging Kits!
Step 2: Tie gathering knots to secure the braids
Once you get the braided handles the way you want them, we’re going to tie a gathering knot at each end of them to hold it secure.
You’ll need the 4 shorter pieces of cord to do this part.
Tie a gathering knot at the end of each braided section, you’ll do four gathering knots altogether.
Related: DIY Macrame Feathers // Tutorial + Video
Step 3: Alternating square knots
The rest of the bag is made with alternating square knots. Leave about an inch to an inch and a half of space in between them and keep the rows even.
I recommend draping both handles over the dowel and working on the two sections facing you, and then we’ll flip it around after we get those attached and do the other side.
Starting on the left under one of the gathering knots, skip the first two strands and make three square knots from left to right.
Leave an inch or so of space under the knots and then do a row of four square knots, then leave another inch below that and do one more row of three square knots.
Now repeat this sequence on the other side facing you (not the back ones yet).
Step 4: Connect the centers
Line up the left and right sides so everything is straight. We’re going to tie a square knot in the center that will connect the left and right sides.
Make this connecting square knot even with the third row of square knots we made previously.
You’ll now have a row of square knots going all the way across this side of the bag.
Make one more row of alternating square knots an inch or so below this row.
Step 5: Do all of that on the other side
Flip the bag around and repeat all the steps we just did on the first side on the second side.
Take care to make the rows of knots even with the other side so everything will line up properly.
Related: Crescent Moon Macrame Dream Catcher // Tutorial + Video
Step 6: Attach the sides
Now it’s time to attach the sides together.
Use the two cords hanging on the left side of the front and back part of the bag, tie a square knot that’s even with the third row of square knots from the top.
Go down one row and tie a square knot in the space to the bottom left and right of the first connecting square knot, filling in the spaces.
These knots will be even with the fourth row of knots.
Do the same process on the other side of the bag. Now you should have basically a tube shape with handles.
Step 7: Make six more rows of alternating square knots
To finish the body of the bag, keep making rows of alternating square knots.
I had 10 rows altogether, but you could make it longer if you like.
You can make a few rows in the middle of the bag a little closer together for visual interest, that’s what I did.
Or you can keep them all equally far apart, it’s up to you. It goes faster if you keep more space between the knots.
Related: Macrame Terrarium Plant Hanger DIY // Tutorial + Video
Step 8: Tie the bottom together
I learned how to this part by watching Emily Faith’s video.
I tried a couple of other ways, but this was the most straightforward technique I saw, and as far as I’m concerned the easier the better!
One VERY IMPORTANT thing you’ll want to keep in mind.
Before you tie the bottom together, take your bag off the dowel and hang it in the other direction.
The picture below is showing the direction the handles are facing on the dowel.
If you leave it hanging like this when you finish the bottom, it won’t lay right.
You’ll need to hang it on a hook or something instead of a dowel so that the handles are facing the other way, like in this next picture.
I didn’t think of this when I was tying the bottom of my bag, and I realized once I had it all finished that the bag didn’t lay right when I had it on my shoulder.
I’m way too OCD to leave it like that, so I had to untie and fix it which was a little tricky considering I had cut the strings and attempted to brush the fringe out.
Don’t be like me. LEARN FROM MY MISTAKE! (If you don’t know what I mean, watch the last part of the video and you’ll see what I mean.)
OK, now that the PSA is out of the way…
To tie the bottom, you’ll line up all the square knots in on the front of the bag and the back of the bag.
Then, starting at the far left, grab the two left cords from the front and back square knots and tie them together like you’re going to tie your shoe.
Tie it the same way again, making a double knot.
Pull it nice and tight. Do the same thing with the two right cords from the front and back square knots.
Continue this all the way along the bottom of the bag. (You’ll have two double knots for each pair of square knots.)
Step 9: Cut the excess rope and add some glue
Cut the excess rope leaving about a quarter inch sticking out.
Add some glue to each knot (I used nontoxic Tacky Glue) and smooth the ends down against the knot.
Let the glue dry and then flip your bag so the knots are on the inside. Done!
I hope you enjoyed this DIY market bag tutorial!
If you make one like this, be sure to post it on Instagram and tag me @marchingnorth, I’d love to see it!
My bad, I read it wrong. 11 inches on each side from the middle.
just to be clear, the 22 inches of handle are from the tape down?
Very very nice and useful… jana
I decided to make this bag while in quarantine and it turned out really nice! It was super easy to make even with my little experience in macrame art (probably because I used to make paracord bracelets since they’re made with square knots). Thanks for the tutorial!
I was very impressed by your instructions. The patterns look very simple, easy and attractive. I macramed a ton back in the ’70’s. The instructions all came back to me.
Thank you. Don’t stop creating.
Kathy Fraser
Thank you so much for the kind words! I’ll be creating as long as I’m still kickin’! Thanks for stopping by 🙂