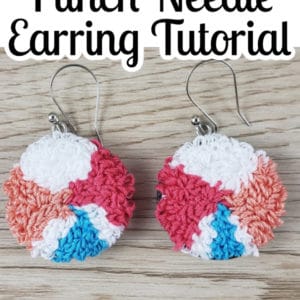
Adorable DIY Punch Needle Earrings | Quick & Easy Tutorial
Looking for a fun DIY punch needle project you can whip up in an afternoon?
Don’t forget to pin this for later!

These DIY punch needle earrings are a quick and easy project that will add a pop of color and fun texture to your ensemble.
You can make them any color you want and they only take a half-hour to complete!
These earrings are fast, cheap, and so so cute!
If you have punch needle supplies already, you’ll only need to get the bezels and a couple of ear hooks.
For a last-minute gift or if you need something cute to jazz up your outfit, these earrings are the answer!
I don’t know about you, but I love a project that can be completed in one sitting. Bonus points if it’s wearable!
Let me tell you what you’ll need to complete this DIY punch needle project!
(This post may contain affiliate links. If you click one and make a purchase, I may receive a small commission at no extra cost to you. Read the disclaimer here. Thank you for your support!)
Supplies You’ll Need
For these earrings, I used my Ultra Punch with the medium needle set to #4 stitch length.
You’ll also need embroidery thread in your choice of colors, a small piece of Weaver’s cloth, an embroidery hoop, craft glue, two wooden bezels, and ear hooks.
You could easily whip up a whole bunch of these cute earrings without spending an arm and a leg.
These would be great for a craft fair booth or even to sell on Etsy!
For more information on how to do punch needle embroidery, check out my article here.
If you want to know my favorite places to get punch needle supplies (like punch needle fabric), this article will help you out.
On to the tutorial!
DIY Punch Needle Earrings Tutorial
Supplies:
- Ultra Punch (medium needle, #4 stitch length)
- Embroidery thread in your choice of colors
- Weaver’s Cloth (4”x6”)
- Embroidery hoop
- Beacon 3-in-1 Craft Glue (or something similar, hot glue would work too)
- 2 Wooden Bezels
- Ear hooks
- Pencil or pen
- Jewelry Pliers
Directions:
Prepare Your Fabric
First, you need to draw a circle the same size as your bezel on your Weaver’s cloth.
The wooden bezels I used have a lip all the way around, so I put the bezel under the cloth and ran the pencil around the inside of the lip to draw my circle.
Do this twice with enough space between the circles to move the fabric in the hoop without having to smash your first punch needle earring.
Hoop your fabric with the circle in the middle and pull it drum tight.
Punch the Design
Thread your punch needle with your first color of embroidery thread (use all six strands). Punch an organic shape inside the circle.
Then move onto the next color and punch another organic shape.
Continue doing that until the whole circle is filled. Keep your stitches fairly close together so the front is nice and bushy.
Once you finish punching, trim up any long threads on the front side.
Trim the Edges
Take the punch needle embroidery out of the hoop.
Get your scissors and trim the fabric around the loops, leaving about a ¾ of an inch border.
Next, cut into the border fabric several times around so it’s easier to fold.
Glue Down the Fabric
Apply a small blob of glue under one of the border flaps and press it down on the backside.
Continue gluing and pressing down flaps all the way around until the whole border is glued down.
Assemble
Apply glue to the inside of the bezel. Make sure it goes all the way to the edge.
Press the punch needle piece down into the bezel firmly and make sure it’s glued down well.
If you’re using the 3-in-1 glue I listed or hot glue, you can go ahead and move onto the next step. Otherwise, you may want to let it dry for a bit before finishing up.
The wooden bezels I used came with a metal hanging clip attached. For this project, they aren’t necessary so just remove them.
Depending on your ear hooks, you will either have to open the loop and attach them, or just slide it through the hanger on the bezel and squeeze the hook closed. (I chose the easy kind!)
Tada! Now you have an adorable pair of punch needle earrings to wear or share!
In Conclusion
I hope you love these adorable DIY punch needle earrings as much as I do!
You can experiment with so many different color combinations and designs.
Making these inspired me to try some other punch needle jewelry designs. I love how fast a punch needle project works up!
If you make these DIY earrings, please share a picture on Instagram and tag me @marchingnorth!
Related Posts
- Must Have Punch Needle Supplies (& Where to Find Them)
- How to Punch Needle | Tutorial for Beginners
- Punch Needle Sweatshirt Tutorial + Free Printable Patterns!