Punch Needle On A Sweatshirt Tutorial + Free Patterns!
Did you know you can do punch needle embroidery right on your clothes?
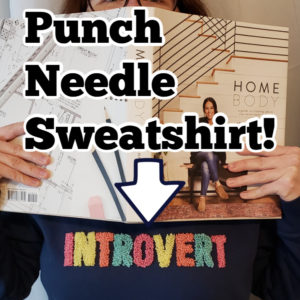
With the Ultra Punch, it’s a piece of cake to make a cute punch needle sweatshirt like this one!

(This post may contain affiliate links. If you click one and make a purchase, I may receive a small commission at no extra cost to you. Read the disclaimer here. Thank you for your support!)
In this tutorial, I’ll show you how to make this fun “Introvert” punch needle sweatshirt and you can download the free pattern to make it yourself.
Don’t want yours to say “Introvert”? No problem!
I made five different patterns for you to choose from: INTROVERT, CAT LADY, AWESOME, BE HAPPY, and HOMEBODY.
You’ll find a form to get your free punch needle patterns at the bottom of this post.
Supplies Needed for Punch Needle Sweatshirt Project
✔️ Blank Sweatshirt:
It needs to be a poly-cotton blend like this one.
I found mine at Walmart. Make sure you pre-wash it before doing this project.
✔️ Embroidery Floss:
DMC #964 and #352 and J & P Coats #0106 and #0159 (from a value pack) are what I used.
I used one skein of each color and had just enough, so you might want to buy a few of each one just in case.
✔️ Ultra Punch Needle:
Fitted with the medium-sized needle inserted and set to #5 stitch height.
✔️ Fusible Woven Interfacing:
Make sure you get woven interfacing, like this one.
✔️ Iron and Ironing Surface
✔️ Cover Cloth for ironing on interfacing
✔️ Pen or Fine Tip Sharpie (not water-soluble)
✔️ Aleene’s OK To Wash-It Fabric Glue
✔️ Small Paintbrush for spreading the glue
✔️ Printed Pattern of your choice (see sign up box below)
Directions
Prewash your sweatshirt if you haven’t already.
Turn the sweatshirt inside out and put it on (bare with me here). You need to mark where you want the design to be on your sweatshirt.
My method was to put it on inside out, hold the pattern up to the shirt and look in a mirror. Then use two pins to mark where the ends of the word are (don’t stab yourself!)
Make sure it’s centered and looks right. Once you’re happy with the placement, carefully take the sweatshirt off and lay it out flat on your ironing board.
Go ahead and preheat your iron at this point so it’ll be ready to go in a few minutes.
Transfer Pattern to Interfacing
Get your woven interfacing and cut a piece that’s at least two inches larger than the printed word on all sides.
With the fusible side down (you should be able to tell by the way it feels which side is which), lay the piece of interfacing on top of the printed pattern and carefully trace each letter with a pen or fine-tipped Sharpie.
Make sure the pen you choose isn’t water-soluble, because you have to iron the interfacing with a damp cloth and your pattern lines will get all messed up.
My gel pen bled a little but it was still OK. Sharpie would probably be better.
Iron-On the Lettered Interfacing
Now it’s time to iron the lettered interfacing to the inside of your sweatshirt.
Line the letters up with the pins you put on the sweatshirt before.
You should be able to see the pins. If you can’t, carefully move the pins to the inside (hold the spot with your finger so you don’t forget where it goes).
Lay the interfacing fusible side down onto the inside of the sweatshirt. Once you have it lined up how you want it, carefully remove the pins! I learned that the hard way…
Follow the directions on the interfacing packaging to iron it on.
Mine said to turn the iron to the hottest setting (Linen/Cotton), use steam, and also place a damp cloth over the interfacing.
Then iron one spot at a time for 10 seconds, pick it up and move to the next part until the whole piece is secured.
Put the Sweatshirt in Your Frame
Now we’re getting to the fun part!
You need to get the sweatshirt into your frame or a hoop. I used a Snap Frame that’s 11”x17” and it was perfectly sized.
Because of the stretchiness of the sweatshirt fabric, this was a little tricky to get flat and straight, but if I did it you can do it.
Pull the sides gently all the way around until it’s evenly stretched.
Thread Your Punch Needle
Get your Ultra Punch and fit it with the medium needle. Set it to #5 stitch height.
It’s a good idea to mark each letter with the first letter of the color you plan to use. If you’re like me, its easy to get wrapped up in what you’re doing and use the wrong color!
Thread your first color into your punch needle. We’re using all six strands of floss for this project so you don’t have to separate it out.
Punch the Letters
Start by punching the outline of the letter with close together stitches, and then continue stitching the inside of each letter with longer staggered stitches until it’s filled.
Once you finish the first letter, punch the other letters that use the same color. That way you don’t have to rethread as many times.
Check the other side to make sure there aren’t any sparse looking spots. If there are holes, just stitch a few more stitches in those areas.
Continue punching your letters until they’re all punched. Look on the front side and make sure everything looks right.
You may have to poke the threads around a bit to get them laying properly.
Trim any long pieces of floss if you see any.
Apply Glue to the Back
Turn the shirt inside out again.
Now we’re going to apply the fabric glue to the backside of the stitches to make sure they’re really secure.
Apply a small squirt of glue on one letter, and use the paintbrush to spread it evenly over the stitches.
You want to be liberal with the glue, but not too crazy.
Done!
Once the glue is dry to the touch, you can turn the shirt right side out and marvel at your handiwork!
Allow the glue to dry for 24 hours before you wear your sweatshirt, and let it cure 7-10 days before washing it.
How to Wash Your Punch Needle Sweatshirt
Thanks to the layer of fabric glue, the punch needle stitches will be nice and secure.
I recommend turning the sweatshirt inside out before you throw it in the wash. Also, don’t wash things with zippers, velcro, or other parts that could hang up on the loops.
If you’re still worried, get a large mesh laundry bag (like a large version of the ones you use for bras and stuff) and put it in there before you wash it.
Punch needle embroidery is surprisingly secure once it’s finished because the pressure of the threads pushing against each other locks it in tight.
In Conclusion
I hope you enjoyed this punch needle sweatshirt tutorial! I’m in love with the one I made and there will definitely be more wearable punch needle projects in my near future.
If you make one of these I’d love to see the finished result!
Please share a picture of yours on Instagram and tag me @marchingnorth so I can take a look. (Seriously, it would make my day!)
Comment down below if you have any questions or you just want to talk about punch needling!
Related Posts
- Must Have Punch Needle Supplies (& Where to Find Them)
- Punch Needle Tips You Need to Know BEFORE You Try It + Free Printable Pattern
- How Punch Needle Stays in Fabric (or Sometimes Doesn’t)
I am glad to see that this can be done on clothing as that is what I am interested in doing it on. My question is can you use yarn on the clothing?
I’m so excited to have found this! I knew there had to be a way to do this on clothes!
Hiya, super helpful step by step for beginners, but I was wondering if the interfaces were really needed for it to work?
I have purchased 2 punch needle kits so far and I can’t believe something so simple looking is so complicated. The first kit has a rather large needle with cross stitch fabric. It’s way too hard to punch and not enjoyable at all. Can you recommend a video that will give me minute details. I would like to do a character on a t shirt. Is that possible?
Thanks for the tutorial!
I don’t have an ultra needle, do you know what size punch needle would work? I have a 1.26mm, 1.6mm, 2.2mm and 3mm needle.
Hi Isobel!
Hmm… I can’t say for sure, but I would probably start with the 2.2mm. You just need one that works well with 6 strands of embroidery floss. If the 1.6mm works with that many strands, you might try it too and see which one works best. I hope that helps a little! Good luck and thanks for stopping by!
Hi! I’m new to needle punching and I have embroidery floss and an ultra punch with the same woven interfacing shown above. I bought a crewneck and followed the steps exactly above. However, when I go to work on my project and start punching, my loops don’t stay on the other side and easily pull through. The stitching on the side that I can see looks fine but it doesn’t create the loops on the other side. What do I do?
Hi Courtney!
Hmm… It’s hard to say for sure without seeing, but what stitch height setting do you have your Ultra Punch on? Also, the loops seem really easy to pull out at first (and they are), but once you punch a lot of stitches all right next to each other they stay in much more securely. If it still won’t work, another option is to put a piece of weaver’s cloth on the inside of the sweatshirt and secure both fabrics in your hoop, and punch through both the weaver’s cloth and the sweatshirt. If you can’t get it to work with the woven interfacing alone that’s what I would try. I’m sorry it isn’t working for you!! Maybe the sweatshirt quality has changed since I posted this tutorial. I hope that helps! Let me know if you need more help!
Can you punch needle on t-shirts?
I haven’t tried it yet, but I assume the process would be the same as a sweatshirt. You’ll just want to make sure it’s not a super stretchy tee-shirt. Hope that helps!
I watched your tutorial and it looks simple but my loops don’t come through, I can’t figure out what I am doing wrong; ready to give up on this project.
When you say your loops aren’t coming through, do you mean they aren’t staying in the fabric? It’s really important to make sure you have your punch needle threaded completely (through the tube and then through the eye of the needle) and you don’t have any tension on the thread while you’re punching. Tell me a little bit more about what’s happening and I’ll do my best to help!
Hello, this is a fantastic tutorial and I love the outcome! Do you have any tips on getting the yarn to stay in? I have no problem on other fabrics but sweatshirt material, it just won’t lock in no matter how tight it is. Very frustration. Hope you are taking care.
Mine worked well with the woven interfacing, but I was using embroidery floss and not yarn. I’ve washed mine a zillion times and it still looks great! Good luck!
Thank you for this tutorial. I’m afraid to go outside with this COVID-19, have my supplies, and been wanting to try. Your words make it sound doable for me to try. I’m over 70 and I think I can do it. Do you think I can use #10 cotton instead of floss? My Needle Punch says it will take it, I’ll have to recheck. I just wanted to know if you have ever embroidered with it, yourself. Thanks again for the Tutorial.
I know what you mean, it’s the perfect time to do all those craft projects we’ve been meaning to do! I think #10 cotton should work fine as long as it goes through your punch needle. I haven’t tried that for this project but I do have some #10 cotton laying around in my yarn stash and I don’t see why it wouldn’t work. Punch needle is pretty forgiving as long as the thread freely flows through the punch needle and you’re using appropriate fabric. I like to experiment with different combos! Good luck, you got this!
Hi Crystal!
I love this, thank you! I’m so impressed that I’ve subscribed, something I almost never do since being sent several emails every day after subscribing to a certain website 10 years ago.
Love from Australia ?? ❤️ (Sammantha)
I’m so glad you like it! I promise I won’t inundate you with emails, I just send a weekly newsletter. I don’t like getting tons of them every day either so I totally understand! Thanks for subscribing!!
Hi I did this years ago bought spools of light weight yarn in a package cost about $9. Loved the effect do you know where I can get this type of yarn ? Its not cost effective to buy several skeins of yarn to do a sweat shir. i am also looking for transfer patterns
Hi Judi! For this sweatshirt, I used DMC embroidery floss (which is pretty cheap, under $1 a skein). There are a few free punch needle patterns available in the Resource Library, and I’ll be adding more as time goes on. Those are available for subscribers to my blog. If you’re interested, check out the sign up for above. Thanks for stopping by!
I just bought 100 skeins of embroidery thread in a rainbow of colours from amazon for under £8, not too bad for a craft project!