Easy Punch Needle Wall Hanging on Wool Fabric // Gather & Give Thanks
Learn how to make a punch needle wall hanging on wool fabric in this step by step tutorial and video!
Don’t forget to pin this for later!

(This post may contain affiliate links. If you click one and make a purchase, I may receive a small commission at no extra cost to you. Read the disclaimer here. Thank you for your support!)
Have you seen these cool fabric wall pennants with words embroidered or appliqued on them popping up all over the place?
I have, and I love them! I decided a punch needle wall hanging on wool was in order and I created this fun project tutorial so you can make one too.
My inspiration all started with this wool fabric I bought a while back. I really didn’t have a plan for it and honestly it was a bit of an impulse buy.
I knew I wanted to do something with punch needle and wool, and I originally assumed I’d cut it into strips and use it to punch needle with.
Then I did a little research and found out you can actually punch directly onto the wool itself and I just had to try it!
This pattern is inspired a popular Thanksgiving decor quote (one of my favorites), but you could make this wall banner any time of year.
I think it lends itself to the fall and winter months because of it’s cozy vibe, but I won’t judge you if you want to make one in the middle of summer!
The finished size of this sign is about 11″ x 16″, but yours may vary slightly depending on how you cut it.
Get your FREE printable pattern
Grab your free pattern by filling out the form below!
Supplies You’ll Need to Make Punch Needle Wall Hanging on Wool Fabric
- 1/4 yard of Wool fabric
- Worsted weight wool yarn (The color I used is called Gull)
- Oxford #10 fine punch needle
- Q-Snap frame or large Morgan no-slip embroidery hoop
- Sharp scissors
- 12” wooden dowel
- Hot glue gun/glue sticks
- Pen (contrasting from fabric color, I used a white gel pen)
- Metal ruler
- Free printable pattern (see the form above)
How to Make a Punch Needle Wall Hanging on Wool Tutorial
Step 1: Put the fabric in your frame and transfer the pattern
First, stretch your wool fabric into your snap frame or hoop. I used my 11″ x 17″ snap frame and I made sure my fabric was big enough to fit in that without slipping.
It’s not going to be quite as tight as monk’s cloth normally would, but make it as tight as you can. Luckily it’s pretty easy to punch through.
Once it’s all snug in the frame, tape the pattern on the back, hold it up to a bright light or window, and trace the design onto the fabric.
It’s a little tricky since the fabric is thick, but it’s a simple pattern so it’s not too bad. I recommend using a contrasting pen color. You can see in the picture above I started with black in but changed to a white gel pen so the letters were easier to see.
Step 2: Punching the words
Once you have the pattern all traced, thread the yarn into your punch needle and begin punching the outlines of the letters.
This is a good time to mention that for this pattern, the flat stitch side will be on the front, so you’ll actually be punching on the front side of the wall hanging.
Make sure you cover all the pen lines but still stay within the lines so the letter shapes stay consistent.
After you get the letters outlined, go in and fill the shapes. Make your stitches neat and even and try not to leave any gaps.
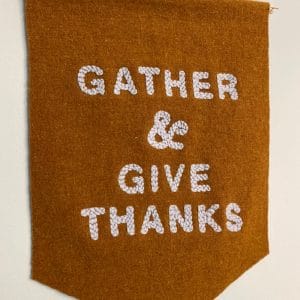
Here’s how it looks once you get all the words punched. I’m covering up the word THANKS, but I promise it’s there!
Step 3: Making the rod pocket
Now we need to make the pocket at the top for the wooden dowel to go in. For this part I decided to keep it easy and use hot glue.
Fold down the top a couple of inches and hot glue in in place.
Step 4: Finishing
Now to finish the sign, measure down from the dowel on each side of the wall hanging and make a mark. I measured down 12″ on each side so there was about 2″ of space under the words before the bottom started to taper.
Then, fold the bottom in half and make a mark right in the center. Now you can use your metal ruler to mark your cutting line from the left to the center and the right to the center.
I used my sharp scissors to cut it, but if you have a rotary cutter it would be super handy right here.
Done!
I hope you enjoyed this punch needle wall hanging on wool fabric tutorial! This is a simple project but I think the textures of the materials really make it shine.
If you make this project, please take a moment to share a pic on Instagram and tag me @marchingnorth. I love to see your creations!
Related Posts
- Punch Needle Wall Hanging Tapestry // Tutorial + Videos
- Macraweave Wall Hanging // Tutorial + Video
- 8 Punch Needle Tips You Need to Know BEFORE You Try It!
- Captivating Punch Needle Portraits That Speak Volumes
- How to Make a Mirror Rug {DIY Punch Needle Mirror} Full Tutorial & Video!
- Punch Needle Class (Online!) | Modern Punch Needle with Yarn
- Punch Needle Embroidery (Ultimate Beginner’s Guide!)
- Punch Needle with Yarn (Ultimate Beginner’s Guide!)
- The BEST Scissors for Macrame Cord, Yarn and Fabric | Fiskers vs. Proshear vs. Kai vs. Gingher
Hi! Thank you so much for the tutorial! I’m hoping to make something similar but with a different phrase. Would you be willing to share what font you used? I love it!
I used a basic san-serif font, I’m not sure which one but I made the design in Procreate and then printed it out. Good luck with your project and thanks for stopping by!