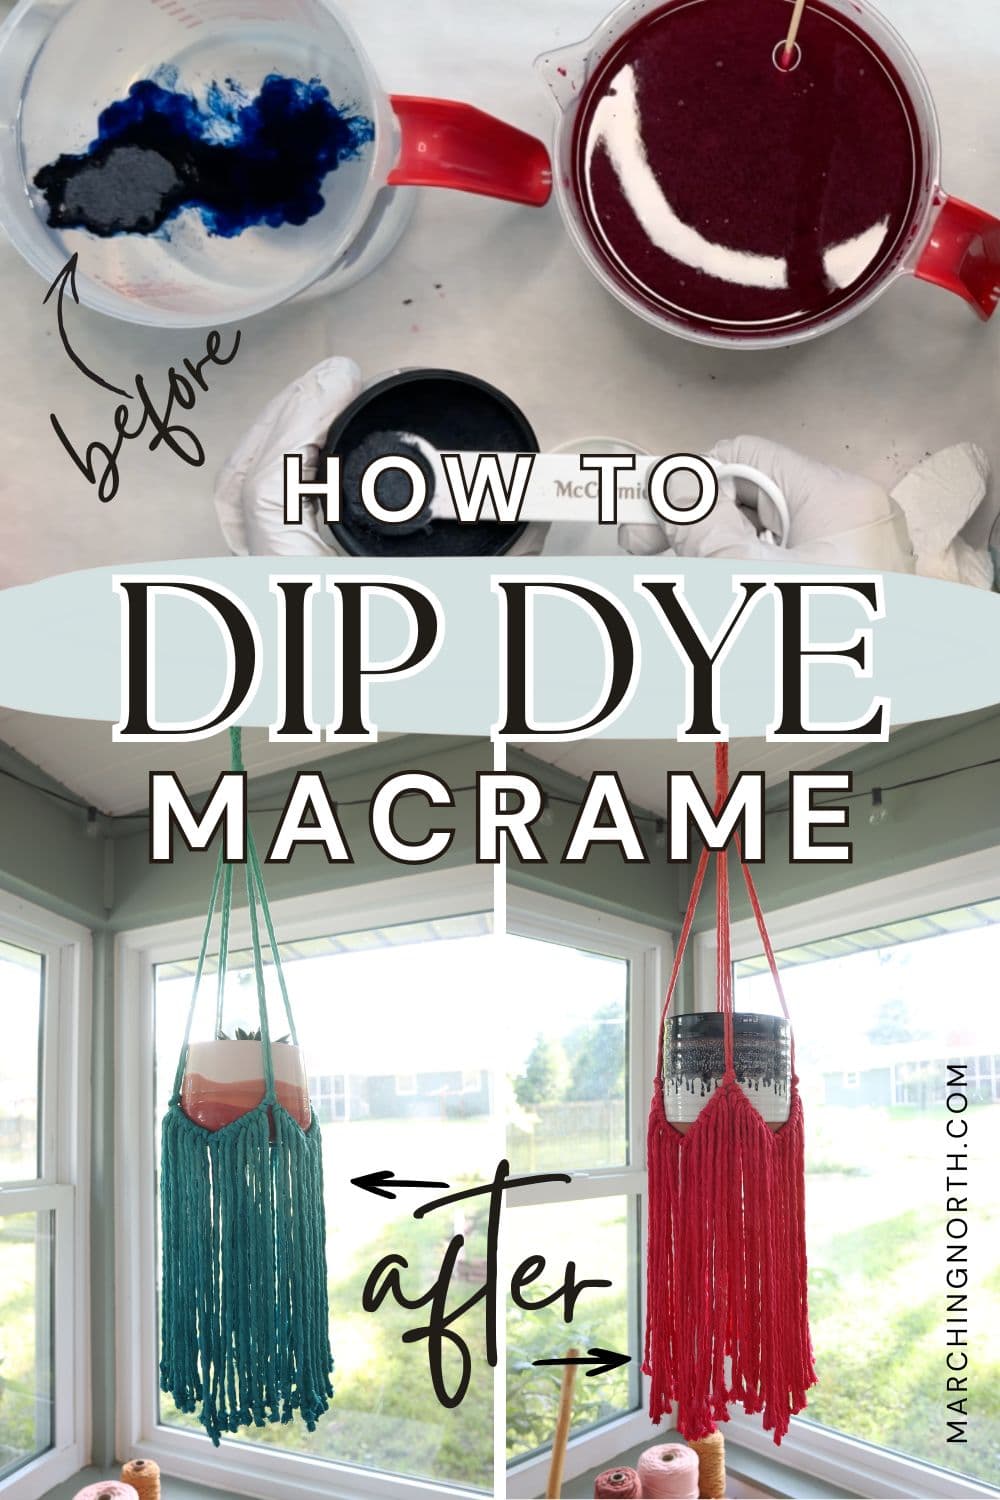
Dip Dye Macrame Plant Hangers = Instant Joy (Tutorial + Video!)
In this post, we’re going to do something a little different, fun and very colorful.
I’m going to show you how to make a lovely fringy macrame plant hanger, and then we’re going to dip dye them!
This was my first time dip dyeing a macrame project and I decided to bring you along for the ride. And it did not disappoint.
Don’t forget to pin this for later!
(This post may contain affiliate links. If you click one and make a purchase, I may receive a small commission at no extra cost to you. Read the disclaimer here. Thank you for your support!)
In this post and in the video below, I’ll walk you through the whole process, from making the plant hangers to mixing up the dye, doing the dip dyeing, and then of course the big reveal.
Before we dive into all of that, let’s talk about supplies, plus some of the important things you need to know to get started with dyeing macrame projects or cord.
But first real quick: If you’re new to macrame and want to learn the basic knots, I can help you with that!
Also, be sure to sign up below for my free printable PDF knot guide so you can keep it handy while you’re working on your projects!
Supplies You’ll Need (for Dip Dyeing)
This is a pretty long list, but here are the things I used to dye these plant hangers.
- Macrame plant hangers or project to dye (tutorial for the one I did is down below)
- 2 colors of Fiber reactive dye per plant hanger (I used Procion dye from Dharma Trading Co in the colors Hot Hibiscus, Coral Pink for one plant hanger, and Cayman Island Blue and Electric Blue for the other.)
- Soda ash
- Plain Salt (make sure it’s non-iodized – I got mine from Walmart in the spice section just by the table salt)
- Container for the soda ash solution (I used a plastic tote with a lid)
- Bucket for your lighter color of dye
- Container or another bucket for the darker color of dye (I used plastic 4 cup measuring cups)
- Stirring sticks (I used skewers)
- Warm water
- Paper towels
- Nitrile or rubber gloves
- Dust Mask
- Goggles
- Plastic table cloth to cover your work surface
- More paper towels 😉
I got most of my containers and tools at Dollar Tree and it was super affordable.
Definitely check there or your local dollar store for things like buckets, measuring cups and spoons, skewers, and all that fun stuff.
I also grabbed a decent quality dust mask and goggles over at my local hardware store.
As for the dye and the soda ash, I bought those from Dharma Trading Co. There are so many gorgeous colors to choose from!
Just make sure you’re getting fiber reactive dye, and don’t forget to grab some soda ash. They sell it at Dharma, too.
About Dyeing Macrame Projects & Cord
When it comes to dyeing macrame, the type of cord you use really matters.
You’ll want to make sure you’re using 100% cotton cord for this project. Specifically, I used 4 mm single strand cotton macrame string.
Cotton is a natural fiber, which means it absorbs fiber reactive dye beautifully and gives you vibrant, lasting color.
Synthetic cords like polyester or nylon just don’t take fiber reactive dye the same way.
In fact, I honestly have no idea how they’d react- but it probably wouldn’t be very good. Stick with cotton if you want the best results.
My favorite places to buy macrame cord:
Why do you need to Pre-Soak in Soda Ash?
Before dyeing, you’ll need to soak your macrame pieces in a soda ash solution.
It really makes a big difference so don’t skip this step!
I tested it myself on a few swatches, and the ones pre-soaked in soda ash turned out way more vibrant and even. It’s worth the extra time and it’s really easy.
Soda ash is also known as washing soda, and both terms refer to the same thing: sodium carbonate.
When it comes to dyeing, soda ash is used to raise the pH of the fiber so the dye bonds more effectively, resulting in brighter, longer-lasting colors.
You can buy it from dye supply stores, or just use 100% pure washing soda from the laundry aisle. Just make sure it doesn’t contain any added scents or ingredients.
I went ahead and bought my soda ash from Dharma Trading Co. since I was buying the dye from there anyway.
Here’s how I made the soda ash solution:
- Mix 1 cup of soda ash into 1 gallon of warm water
- I mixed mine up in a medium-sized plastic tote with a lid (which was super handy for storing it later)
Let your macrame piece soak in the solution for at least 20 minutes.
It’s totally fine to leave it in longer if you need to run to the store or something. There’s no real benefit to a longer soak, but it won’t hurt anything either.
Heads up: the soda ash solution can be reused several times, but if it starts smelling like a not-so-fresh litter box (aka ammonia), it’s time to toss it and mix up a fresh batch.
Do I really need salt??
or The Role of Salt in the Dyeing Process
This part was a little confusing when I first looked into it (you’ll find a lot of science-y chemistry talk online) but here’s the simple version:
Adding salt helps the dye stick to the cotton fibers more effectively. That’s really all you need to know.
I used regular table salt, just make sure it’s not iodized. Iodine can possibly affect your dye color.
I saw mention of something called Glauber’s salt, but honestly, I wouldn’t even know where to get that. The plain, non-iodized kind you find in any grocery store worked great for me.
Grab a few boxes of it, you’ll be using a lot! For the amount of dye used to dip dye one plant hanger, I used a cup and 4 tablespoons of salt.
What Kind of Dye Should You Use?
For this project, I used Procion fiber reactive dyes from Dharma Trading Co.
I’ve seen people say that this is the best dye to use, and I highly recommend sticking with this brand if you want vibrant, long-lasting results. It did not disappoint!
These dyes are specifically made for natural fibers like cotton and bond chemically with the fabric, which means your colors won’t wash out or fade easily.
I’ve seen other recommendations to use dyes like Rit or Dylon, but those are a different type of dye (usually all-purpose or acid dyes), and I’m not sure they would hold fast or stay as vibrant over time.
If you’re going to go through the effort of dip dyeing your macrame, it’s worth using a dye that’ll give you beautiful results that last, so I say go with the Procion!
I was a little intimidated at first, because the whole process just seemed daunting. But now that I’ve done it, it actually is really easy. And the color turns out so vibrant and gorgeous with the Procion dyes.
Alright, now that we covered all that- let me show you how to make this plant hanger first, and then we’ll jump into the dip dyeing info!
Video Tutorial: Making the Plant Hanger and Dip Dyeing It
Check out the tutorial video over on my YouTube channel, and don’t forget to subscribe!
Fringy Macrame Plant Hanger Tutorial
Here’s the step by step tutorial for the fringy macrame plant hanger I dyed. It’s really easy and quick to make!
Supplies You’ll Need
- 4 mm macrame string
- tape measure
- masking tape
- somewhere to hang your plant hanger while you knot (I use a clothing rack and S hooks)
Cut List
- 4 pieces @ 84 inches long (213.36 cm)
- 2 pieces @ 20 inches long (50.8 cm)
- 44 (or possibly more) pieces @ 30 inches long (76.2 cm) – this is for fringe, you can always add more if you need to fill in the gaps
Directions
Making the Hanging Loop:
Take your 4 pieces of 84 inch long cord, line up the ends and then find the center of the cords by folding them in half.
Hold that center point with your hand and then lay the cords out on your work surface vertically.
Grab a tape measure and measure 3 inches up from the center of the cords. Tape the cords down to your work surface at that mark.

Do a 4 strand braid starting just under the tape, and going until it’s 6 inches long.
Here’s how to do a four strand braid:
Lay the 4 cords out separately.
Here’s the pattern: Starting with the right two cords, you’ll do right over left, then with the two left cords you’ll do right over left.
Then in the center, you’ll do left over right.
Just repeat that over and over and that’s all there is to it!
Continue your 4 strand braid until it’s 6 inches long.
Un-tape the cords and wrap the braided section together into a loop, lining up the starting and ending of the braid.
Grab a 20 inch long piece of cord and use it to tie a wrapping knot just under the loop.
To tie a wrapping knot, you hold the 20 inch long cord in a U shape in front of the part you want to wrap.
Then you wrap the long end of the cord around the whole bundle 4 or 5 times, and thread the end through the loop that’s left on the bottom under the wraps.
Pull the short cord sticking up out of the top and pull the loop up halfway under the wraps.
Then trim the excess wrapping knot cord from the top and bottom and poke the ends under the wraps.
Transfer your work over on your macrame rack or hang it from a hook.
Plant Hanger Basket:
Divide the cords into 4 sections with 2 cords in each section. Make sure they look right coming out of the wrapping knot and the cords in each section are next to each other.
Measure down 16 inches from the bottom of the wrapping knot.
Take a pair of cords that form one arm and tie an overhand knot at that 16 inch mark.
Repeat that with the remaining 3 arms.
Next, measure down about 3.5 inches for the second row of overhand knots.
This time, we’re going to alternate the cords to connect the arms together and start forming the basket.
To do this, take two neighboring arms and tie a knot using one cord from each.
For example, take the right cord from the left arm and the left cord from the right arm and tie them together in an overhand knot.
Repeat this all the way around to join all the arms and create the base of your plant hanger basket.
Measure 3 inches down from that row of knots and tie one last wrapping knot with the other 20 inch long cord.
Adding the Fringe:
Take a piece of your fringe cord and use it to tie a Rya knot over one of the lower row of overhand knots.
To do that, hold one of your fringe cords above one of the lower overhand knots so the center is lined up with the knot.
Then wrap the right side around the right cord and bring it through the center to the front. Do the same thing with the left side, going around the left cord and push it through the center to the front.
Repeat that with each of the lower overhand knots. That just makes sure there isn’t an empty fringe spot there in the middles.
Then take each piece of fringe and attach it to the connecting cord between the upper and lower overhand knots using a cow hitch knot.
(That’s just a lark’s head knot but done the other way so the bar is on the back.)
Depending on the spacing of your knots, you may be able to fill it in with 5 pieces of fringe or you might need more.
On my first plant hanger, 5 covered it, and on the second one I needed 6 for each section.
Either way, add all the fringe around each side of the plant hanger until it’s all filled in.
Trim the tassel fringe from the wrapping knot so it’s shorter than the outside fringe, that way it blends in.
If you want, you can tie overhand knots in the bottom of each piece of fringe. This is optional but it looks kind of cool. I did that for one plant hanger and I left the other one unknotted.
It didn’t really make a major difference after dyeing so it’s up to you.
OK, let’s Dip Dye these Macrame Plant Hangers!
Alright, it’s finally time for the part you’ve been waiting for- Let’s dip dye these bad boys!
Step 1: Soak in Soda Ash Solution
Mix up your soda ash solution in a bucket or a plastic tote with a lid if you want to save it to use later (recommended!)
NOTE: Put on some protective gloves for this, this stuff can irritate your skin.
- 1 cup soda ash
- 1 gallon of warm water
Stir it up until it’s totally dissolved and you might want to wear a mask for this if you’re sensitive. It never hurts.
Submerge your plant hanger in the solution and push it under with a plastic spoon or something. Let it soak for at least 20 minutes.
This is the perfect time to mix up your dye!
Step 2: Mix up the dye
OK, for this part you can kind of do whatever you want, but here’s what I did.
Lighter color: I used a 9 quart bucket and I put a gallon of warm water in it. I stirred in a cup of salt, then I mixed in 8 teaspoons of dye and mixed it up really good with a wooden skewer.
Darker color: I used a 4 cup measuring cup and put 4 cups of warm water in it. I mixed in 4 tablespoons of salt and then I mixed in 2 teaspoons of dye.
When I do this again, I will probably have more things ready to dye and use a bucket for both colors.
The smaller 4 cup measure was a little tricky to work with and not end up getting dye all over the place.
But it did work, so you can choose your own adventure here!
Step 3: Lighter color dip
Make sure you still have your gloves on (and I had long sleeves on just in case) and pull your macrame piece out of the soda ash solution.
Squeeze it out a bit so it isn’t too crazy drippy.
Carefully dunk it into the lighter color of dye. Use a skewer or something to push it down into the dye and let it sit in there for a few minutes.
The longer you let it sit the darker it will get, so keep that in mind.
When you’re happy with the color, pull it out and carefully squeeze it out a bit.
At this point I hung it up on my rack with lots of paper towels and an aluminum baking pan underneath to catch all the drips, but it still got all over the place.
If you can do this outside, I recommend it!
Luckily the dye wiped off of my walls and floors pretty easily and I’m going to be repainting it soon anyway so I wasn’t worried.
If you are concerned about it staining the walls, definitely do this outside.
Step 4: Dip dyeing the fringe with the darker color
I grabbed my 4 cup measuring cup full of super bright dye, and I poured a smidge of it out because it was just too full.
Then I dipped the fringe in it, going around a section at a time. I made sure to get it all the way to the top of the fringe and just kept dunking it all in until I was happy with it.
I put the bottom of all the fringe in the container at the end to get the bottom a little darker.
You can hold it in there as long as you like. I just keep it in like a minute or so, but it did make a difference and turned out really pretty.
Once you’re happy with it, squeeze it out a bit into the dye cup and let it drip into a foil pan, and hopefully not splatter all over your wall.
Step 5: Waiting
Now you need to let the dye sit on the macrame overnight, or at least for several hours.
After the dripping had mostly died down, I wrapped the hanging plant hanger in plastic wrap. I was originally planning to stick it in a bag, but I didn’t want to mess up the ombre effect.
I left it in the plastic wrap about a day and a half, because I got busy and couldn’t get around to rinsing it right away. It was fine though!
Step 6: Rinsing
I DEFINITELY recommend doing this part outside if you can. But I did it in my shower, lol.
Take one piece at a time (in case you did more than one like I did) and rinse it under cold water.
It’s going to splatter all over the place, so be prepared for that. I rinsed it until it ran mostly clear, and then hung it up from the shower head to drip for a while.
I did the same thing with the other one and hung it up from a hook on the other side of my shower.
It was very colorful in there! But it wiped up no problem- no guarantees it won’t stain though
(So, don’t get mad at me please if it does- I told you to go outside, remember? 😉
Step 7: Let it dry
After the dripping was over they were just damp, I brought them out and hung them back up on my macrame rack and pointed a fan at them.
I didn’t want them to stay damp too long and get musty.
They dried really quickly with the fan pointed at them. And I was getting very excited at this point because they looked AMAZING!!
The Big Reveal!
Holy cow. These turned out sooo awesome! The brightness is crazy, and I absolutely love the colors!
They stayed super vibrant and the color turned out just like I was hoping.
There were a couple of white spots, maybe if I would of swished them around a bit more in the dye that wouldn’t of happened, but its just a bit and it doesn’t look bad.
But yes, I will definitely be doing more macrame dyeing projects!
In Conclusion
Are you going to try a dip dye macrame project? I would love to hear about it down in the comments below!
If you make one of these, please take a picture and share it over on Instagram and tag me @marchingnorth so I can take a look. I love seeing all your awesome projects!
Looking for more macrame ideas? Check out my latest macrame posts: