Macrame Bookmark Tutorial | Cute DIY Paperclip Bookmarks (Great for Gifts!)
If you love quick little macrame projects, you’re going to have so much fun with this one!
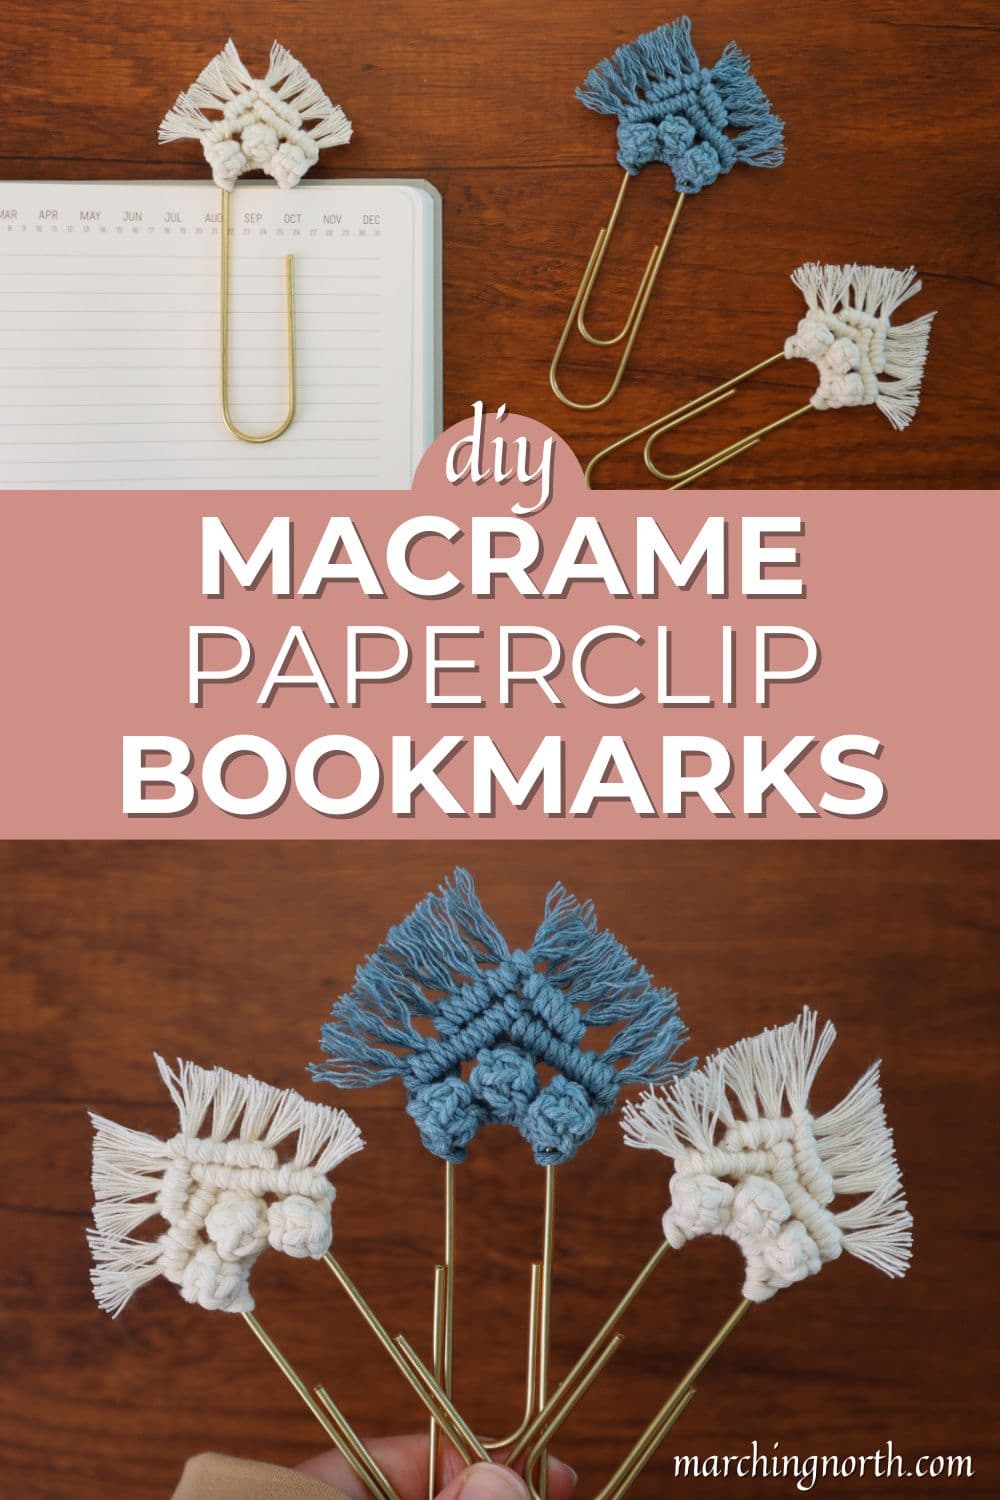
These macrame bookmarks are made using a simple paperclip as the base, and they come together super fast.
Don’t forget to pin this for later!
(This post may contain affiliate links. If you click one and make a purchase, I may receive a small commission at no extra cost to you. Read the disclaimer here. Thank you for your support!)
They’re the perfect scrap-buster project, and they make adorable little gifts for your fellow bookworms (or to keep for yourself, I won’t judge 😉
In this tutorial, I’ll walk you step by step through how to make your own macrame paperclip bookmark, even if you’re brand new to macrame.
All you need are a few supplies, some cord, and a big paperclip, and you’ll have a cute boho-style bookmark in no time.

Buy the PRINTABLE copy
Macrame Paperclip Bookmarks – Printable PDF Pattern!
Reference this pattern any time you want with the printable PDF version!
It’s ad-free, and includes the written pattern with step by step photo tutorial!
Below, you’ll find the free pattern and the video tutorial for this fun project.
If you’re new to macrame and want to learn the basic knots before you dive in, I can help you with that!
Also, be sure to sign up below for my free printable PDF knot guide so you can keep it handy while you’re working on your projects!
More Free Macrame Patterns!
Looking for more macrame ideas? I’ve got lots of them to choose from! Here’s a few to get you started:
- “Auda” Mini Macrame Wall Hanging – Free Pattern and Video!
- Free DIY Macrame Plant Hanger Pattern (Low Key & Tassel Free!)
- DIY Macrame Diamond Keychain (Free Pattern & Video!)
- 5 Boho DIY Macrame Christmas Ornaments
- Macrame Sling Bag (Phone Holder) Tutorial & Video!
Macrame Paperclip Bookmark Tutorial
Supplies You’ll Need
- 2 mm single strand cotton string
- (NOTE: you can also use 3 ply rope, as long as it’s the same thickness. The blue one in the finished pictures is done with 2 mm 3 ply rope.)
- large paperclip (mine is 4 inches long by 1 inch wide)
- Sharp Scissors
- Large eye needle
- Brush or comb for fringe
Cut List
- 6 cords @ each 24 inches long (61 cm)
Video Tutorial
Check out the tutorial video for this macrame bookmark on my YouTube channel, and don’t forget to subscribe!
Step 1
Fold one cord in half so the ends line up evenly. Attach it to the single-loop side of the paperclip using a cow hitch knot.
To tie a cow hitch: bring the folded loop of the cord up behind the paperclip and over to the front, then pass the two cord ends through that loop. Pull the ends to tighten.
Repeat this step with each of the remaining cords.
Step 2
Separate the cords into 3 sections with 4 cords in each section.
Starting in the center, tie a stack of 3 square knots, leaving about 1/4 of an inch of space at the top.
Thread the 2 center cords coming out of the bottom of the square knots onto your large eye needle.
We’re going to poke the needle through the center space that we left at the top of the knots.
Pull the cords until the berry knot rolls up onto itself.
Now tie a square knot right at the base of the berry knot to hold it in place.
Repeat that process with the other two sections of cords. You’ll have 3 berry knots all together.
Step 3
Take the furthest cord to the left, and bend it in front of and across the next 5 cords on the left side.
We’re going to use it as the filler cord to tie a row of double half hitch knots going across to the right.
Starting with the next cord on the left, tie 5 double half hitch knots going down and to the right.
(If you need help with that knot, be sure to watch the video and also sign up for my free knot guide at the top of this post!)
Now grab the furthest cord to the right, and bend it across the next 5 cords on the right side. Use it as the filler cord to tie a row of 5 double half hitch knots going to the left.
Cross the left center cords over the right center cord, and tie one last double half hitch knot going down and to the right to connect the two sides.
Step 4
Move the 2 furthest cords to the left and the right out of the way, and use the next cord on the left as the filler cord for 3 double half hitch knots going down and to the right.
You’ll tie these ones right up next to the previous row.
Do the same thing over on the right side, but you’ll be going down and to the left this time.
Cross the left cord over the right cord and use it to tie one last double half hitch knot going down and to the right to connect the two sides.
Step 5
Cut the excess cord, leaving about an inch or so for fringe.
Brush out the fringe really well. I like to brush the front side and the back side.
Give it another trim to get it nice and neat.
And now your cute macrame paperclip bookmarks are complete!
In Conclusion
I hope you enjoyed this macrame bookmark paperclip pattern!
These are such a fun, quick project, and they make wonderful gifts or just a cute treat for yourself.
If you make one, I’d love to see how it turned out!
Share a picture on Instagram and tag me @marchingnorth so I can take a look.
Want to check out some more free macrame patterns?