Free Striped Knitting Machine Hat Pattern (Reversible!)
Learn how to make a reversible knitting machine beanie with stripes in this free pattern and step by step video tutorial.
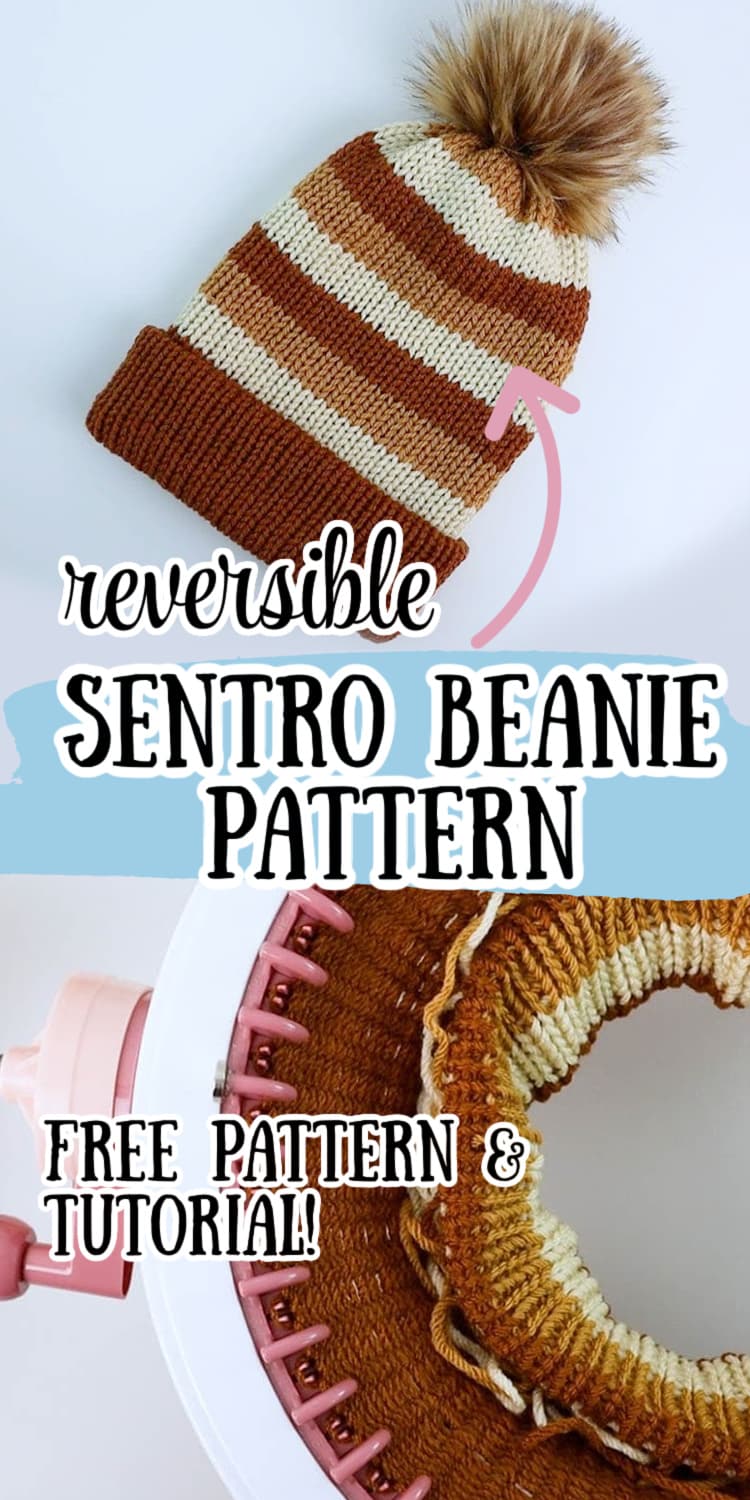
This beanie pattern is super easy, and it turns out so cute!
Want to remember this? Post this Striped Knitting Machine Beanie tutorial to your favorite DIY Pinterest board!
(This post may contain affiliate links. If you click one and make a purchase, I may receive a small commission at no extra cost to you. Read the disclaimer here. Thank you for your support!)
You can go with the solid color side one day, and switch it to the striped side the next. Both are great options!
There isn’t any waste yarn involved, you won’t need any stitch markers, and it’s a super straight forward project.
It’s the perfect project to make as a last minute gift!

I’ll be making this knitting machine on my Jamit, which is basically a Sentro knitting machine knock off.
You could also use an Addi knitting machine, or any other 46 or 48 pin circular knitting machine.
This circular knitting machine is perfect for making hats, headbands, blankets, sweaters and more!
Just make sure you install your own digital counter following my tutorial to help with accuracy.
The finished hat is sized for adults, although they’re really stretchy and as far as tightness goes they’ll fit on kids as well.
You can make different sizes by reducing the number of rows, or if you want to make a hat for a baby or toddler, by using a smaller knitting machine.
If you wanted to make this the right size for a child, I would recommend reducing the rows by 5 or 10 so it’s not too long.
Using a circular knitting machine is so much faster than making hats by hand with circular needles, straight needles, double-pointed needles, or even a knitting loom.
Of course hand knitting is great, and can be a really enjoyable process. But machine knitting allows you to crank out an easy hat in just 20 minutes once you get the hang of it, including finishing and adding a pom pom.
You just can’t beat that!
Circular knitting machines have also helped lots of people who suffer from arthritis or disabilities be able to craft again, which is a wonderful thing.
If turning the handle is difficult, you can even get an electric screwdriver and an attachment to do that part for you and spare your arm and shoulder!
Even an avid hand knitter can appreciate how a machine allows you to quickly make gifts, donations or stock up on items for the craft fair.
It’s also a great way to use up a lot of yarn in a short amount of time. If you have a big yarn stash you need to bust through, a knitting machine may be just what you need.
Best Yarn for Knitting Machine Hats
Circular knitting machines are notoriously picky about what yarn you can use. It’s important to use the right yarn weight and pick a yarn that will work well and not cause you a bunch of headaches.
For this hat pattern, I used Big Twist yarn from Joann’s and it worked wonderfully.
That yarn is affordable and it comes in a lot of beautiful colors, so it’s a great choice!
Here are a few other yarns that seem to work well in MY knitting machine, so hopefully they’ll work in yours too:
- Lion Brand Heartland
- I Love This Yarn worsted weight acrylic (Hobby Lobby)
- Caron Simply Soft
I recommend testing out different yarns and seeing how your machine does with them.
Sometimes you’ll find a new yarn that works great, but certain colors of it won’t work as well.
I’ve seen a lot of comments about Red Heart yarns with some of them working OK and some not working well at all.
It’s a good idea to use yarn conditioner to help the yarn flow through. I have some Thread Magic attached to the front of my machine where the yarn feeds into it to help cut down on static.
Digital Row Counter
The row counter on my knitting machine promptly broke the first time I used it.
I tried to fix it but it just wouldn’t work.
So I totally removed the inside parts of the row counter (because it made a terrible grinding noise if I left it in there) and installed a new digital row counter that has worked FLAWLESSLY for a couple of years now.
I have a whole tutorial showing how I installed it on my YouTube channel. It wasn’t hard (although it did take me a minute to figure it out!)
Check out the video to see how I did it and what supplies you need to install your own. It’s actually super cheap!
More Free Hat Patterns
You can find several free patterns here on my site, including Sentro machine hats, crochet hats, and loom knit hat patterns as well.
They’re all beginner friendly and a few of them can be worked up really fast. Especially the knitting machine one!
There’s also a knitting machine headband thrown in there for good measure.
Check them out below!
- Basic Solid Color Knitting Machine Beanie Pattern
- Free Twisted Knitting Machine Headband Pattern (Sentro, Jamit, or Addi)
- Easy Ribbed Crochet Beanie Pattern
- 1 Hour Chunky Crochet Hat Pattern
- Basic Loom Knit Hat with Folded Brim
- Striped Loom Knit Hat
- Ribbed Loom Knit Hat
Supplies You’ll Need
- 3 colors of worsted weight yarn (I used Big Twist Value in the colors Cream, Camel and Toffee)
- 46 or 48 pin circular knitting machine (I’m using a 48 pin Jamit with a digital stitch counter installed)
- yarn needle or tapestry needle
- scissors
Here’s the basic recipe for this striped knitting machine beanie:
- 5 rows toffee
- 5 rows camel
- 5 rows cream
- 5 rows toffee
- 5 rows camel
- 5 rows cream
- 5 rows toffee
- 5 rows camel
- 5 rows cream
- 45 rows toffee
Check out the YouTube video over on my channel Yarn Stash with Marching North, and don’t forget to subscribe!
Step 1: Cast on
To cast on, start with the white pin at the front.
Wrap the first color of yarn around the white pin (I’m using toffee) and then go back and forth around the pins as you turn the handle until you get back to the pin just to the right of the white one.
Make sure the yarn goes under the divider that’s between the white pin and the pin to the right of it, and then insert it into the yarn holder slot.
I put the yarn in the center tension hole, it seems to work pretty well with this yarn.
That’s your first row, now we’ll move on to the stripes.
Step 2: Make the stripes
Slowly crank for the first couple of rows, and then continue until you have 5 rows with the first color.
Stop as soon as you just pass the white pin, then cut the yarn, leaving about a 10″ tail.
Put the tail of the yarn in the middle, making sure it’s hooked around the white pin.
Then grab your next color (camel) and insert it into the yarn feeder, leaving a tail about 10″ long in the middle next to the other tail.
Pinch both yarn tails together right next to the pins while you start cranking so it doesn’t end up dropping a stitch.
Turn the handle a little ways so you knit about 10 stitches or so, and then tie the two ends of the yarn together with a half knot so everything stays where we want it.
Then continue for 5 more rows.
Repeat that process with the third color (cream).
Continue making stripes until you have 9 stripes and you’ve done 45 rows.
Step 3: Make the solid color section
Join the main color (toffee) with the same method that we did with the striped sections.
Knit 95 rows. When you get to the last row, stop just when you pass the white pin.
I did this part with my electric screwdriver to speed things up. 🙂
Step 4: Cast off
Cut the yarn, leaving a tail that’s about 12 to 18 inches long.
Put the tail in the center of the machine, and turn the handle until you get almost all the way around, but you still have 5 or 6 pins to go.
Thread the long tail onto the yarn needle, and slowly turn until the white pin is up.
Start picking the stitches up off the pegs going around counter clockwise until you get all the way back to the front.
You’ll need to slowly turn the wheel to get the last few loops off.
Once you get them all off the machine, set it aside and it’s time to finish off the hat.
Step 5: Finishing
At this point the hat is a long tube.
Flip the hat tube inside out, and tie each pair of yarn ends together in a knot. You want to pull the ends together a bit, but don’t pull so hard that it puckers on the front.
You just want to make sure the color change jog is gone.
Trim the ends of those yarn tails down, leaving about an inch or two that will be hidden inside the hat.
Don’t trim the long tail from the end of the hat accidentally.
Flip the hat back right side out, and fold the one end up inside the other so that both open ends are on one side.
Starting with the inner end, pull the long tail to cinch it up.
Thread the long tail onto your yarn needle and sew through all the loops surrounding the hole. (That’s optional, but I like to do it to make sure the hat doesn’t come undone later.)
Pull it closed again and tie a knot with the yarn to hold the hole closed.
Do the same thing with the other end, and make sure the yarn tail from the inner side is still sticking out.
Once you get the second end cinched up, tie the two yarn tails together firmly to hold the two sides of the hat together.
Thread the tails onto your yarn needle and feed them down through the two layers of the hat.
Trim the excess and pull the hat so the tails disappear inside the hat.
Done!
Feel free to add a pom pom if you want, or just leave it as it is!
Since it’s reversible, you can always temporarily add a pom pom by tying it on and you can untie it later.
More Free Knitting and Crochet Patterns
Check out these other fun knitting and crochet patterns from my blog!
Hi there. On step 3, do you do 50 more rows or 95 more rows?