DIY Boho Mirror with Macrame & Raffia
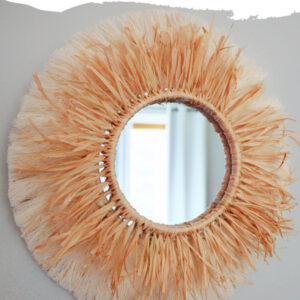
Looking for an easy DIY boho round mirror idea? Check out this macrame and raffia mirror frame!
I’ve been meaning to make a DIY mirror frame like this for a long time, and I finally sat down to do it. The only macrame knots needed for this project are lark’s head knots.
Besides that you’ll just need some glue gun skills and a little bit of time. You don’t get much easier than that!
Want to remember this? Post this DIY Boho Mirror tutorial to your favorite DIY Pinterest board!

(This post may contain affiliate links. If you click one and make a purchase, I may receive a small commission at no extra cost to you. Read the disclaimer here. Thank you for your support!)
This is a great project to use up some of your scrap macrame cord, and you can find most of these supplies at the Dollar Tree or your local craft store.
I found the round mirror and wooden rings for this project on Amazon, the raffia at my local craft store, and the macrame cord was all from my scrap bin.
You can jazz this project up even more with wooden beads, popsicle sticks or paper sticks, the possibilities are endless!
I hung this beautiful piece of boho decor in our living room, but you could totally hang it in your dining room, entryway, bathroom, or even your craft room.
Keep scrolling to jump right into this easy project.
Supplies You’ll Need to Make a DIY Boho Mirror with Raffia & Macrame
NOTE: The sizes below are what I used. You could use a larger or smaller mirror, you just need one of the wooden rings to be about the same size as the mirror, and one to be slightly smaller. If you use larger rings and a larger mirror, you’ll need more raffia and macrame cord.
- round 6 inch mirror
- 2 wooden rings
- 1 ring @ 6″ diameter
- 1 ring @ 5 1/4″ diameter
- 3, 4, or 5 mm macrame cotton rope or string – I used 51 pieces of single strand cotton string @ 10″ long and you’ll also need a piece about 12″ long for a hanger
- raffia – a decent sized handful cut into 7″ pieces
- hot glue gun and glue sticks
- 5″ round piece of scrap cardboard for the back of the mirror
- scissors
- brush or comb for fringe
- stiffening spray
- 12″ round piece of cardboard or anything to mark where to cut your fringe
How to Make It
Check out the video tutorial over on my YouTube channel, and be sure to subscribe so you don’t miss any of my future videos!
Step 1: Attach the Raffia Pieces to the Smaller Ring
I recommend just grabbing like two or three pieces of raffia at a time for this.
You’re going to fold them in half, and put the loop up under the wooden ring. Then just bring the end through the loop to make a lark’s head knot and pull to tighten.
Repeat that until the whole ring is filled.
Step 2: Attach the Macrame Cord Pieces to the Larger Ring
Take one piece of macrame cord at a time, fold it in half, put it up under the ring and bring the end through the loop to tighten it up.
Repeat that around until the whole ring is filled.
It took 51 pieces to fill my ring, but yours might be more or less depending on the width of your macrame cord.
Step 3: Brush Out and Cut the Fringe
Now it’s time to brush the macrame cord out really well. Brush it out on both sides, then spray it liberally with stiffening spray and let it dry.
After it dries, brush it out some more.
Now grab something that’s about 12″ in diameter, and lay it on top of the brushed out macrame circle. Center it and use it as a guide to cut the fringe evenly all the way around.
Step 4: Gluing the Mirror to the Macrame Ring
Now we’re going to glue the mirror to the macrame cord ring.
First, put the mirror down or your work surface and run a bead of hot glue all the way around.
You want to work kind of fast so that your hot glue doesn’t set up before you get a chance to attach your ring to it.
Grab the macrame cord ring and press it down onto the glue, making sure it’s centered. I had the front of the lark’s head knots facing the mirror, but you can use whichever side you prefer.
Step 5: Gluing the Raffia Ring
Take the raffia ring and decide which side you want to be on the front. I went with the back of the lark’s head knots facing the front.
Put a bit of hot glue around the back of the raffia ring and be careful not to get any drips on the front.
Line it up and press it down onto the mirror.
Step 6: Making the Hanger & Adding the Backing
The mirror I used for this project had a little metal hanging loop on the back already. If your mirror doesn’t, you can hot glue your hanger in place (or use E-6000 glue or Gorilla Glue if you’re worried hot glue isn’t strong enough.)
I used about a 12″ or so piece of cord, folded it in half and made a lark’s head knot onto the hanging loop.
Then you’ll want to make an overhand knot in the ends of the hanging cord, making sure it doesn’t stick out where you’ll be able to see it when it’s hung on the wall.
Cut the excess cord off the ends.
To attach the cardboard backing circle, line it up on the back and find where the hanger will need to come through.
Use a pair of scissors or a craft knife to cut a slit large enough for the hanging cord to slide through. Feed it through, and then hot glue the cardboard down to the back of the macrame ring.
Step 7: Brush the Fringe Some More!
Now all you have to do is brush the fringe a bit more and possibly add some extra stiffening spray to get it to behave.
Done!
I hope you enjoyed this DIY Boho Mirror tutorial and you’ll make one of your own!
If you do, please share a picture over on Instagram and tag me @marchingnorth so I can take a look. I love seeing all of your awesome creations!