Macrame Ghost Pixel Art | Halloween Wall Hanging DIY
Learn how to make a spooky macrame ghost pixel art wall hanging for Halloween in this step by step tutorial!
Don’t forget to pin this for later!

(This post may contain affiliate links. If you click one and make a purchase, I may receive a small commission at no extra cost to you. Read the disclaimer here. Thank you for your support!)
Halloween is one of our favorite holidays around here. We usually start getting our spooky decorations out before October hits.
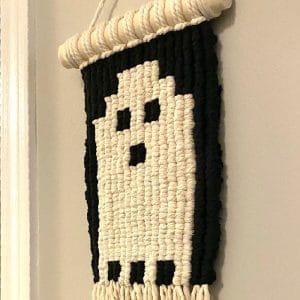
I thought this year I’d put a fun macrame spin on our Halloween decor with this macrame ghost wall hanging!
This technique is really cool because you can make all sorts of pixel based designs. The whole thing is done with vertical double half hitch knots, and you just change colors according to the chart to make the pattern. Once you get the knot down, it’s simple!
You can grab the printable version of the chart to go along with this pattern down below!
OK, let’s make a Macrame Ghost!
Looking for More Free Macrame Wall Hanging Patterns?
Check out this list of 16 free macrame wall hanging patterns with video tutorials and written instructions!
Supplies You’ll Need to Make a Macrame Ghost Wall Hanging
- For Filler Cords:
- 4 mm twisted cotton macrame rope (natural color)
- 9 pieces @ approx. 65″ long (you’ll end up cutting a bit off, but that’s how long I made mine)
- For Working Cords (full cut list is down below, but this is how much you’ll need total):
- 54 feet of 3 mm cotton macrame string in natural (although I refer to it as white in the tutorial)
- 46 feet of 3 mm cotton macrame string in black
- 3/4″ wooden dowel (approx. 12″ long. I cut mine down to size once the wall hanging was finished)
- hot glue gun and glue sticks
- sharp scissors
These are the lengths of rope you’ll need to cut for each row:
- Row 1: 1 piece black @ 85”
- Row 2: 2 pieces black @ 36”, 1 piece white @ 36″
- Row 3: 2 pieces black @ 24”, 1 piece white @ 48″
- Row 4: 4 pieces black @ 14”, 1 piece white @ 14”, 2 pieces white @ 24”
- Row 5: 2 pieces black @ 14”, 1 piece white @ 62”
- Row 6: 3 pieces black @ 14”, 2 pieces white @ 36″
- Rows 7-11: 10 pieces black @ 14”, 5 pieces white @ 62″
- Row 12: 5 pieces black @ 14”, 4 pieces white @ 14”
Macrame Ghost Wall Hanging Tutorial
**Note: I realized after I finished this project that I could of carried the rope across the back instead of using a new piece of rope for each color change. I haven’t tried it that way yet so I’m not sure what the cord lengths would need to be- but if you try it let me know and I’ll update the pattern.
When I say carry the rope, I mean for example in row 2, you would use a longer piece of black rope and finish the first 6 knots, then drop the black cord but leave it attached. Then attach the white cord, do those 6 knots, and when it’s time to do the next 6 black knots, just pick up the black cord you dropped before and continue down the row. It makes for less ends to glue down later, but the way I did it works fine too, so it’s up to you!**
Step 1: Attach filler cords to dowel
Attach the nine filler cords to the wooden dowel using larks head knots.
Step 2: Lots of Vertical Double Half Hitch Knots
Now for the knotting. This whole wall hanging is made using Vertical Double Half Hitch Knots (I’m going to say VDHHK for short).
If you aren’t sure how to tie that knot and want a step by step demonstration, check out my Macrame Knots for Beginners post (it’ll open in a new tab so you won’t lose your place). There’s a written tutorial for each knot and a video as well!
Here’s a quick run through showing how I tied the first knot.
All the knots to going to the right will be tied that way.
Once you reach the far right side, you’ll have to come back all the way to the left. For that part, the knots are tied the same way, but reversed.
The first knot you tie when you start back to the left is a little different than the rest, so let me explain that a bit.
To turn around and head back to the left, you’ll tie the first half of the VDHHK the same way you have been when you were going to the right.
Then, for the second half of the knot, you’ll bring the working cord behind and to the left of the filler cord, and then start wrapping it around the other way, like in the picture below.
Then for the rest of the knots in the row, you’ll tie them the same way you tied the second half of that knot. If this is confusing I definitely recommend watching the video and/or checking out the basic macrame knots tutorial. It’s so much easier to show than to explain!
OK, now that we got that down, let’s talk about the pattern!
So, I divided this pattern into 12 rows. Each row includes one pass all the way to the right, and another pass all the way back to the left.
Basically, you’re making square pixels, and each pixel contains four knots total.
Here’s an image of the chart for this pattern.
Here’s a run down of the knots and colors for each row:
- Row 1: 18 VDHHKs with black cord
- Row 2: 6 VDHHKs with black cord, 6 with white cord, and 6 more with black cord
- Row 3: 4 VDHHKs with black, 10 with white, and 4 more with black
- Row 4: 2 VDHHKs with black, 4 with white, 2 with black, 2 with white, 2 with black, 4 with white, and 2 with black
- Row 5: 2 VDHHKs with black, 14 with white, and 2 with black
- Row 6: 2 VDHHKs with black, 6 with white, 2 with black, 6 with white, and 2 with black
- Row 7-11: 2 VDHHKs with black, 14 with white, and 2 with black
- Row 12: 2 VDDHHKs with black, 2 with white, 2 with black, 2 with white, 2 with black, 2 with white, 2 with black, 2 with white, and 2 with black (whew)
You made it! Alright, let’s finish this thing off!
Step 3: Glue down the ends and trim
Once you get all the knotting done, the back will look something like this.
Wow, I’m not sure which side is scarier, the front or the back!
I decided to tackle this the easy way… with hot glue.
Lay your macrame ghost down on a table, and hot glue all the ends down so they don’t show on the front.
Then trim the ends off and it’s ready to hang up! Also, I didn’t show this but I also untwisted the long filler cord ropes and trimmed them a bit for fringe.
Step 4: Attach the hanger & done!
I used a constrictor knot to attach the hanging cord (and that’s another knot demonstrated in the macrame knots tutorial I mentioned earlier).
In Summary
I hope you enjoyed this fun macrame ghost wall hanging tutorial! If you make one, please share a pic on Instagram and tag me @marchingnorth so I can see it! I love seeing your awesome creations, it seriously makes my day.
Join the Macrame for Beginners and Beyond with Marching North Facebook Group!
If you’re new to macrame or if you’ve been knotting for a while, connecting with other macrame lovers is always a great idea!
Come check out our Facebook group, Macrame for Beginners and Beyond with Marching North. It’s a friendly community where you can ask questions, get inspiration, and share your awesome work with other macrame lovers! Come join the conversation today!
More Related Posts!
- DIY Cowrie Shell Macrame Bracelet (Free Pattern + Video Tutorial)
- Easy Beaded Macrame Bracelet with Sliding Knot (Beginner Tutorial + Video)
- 35 Free Step-By-Step Macrame Plant Hanger Patterns (with Tutorials & Video!)
- How to Make a Boho Fall Floral Macramé Wreath for Your Front Door (+ Video!)
- Macrame Bookmark Tutorial | Cute DIY Paperclip Bookmarks (Great for Gifts!)
- Dip Dye Macrame Plant Hangers = Instant Joy (Tutorial + Video!)