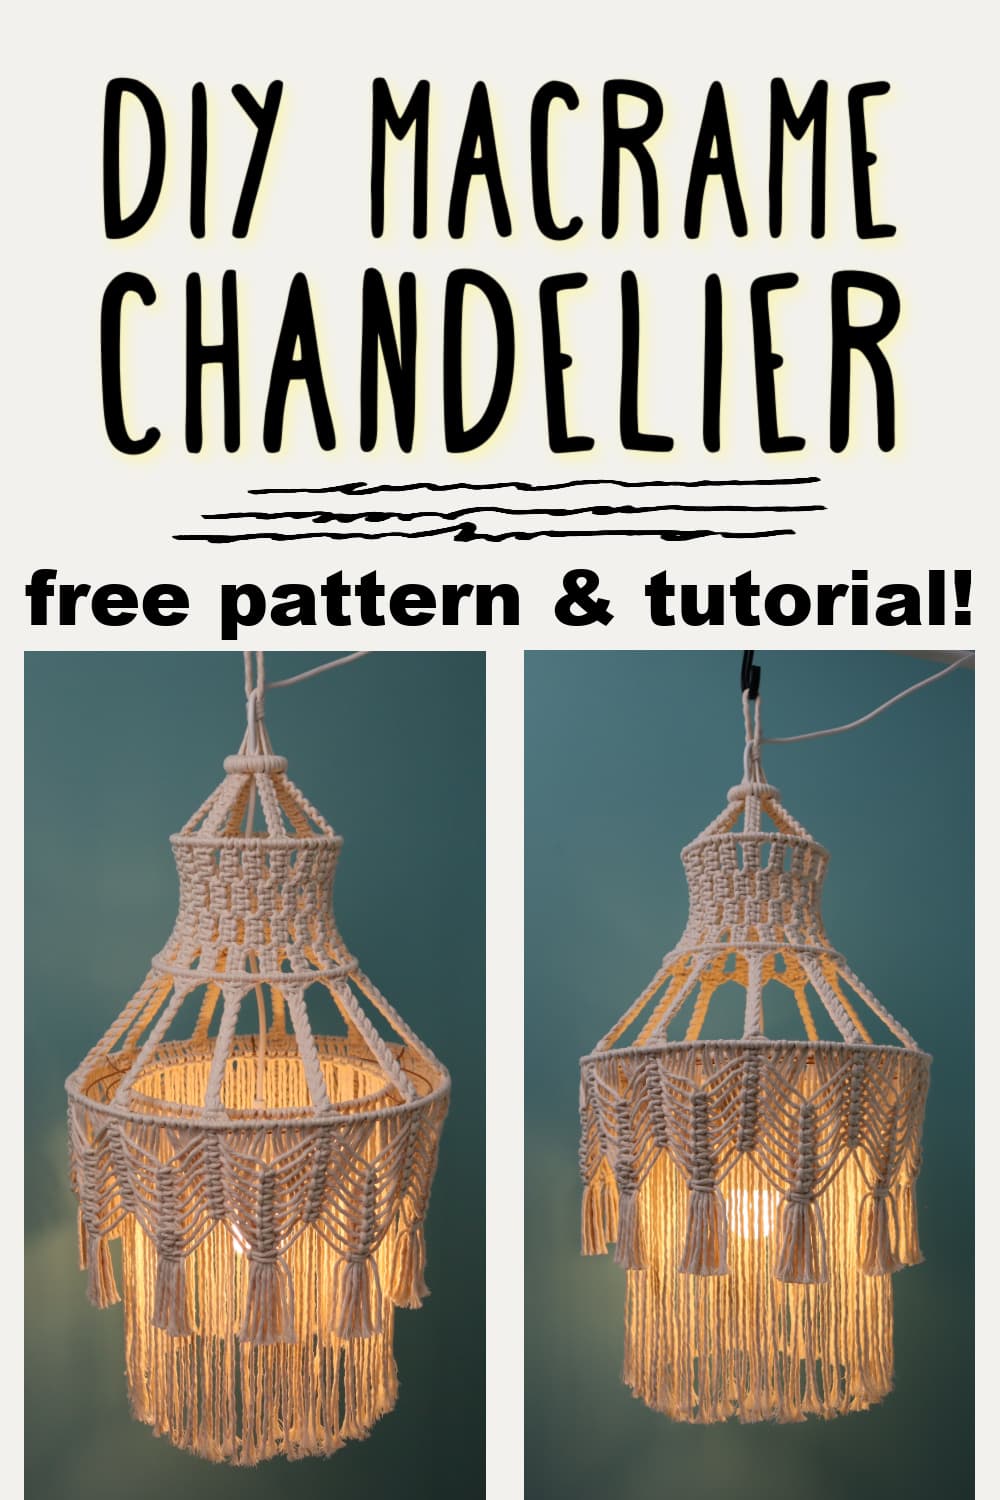
Boho DIY Macrame Chandelier (Free Pattern & Video!)
Learn how to make your own beautiful macrame chandelier in this step by step pattern and video tutorial!
Want to remember this? Post this DIY Macrame Chandelier tutorial to your favorite DIY Pinterest board!
(This post may contain affiliate links. If you click one and make a purchase, I may receive a small commission at no extra cost to you. Read the disclaimer here. Thank you for your support!)
Several months ago I picked up this IKEA pendant light fixture with the intention of making a macrame lampshade to go along with it.
I finally sat down and figured it out and I just love how it turned out!
This is a great way to add some boho decor to your home and it looks like something you’d get at a high end store but without the high price tag.

Buy the PRINTABLE copy
Boho Glow Macrame Chandelier – Printable PDF Pattern!
Reference this pattern any time you want with the printable PDF version!
It’s ad-free, and includes the written pattern with step by step photo tutorial!
All you’ll need for this macrame project are:
- some 3 mm single strand macrame cord
- a few metal rings in various sizes (or you can use a wooden hoop or an embroidery hoop as long as it’s the same size)
- a 14″ wreath ring for the bottom ring that you can pick up at Dollar Tree or most craft stores.
Pair that with a “light bulb on a wire” like the one I found at IKEA and you’re all set!
Another alternative idea is to use fairy lights inside. That would look super cute too!
I didn’t tie knots along the cord to make a chandelier chain, but you could do that too if you want. That’s a great way to use up scrap cord!
Macrame Knots for Beginners
If you’re new to macrame, you’ll want to start off with my Basic Macrame Knots for Beginners post which you can find by clicking right here.
You’ll learn all the basic knots used in this project, plus several others, and there’s a free printable guide for the 5 most important simple knots!
Get your copy of 60 Macrame Knots & Knot Patterns eBook today!
Click here to find out more about this helpful macrame knot book that features step by step photo tutorials for 60 different macrame knots and knot patterns!
It’s a perfect resource to help you take your macrame creations to the next level.
Supplies You’ll Need
- 3 mm single strand cotton macrame string in the following lengths:
- 6 pieces @ 120″ long (starting cords)
- 1 piece @ 18″ long (to tie the wrapping knot at the beginning)
- 6 pieces @ 100″ long (1st cord addition)
- 24 pieces @ 80″ long (2nd cord addition)
- 72 pieces @ 30″ long (pieces added to outer ring)
- 72 pieces @ 28″ long (pieces added to inner ring for last fringe layer)
- metal or wooden rings in the following sizes:
- 2″ ring (I used a sturdy wooden ring for this one)
- 6″ ring
- 7″ ring (mine was actually 7.25″ but 7″ should be OK)
- 14″ wreath ring (with multiple rings attached together)
- scissors
- tape measure
- IKEA light bulb kit or any LED light bulb on a wire setup with a long enough cord
DIY Macrame Chandelier Tutorial
Check out the video tutorial over on my YouTube channel, and don’t forget to subscribe so you don’t miss any new videos!
Step 1: Making the Hanging Loop
First we’re going to make the hanging loop for the base of your chandelier.
Take the 6 pieces of cord that are 120″ long, hold them all together with the ends lined up and find the center of the cords by folding them in half evenly.
Bring your hands out 3 inches from the center on both sides so you have a 6″ section marked with your hands right in the center of the cords.
Flip the cords around so the right side is at the top and your left hand at the bottom, and tape them down to your work surface where your right hand was.
Now you’re going to braid the cords with a basic 3 strand braid (hold 2 cords together for each section) until it’s 6″ long.
Carefully untape the cords and fold the hanging loop so the bottoms of the braids are matched up.
Now grab your 18″ long piece of cord and use it to tie a wrapping knot at the base of the braids. You’ll make 5 wraps all together.
(See a tutorial for the wrapping knot here if you’re not sure how to do that knot.)
Trim off the short excess cord from the wrapping knot, but be careful not to cut the 12 long cords.
Step 2: Attaching the 1st Ring
Thread all the cords through the 2″ ring and bring it up about 2 inches or so away from the wrapping knot.
You want to leave enough space that you can fit the plug from your light up through the ring without too much trouble.
Attach each cord to the ring with a double half hitch knot.
At this point I recommend hanging your work up on a macrame rack or a hook so it’s easier to knot.
It’s a good idea to thread the cord of the light up through the ring at this point so you don’t have to try and do it later when it’ll be more difficult.
Grab your next 6 pieces of 100″ long cord and use a cow hitch knot (reverse lark’s head) to attach one piece in between every 2 double half hitch knots on the 2″ ring.
Step 3: 1st Knotted Section
Grab two cords from one of the cow hitch knots you just made, and then grab one cord to the left and one cord to the right of that pair.
Use these 4 cords to tie 7 square knots stacked on top of each other in a sennit.
Repeat that around with the rest of the cords until you have 6 square knot sennits all together.
Step 4: Attaching the 2nd Ring
Take your 6″ ring and thread all the cord ends through the center.
Attach all of the cords to the ring with double half hitch knots and space the 6 spokes from the previous section evenly around.
Grab your 24 pieces of 80″ long cord and attach 4 pieces using a cow hitch knot in each gap between the spokes.
Step 5: 2nd Knotted Section
Starting with 4 cords under one of the spokes, tie 3 square knots stacked on top of each other.
Repeat that around for this first row.
For the second row, tie 3 square knots between two of the square knot sections from the previous row.
It’s alternating square knots, but each section has 3 instead of just one.
Repeat that until you have 4 rows of alternating 3 square knot sections.
Step 6: Attaching the 3rd Ring
Attach the 7.25″ ring right under the last row of square knots using double half hitch knots.
Step 7: Braided Section
Take 6 strands (it doesn’t really matter which 6 you start with) and use the left and right cord to tie a square knot around the inner 4 cords.
Separate the cords out into 3 sections with 2 cords each.
Make a 3 strand braid, going back and forth 20 times. This will make sure all your braids are the same length.
Tie one last square knot at the bottom of the braid using the left and right outer cord and tying it around the inner 4 cords again.
Repeat that around for 12 braids all together.
Step 8: Attaching the Last Ring
Now it’s time to attach the wreath ring at the bottom. Make sure you have it flipped so the rounded side is facing down and thread all the cords through the center of the ring.
Bring one of the braided sections down through the first outer metal section, and then attach the left cord of the braided section with a double half hitch knot.
Attach the next 4 cords with a half hitch (half of a double half hitch), and then attach the right most cord with a regular double half hitch.
Repeat that with each braided section. You might have to adjust the placement as you go because of the dividers in the wreath base, but do the best you can.
Attach 6 pieces of the 30″ long cords in between each braid with a cow hitch knot. You’ll attach 72 pieces of cord all together.
Step 9: Outer Bottom Knotted Section
This part looks complicated, but it’s actually really simple.
Start with the 4 cords under one of the braided sections and tie a square knot.
Grab the next cord to the right and the next cord to the left. Bring them under the 2 working cords you used to tie the first square knot.
Now drop the first working cords and use the two cords you just picked up to tie the next square knot under the first.
Repeat that over again moving over one more cord on each side until you have 8 square knots all together.
This will make a fishbone pattern. Repeat that around under each braided section.
For the second row, grab the top 2 working cords between two of the sections on the right and the left, and use them to tie a square knot that comes about halfway up the first row of square knots.
Continue tying square knots in the sennit with the next pair of cords going down, dropping the previous pair. This time instead of bringing the next cords under the previous pair of cords, you’ll bring them over.
Repeat that until you have 8 knots in the sennit, and repeat around making sure to keep the knots at the same level for each section.
Once you get those two rows done, you’ll notice 2 cords hanging down from each of the centers of the first row.
You’ll take one cord from either side of the sections we just tied and use them to tie a square knot around all the cords to form sort of a tassel.
Repeat that around for each section.
Trim the tassels evenly however long you like.
Step 10: Inner Fringe Section
For the last fringe section, take the 72 pieces of 28″ long cord, fold them in half and attach them to the inner ring of the wreath ring using cow hitch knots.
Space them out evenly, and then trim the bottoms so they’re nice and even.
I barely trimmed any off of mine because I wanted it to hang down a lot further than the outer layer.
DONE!
I hope you enjoyed this free macrame chandelier pattern!
If you wanted to add some wooden beads or pony beads to this macrame lamp you could thread them onto the longer fringe section.
Or you could add some fun gems or beads using jump rings or a key chain ring to some of the sections.
If you use different colors you could get a totally different look, or you could dip dye the fringe, there are so many options!
I know some of you will want to know if you can make this with different sizes of macramé cords, and basically you’ll want to cut the cords longer if you use thicker cord and shorter if you use thinner cord.
But if you used thicker cords it’ll take less of them to fill up the rings, and if you use thinner cords it’ll take more of them to fill in the rings, so it’s kind of tricky to say.
When you’re working on round macrame projects like this, the best way to figure out how many cords you’ll need is to figure out one section that fills in, say, 1/6th of the ring, and then just repeat that around 6 times.
I hope that makes sense!
I love this and plan on making it. Wonderful job on the instructions. Thank you so much?
I haven’t done macrame for a very long time but I love this. I used to to plant hangers and stuff with cotton clothes line.
I love that you did one on a macrame chandelier light I purchased one along time ago on amazon for like 19$ and it is blue since then I’ve been unable to find one that’s not plain white and not kind of spendy. So I got a bunch of supplies to start doing my own macrame stuff I’ve done macrame in the past but minimal just the twisted braid don’t know the name so still learning. Anyways thank you can’t wait to try this one out and I also purchased your e book awhile back so I can learn. I would love love love it if you could do one on a lotus flower wall hanger and possibly half mandala wall hanger and a full mandala wall hanger. or anything bigger that’s a wall hanging of a mandala/lotus I’ve been wanting to make one since I started getting back into macrame.
Love this! What’s the finished length of this chandelier? I need one that’s 36” and wondering if I need to add or decrease the length of each rope in the pattern. Thanks so much.