Diamond Macrame (Wall Hanging) Plant Hanger | Tutorial & Video!
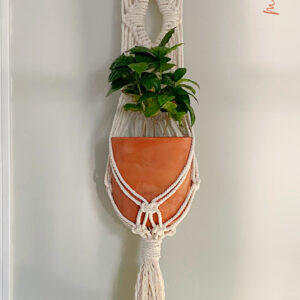
Learn how to make this macrame wall plant hanger with a beautiful open diamond design in this step by step tutorial!
This wall hanging planter is easy enough for beginners and beyond.
Don’t forget to pin this for later!

(This post may contain affiliate links. If you click one and make a purchase, I may receive a small commission at no extra cost to you. Read the disclaimer here. Thank you for your support!)
If you’re looking for a new macrame plant hanger design, this wall hanging version is really modern and unique.
The diamond knot pattern is made using a variation of the vertical lark’s head knot. It’s really quick and easy to learn and you can apply the pattern to lots of other macrame projects as well!
The other knots used in this macrame plant hanger are the lark’s head knot, square knot and wrapping knot.
If you’re new to macrame and want to wrap your head around those knots first, check out this post with all the beginner macrame knots you’ll need to know to get started.
Looking for More Free Macrame Wall Hanging Patterns?
Check out this list of 19 free macrame wall hanging patterns with video tutorials and written instructions!
Want a printable, AD-free version of this pattern? Click here to see it in my shop!
Supplies You’ll Need
- 3 mm twisted 3-ply macrame rope in the following lengths
- 10 cords @ 134″ long (about 2 arm spans if you prefer to measure like I do)
- 1 cord @ 50″ long (for wrapping knot)
- 8″ wooden dowel (I used a 3/4″ dowel – and I started with a 12 inch one and cut it down with a hack saw)
- Cute potted plant (the pot for mine is 5″ in diameter and 5.5″ tall)
- Sharp scissors
Diamond Macrame Wall Plant Hanger Tutorial //
Check out the video tutorial below, and scroll a little further for the written tutorial!
Step 1: Attach your cords to the dowel
Take one of your 134” cords, fold it in half, and attach it to the dowel with a lark’s head knot. Repeat that with the rest of the 134” cords and space them out evenly.
Secure your dowel to a garment rack with S hooks, or you can tie a cord to each end and hang it on a nail in the wall or a door knob.
Step 2: Diamond vertical lark’s head knot pattern
Left side of the diamond
Grab the two center cords. Cross the left cord over the right in the shape of a number 4, wrap the end around and bring it through the loop to create a half hitch knot around the right cord.
Now, drop the right cord, pick up the next cord to the left and repeat that process again, tying a half hitch knot with the left most cord around the right most cord.
Hold those two cords together, grab the next cord to the left and tie a half hitch knot around the two cords using the left most cord.
Hold all three cords together, grab the next cord to the left and tie another half hitch knot around the three cords.
Repeat this pattern until you make it to the last cord on the left.
Now, you’re going to use the same cord you used for the last half hitch knot.
This time instead of crossing it in front of the bundle in the shape of a four, you’re going to bring it behind the bundle and wrap it around the other way to the front.
It’s still a half hitch knot, but it’s reversed from what we did before this.
You’re going to do that with each cord going back to the center. That will complete one side of the diamond.
Right Side of the Diamond
Now we’re going to repeat that whole process over on the right side.
So grab the two cords closest to the center, wrap the right most cord around the left most cord in the shape of a four (in front of the cord, like the first half of the left side) and bring the end around and through the loop.
Hold those two cords together, grab the next cord to the right, and repeat. Do that pattern until you reach the last cord on the right.
Now, using the same cord you did for the last knot, hold it behind the bundle of cords in a 4 shape, wrap it around and bring it though the loop.
Repeat that for each cord going back to the center, just like we did on the left side, but going in the other direction.
Connect the Diamond
Take the right center cord, wrap it around the left center cord in a 4 shape and make a half hitch knot to connect the two sides.
Repeat!
Repeat the diamond pattern two more times the same way, and then we’ll move on to the plant pot holding part.
Step 3: Tie square knots to hold plant pot
Drop down about 5 inches from the last diamond. We’re going to tie a row of four square knots straight across.
Skip the first 2 cords and tie 4 square knots, then skip the last 2 cords.
Now, grab the two cords you didn’t use on each side, and flip the cords toward the center on both sides and then tie a square knot about an inch or so below the row of square knots we just tied.
Use the left two cords from that square knot and the next two cords to the left to tie a square knot about an inch and a half below the knot you just tied in the center. It’ll be on the left side.
Then do the same thing on the right side.
Flip your plant hanger around and continue tying square knots all the way around at the same level as those first two. There will be 5 square knots all together.
Step 4: Wrapping knot
Now you’re going to grab your 50” piece of cord and use it to tie a wrapping knot around all the cords under that last row of square knots.
Step 5: Cut the fringe and finish
Decide how long you want the fringe to be and cut off the excess. I made mine about 5” long or so.
Then if you want you can unravel the ends of the cord, or you can leave them as they are. It’s up to you!
Done!
I hope you enjoyed this macrame wall plant hanger tutorial!
If you make one of these, please share a picture over on Instagram and tag me @marchingnorth so I can see it. I love seeing all of your awesome creations!
More Macrame Projects and Tutorials
- How to Make Macrame Feathers (3 Ways!)
- Macrame Clutch Purse | Free Pattern & Tutorial!
- Macraweave Wall Hanging | Free Pattern & Tutorial!
- How to Estimate Macrame Cord for Projects (Ultimate Guide!)
Thank you for this demo/ tutorial. Very easy to understand. I’m just getting back into macrame again after a very long hiatus…….. Love your work.
Your tutorial is great! Is there an easy way to adjust to have the hanger fit a 8 inch pot?
Still so new to this and love you make it easy to learn.
Thank you,
Amy
Thank you, your tutorials are very detailed and easy to follow. I teach at a senior center and have been requested to teach them how to make macrame plants hangers. I did several back in the 70″s, so I needed a refresher course. May your site continue to grow and the blessing keep coming.