How to Make a Boho Fall Floral Macramé Wreath for Your Front Door (+ Video!)
Fall is hands down my favorite time of year.
There’s just something about the temperature dropping and leaves falling that makes me want to make all the fall themed cozy things.
Don’t forget to pin this for later!
(This post may contain affiliate links. If you click one and make a purchase, I may receive a small commission at no extra cost to you. Read the disclaimer here. Thank you for your support!)
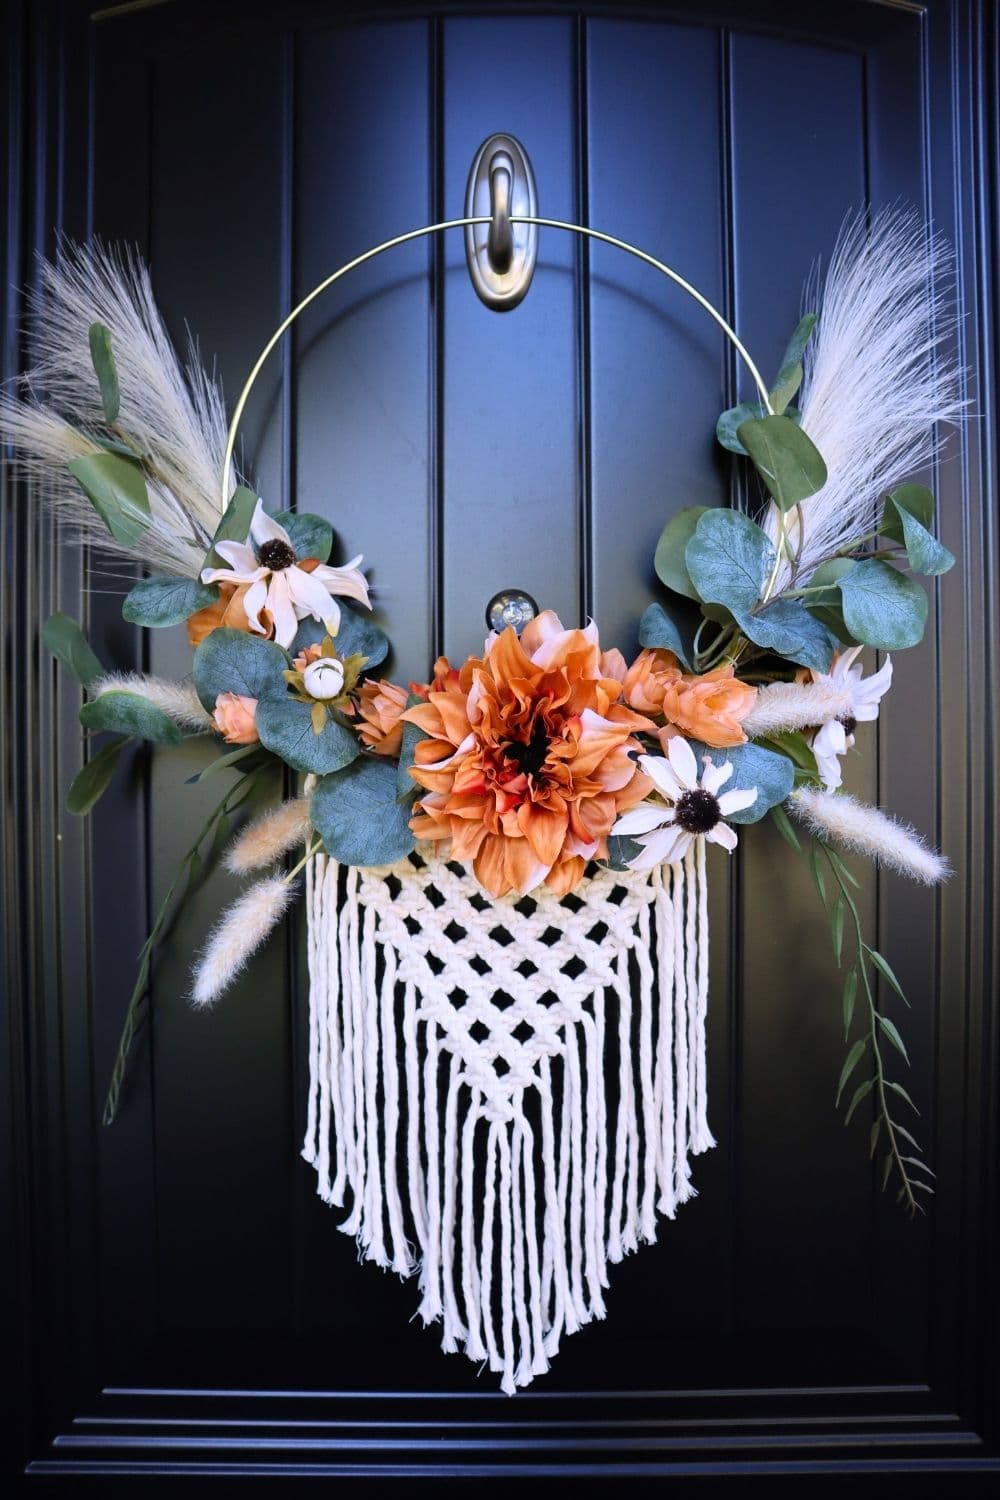
In today’s tutorial, we’re combining two of my favorites – macramé and florals – to make a gorgeous boho fall wreath that’s perfect for your front door or even your dining room wall.
This design has a simple macrame base, lots of soft fringe, and some fun, boho pampas grass, eucalyptus, daisies and sunflowers that bring all the autumn vibes without going over the top.
It’s easy to customize, beginner-friendly, and looks so pretty hanging up (I kind of want to leave mine up all year long, lol).
Below, you’ll find the free pattern and the video tutorial for this fun project.
If you’re new to macrame and want to learn the basic knots before you dive in, I can help you with that!
Also, be sure to sign up below for my free printable PDF knot guide so you can keep it handy while you’re working on your projects!
More Free Macrame Patterns!
Looking for more macrame ideas? I’ve got lots of them to choose from! Here’s a few to get you started:
- “Auda” Mini Macrame Wall Hanging – Free Pattern and Video!
- Free DIY Macrame Plant Hanger Pattern (Low Key & Tassel Free!)
- DIY Macrame Diamond Keychain (Free Pattern & Video!)
- 5 Boho DIY Macrame Christmas Ornaments
- Macrame Sling Bag (Phone Holder) Tutorial & Video!
Fall Floral Macramé Wreath Tutorial
Supplies You’ll Need
- 12″ metal hoop
- 5 mm single strand cotton string
- Order from Niroma Studio
- Order from Right Rope (10% off first order when you click my referral link!)
- Fall faux florals – you’ll want a mix of greenery and fall flowers. 3 different greenery options and 3 different coordinating florals is what I went with, plus some pampas grass for the sides.
- Floral wire and/or tape
- Hot glue gun
- Wire cutters
- Sharp Scissors
Cut List
- 20 cords @ 80 inches each (203.2 cm)
Video Tutorial
Check out the tutorial video for this macrame bookmark on my YouTube channel, and don’t forget to subscribe!
Macrame Section
Row 1
Fold one cord in half so the ends line up evenly. Attach it to the metal ring using a larks head knot.
Repeat this step with each of the remaining cords until all 20 are attached to the bottom of the metal hoop.

Now we’re going to tie our first row of little spiral knot chunks going across.
(I know spiral knot chunks sounds kinda weird, but that’s what I’m going with, lol.)
I started in the center (you don’t have to, you could just start on the left or right side), and found the center 8 cords. Then I used the 4 right cords to tie 4 right facing spiral knots.
To tie a spiral knot, bring the right cord in front of the crossed over cord, behind the 2 center cords and through the loop on the left, then tighten it up.
Repeat that 3 more times, so you have 4 knots stacked on top of each other. It’ll start to spiral to the right.
Twist the knots over to the right so the working cords are on opposite sides from where they started.
Repeat that process with each set of 4 cords going all the way across the ring. You’ll have 10 knot chunks all together.
Row 2
Before we start this row, make sure you’ve got all your knot chunks twisted to the right, so the working cords are on opposite sides from where they started. (This is important!)
Starting over on the far left side, skip the first 2 cords, then use the next 4 (it’ll be 2 from the first chunk and 2 from the second chunk) to tie another spiral knot chunk the same way as we did in row 1.
It’ll be right in between and under the 2 chunks from the previous row.
Repeat that going across the row, and you’ll skip the last 2 cords as well.
Rows 3 – 10
Continue doing this for each row, skipping 2 more additional cords on each side until you finish 10 rows.
Your last row will be 1 spiral knot chunk right in the center.
Cutting the Fringe
Now we just have to cut the fringe down.
Yes there will be a bit of waste cord, but you can always use it for macrame feathers.
Adding the Florals
OK, this part is much more free form, and you can change it up however you like.
I’ll show you what I did, but don’t feel like you have to copy me exactly. Have fun with it!
I started with a base of greenery, and went with these eucalyptus stems to start.
I attached them to the ring using floral wire.
My floral wire was white, which blended in pretty well with the macrame, but I honestly would rather of used green wire.
(I thought I had green wire but I couldn’t find it and I didn’t want to go back to the craft store. You know how it goes.)
Next I added these drapey long leafy sections. I honestly don’t know what this is supposed to look like, but I like it.
Also, I added a bit more eucalyptus to fill that part out a bit more.
Alright, next up is the wheat stems. I tried to keep them from being too matchy-matchy on both sides. I really love how fall-ish these are.
Not the best picture (definitely watch the video to see it more clearly) but I added these pampas grass floofs on the sides.
They’re on the back side going up the sides of the ring. Later, I’ll glue these down a little more securely.
Alright, now it’s time for the fun part! Adding in some pretty orange flowers.
I cut them off their main stem with wire cutters and stuck them in where I could. I secured them with more floral wire.
Next up I added in these pretty cream colored Daisies. I really like how these turned out.
I had some other white Daisies but I didn’t end up using them. They just felt too stark white and didn’t match the vibe.
By the way, the floral wire was getting a little crazy on the back by this time, so I had to go in and neaten it up. Also, I kept cutting myself with the wire because it was all disorganized.
Be more careful than me! lol
And hey, if you don’t even want to use floral wire, just use hot glue. I mean, then you have to avoid getting burned, so you’re trading one danger for another, but you have options.
Just be careful either way, OK?
Last but not least, I hot glued on the main focal flower (and it’s baby) into the center of the wreath.
Since I popped it off the stem, there wasn’t really anything to attach wire to so I had to go the hot glue route. It probably would of been easier to just do that the whole time, but I didn’t…
It’s hard to tell in this picture, but there are 2 center flowers. The main one facing the front, and then a little guy on the upper left.
Isn’t it so pretty?! I mean, I’m not always a big fan of faux florals, but in this case I think it works.
Since I had the glue gun out, I went ahead and attached the side floofs to the ring so they would stay in place.
I made sure you couldn’t see the glue from the front, so just a dab.
I think it turned out so good!! Now it’s time to stick it on the front door for everyone to see.
I think it looks great on our black front door! It blocks the peep hole a bit, but oh well, lol.
Hopefully the spiders will leave it alone and not make webs all over it.
(We have a big spider out there that keeps making crazy big webs.)
But back on topic, I love how this looks so much! What do you think?
In Conclusion
I hope this project inspires you to grab some cord, a few pretty faux florals, and make your own cozy fall macramé wreath to stick on your front door!
This project is the perfect way to kick off autumn, and I love how every version turns out a little bit different depending on the flowers and colors you choose.
If you make one, I’d love to see it! Snap a picture and tag me over on Instagram @marchingnorth!
Want to check out some more free macrame patterns?
I love knitting and crocheting. recently I been quilting. and now looking to do macrame again after years of not doing it.