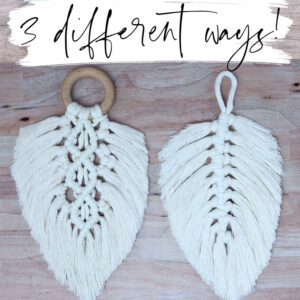
Macrame Feather DIY (3 Different Patterns!)
Macrame feathers are a trendy way to spruce up any macrame project. They can be used as a beautiful boho accent in macrame jewelry, key chains, wall hangings, home decor, or even macrame furniture. Plus, a DIY macrame feather is a great way to use up scrap cord!
This post will show you three easy ways to make beautiful macrame feathers with step by step instructions.
As an added bonus, I’ve included a link to get a free set of printable templates! You can use them to perfectly cut your feathers the easy way.
Want to remember this? Post this Macrame Feather DIY tutorial to your favorite DIY Pinterest board!

(This post may contain affiliate links. If you click one and make a purchase, I may receive a small commission at no extra cost to you. Read the disclaimer here. Thank you for your support!)
Join the Macrame for Beginners and Beyond Facebook Group!
If you’re new to macrame or if you’ve been knotting for a while, connecting with other macrame lovers is always a great idea!
Come check out our Facebook group, Macrame for Beginners and Beyond. It’s a friendly community where you can ask questions, get inspiration, and share your awesome work with other macrame lovers! Come join the conversation today!
Best Macrame Cord for Feathers
Macrame feathers are one of my favorite ways to use up leftover cord. When you make a wall hanging, plant hanger, or anything else, you’ll inevitably end up with some offcuts.
Because of that, you’ll likely end up with a bunch of different pieces of rope that you need to use up. Luckily, you can make feathers with any cord you want!
You can even mix different colors and textures to get a different look. For instance, use some pieces of single twist string mixed with three strand rope.
As long as the pieces of cord you’re using are about the same diameter, mixing them up is the best way to change up your feathers.
The cord I’m using in the tutorial below is 4 mm single strand cotton string. It works really well because it brushes out into beautiful straight fringe and holds it’s shape well.
If you use 3 strand twisted macrame rope, you can brush it out and it makes a wavy fringe that’s really pretty.
You can also use cords made of hemp, jute, or synthetic materials, but cotton cord is my favorite.
Related: How to Set Up Your Perfect Macrame Workstation!
How to Make Different Sizes of Macrame Feathers
You can increase your feather length by using a longer center cord and adding more cords down the length of it.
To make a large feather, just use a different size of cord! Or try doubling up smaller rope if you have a ton of it on hand.
If you want to make really large macrame feathers, you might want to put felt on the back of them so the fringe stays put. Fabric stiffener helps, but felt helps even more.
Check out this tutorial where I show how to add felt to the back of your DIY macramé feather.
There are other kinds like 3 ply macrame rope and braided macrame cord. You can also find cords made of hemp, jute, or synthetic materials.
The single strand cotton macrame cord is one of the best ones to use for wall hangings and especially for any projects that require you to brush out the fringe.
You can also find it in lots of other colors, so feel free to experiment and make different colors of feathers. I have plans to try dip dying some of mine with Indigo dye, I’ll let you know how it turns out!
Alright, let’s get started!
Related Macrame Posts
- Macrame for Beginners (Ultimate Guide!)
- Basic Macrame Knots for Beginners
- Must Have Macrame Cord & Supplies
- How to Make a Macrame Plant Hanger (Ultimate Guide!)
- 12 Free Macrame Wall Hanging Patterns!
Supplies You’ll Need to Make Macrame Feathers
Below is the supply list you’ll need to make the same feathers I made. You can really use whatever lengths of cord you want to get longer or shorter feathers.
Don’t feel limited by this list! You can use small cord in short lengths to make macrame feather earrings and jewelry, or use thicker cord with longer lengths to make big wall hangings. Plus you can add a wooden bead, pieces of yarn, and whatever else you want. The choice is yours!
- scrap macrame cord (mine was 4 mm single strand cotton, but you can use whatever you have) in the following lengths:
- — 1st and 2nd feathers —
- 1 piece @ approx. 20″ long (for the center cord)
- a bunch of pieces @ approx. 9-11″ long
- — 3rd feather —
- 3 pieces @ 44″ long
- 16 pieces @ 10″ long
- — 1st and 2nd feathers —
- 2″ wooden ring (for the 3rd feather)
- sharp scissors
- pet slicker brush (aka cat brush, or you can use a comb)
- stiffening spray, starch or hairspray
- cork board and pins or tape to hold your work to your desk
- feather shape templates (grab yours below)
Macrame Feather DIY Tutorial
In this tutorial, I’m going to show you 3 different ways to make macrame feathers.
The first two feathers start off the same way: you take the 20″ piece of cord, fold it in half, and lay it on your workspace with the loop end facing up. Go ahead and have that done and then we’ll move on to the next step.
I’m also going to show you how to brush out, stiffen, and trim your feathers at the end after I show you the three different ways to make them. That part is the same for all the feathers.
Macrame Feather #1
This feather uses one basic knot: the lark’s head knot.
For the first knot, take one of your short pieces of cord, fold it in half and lay it over the center cords with the loop side facing left. You’ll want it to be a few inches down from the top of the center cord
Wrap it around the cord and bring the ends through the loop to create a larks head knot. The ends will be facing the right side.
Repeat that with the next short cord, but do it in the opposite direction so the ends are facing the left side.
Continue tying knots back and forth until your feather is the length you want.
Note: You can also reverse your lark’s head knot to make a cow hitch knot, which looks slightly different. Or just flip your feather over when you’re done!
Related: Unique Macrame Knots and Patterns
Macrame Feather #2
Start by folding one piece of cord in half and laying it under the center long cord a few inches down from the loop.
Then grab another short piece, fold it in half, and lay it over top of the first piece but with the folded end facing in the opposite direction.
Thread the ends of each piece of rope through the loop of the opposite piece, and pull the ends to tighten it around the middle cords. This will create a square knot.
For the next segment, you’ll do the same thing but in reverse.
Repeat that over and over down the spine of the feather until it’s as long as you like.
Related: How to Estimate Macrame Cord Length (the Easy Way!)
Macrame Feather #3
For this feather, you’ll need to secure your work to a cork board with t-pins, or tape it down to your desk.
Grab the 2″ wooden ring and 3 pieces of 44″ long cord.
Fold each piece of cord in half and attach it to the ring using a lark’s head knot. Then pin it down to the board.
Take 2 pieces of 10″ long cord and attach them on the top of the right most cord using lark’s head knots.
Repeat that on the left side with two more pieces of cord.
Now, you’re going to tie diagonal double half hitch knots using the two center cords as the filler cords.
If you don’t know how to tie the double half hitch knot yet, that’s OK! Check out this tutorial that shows how to tie double half hitch knots nice and slow for beginners.
Tie two double half hitch knots on the left side going down and to the left.
Tie two double half hitch knots on the right side going down and to the right.
Tie two double half hitch knots on the left side going down and to the right.
Tie two double half hitch knots on the right side going down and to the left.
Then connect the two sides together with one more double half hitch knot going down and to the left.
Attach 3 of the 10″ cords to the right and left cord with lark’s head knots.
Now you’re going to repeat the double half hitch knot pattern and continue adding short cords on the side until you have 3 diamonds and 16 pieces of cord have been attached to the sides.
Related: How to Add More Macrame Cord When You Run Out
Brushing, Stiffening, and Cutting the Feathers
OK, now for the fun part!
First, make sure you grabbed your free template by the supply list to make this super easy. Or you can just wing it if you want. You do you!
Use your wire pet brush to brush each side of the feather really well. You’ll want to brush the front and the back.
Then, spritz your stiffening spray, spray starch, or hairspray all over your feather. Brush it out again and let it dry. You’ll want to repeat that for the other side as well.
Cut out whichever shape of the feather template you prefer and center it on your brushed out feather. I used a pair of scissors to cut mine, but if you have a rotary cutter and a self-healing cutting mat it’ll be even easier.
Carefully cut around the template. It won’t be perfect just yet (unless you’re using the rotary cutter, then it might.)
Continue the brushing process (try not to spend all night brushing it, it’s easy to do!) and give it a final trim.
Now your macrame feather is ready to use!
If you want to add felt to the back, you can do that now. It’s best to do that if you’re using your feather for a macrame plant hanger or wall hanging that’ll be flat against the wall.
In Conclusion
I hope you enjoyed this macrame feather DIY tutorial!
If you make one of these fun feathers, post a picture on Instagram and tag me @marchingnorth. I love seeing your creations, it seriously makes my day!
Related Posts
- Macrame Crescent Moon Dream Catcher Tutorial (with Feathers!)
- How to Wrap Stones and Crystals with Macrame Netting
- 6 Free Macrame Plant Hanger Patterns
- DIY Macrame Lamp shade (Video & Tutorial!)
- Macrame Clutch Purse (Video & Tutorial!)
How do you attach them to something like an antler without it turning sideways with the way you did these? Thanks!
thanks so much for the easy to understand directions and pictures they are very helpful
I tried making the feathers by looking at the pictures and no success. So, I am going to try your instructions and hope that when I am finished they will look a little like yours. I think you are a great instructor and I will be able to follow your instructions with no problems. I am 70 years old and macramed back in my 20’s, loved it then and I know I am going to love it now!
Very informative
Thank you so much for you videos! It’s easiest for me to learn this way and they are easy to follow as a beginner.
I want to make an angel and the pattern calls for 3mm string, what is the difference between 3mm cord and 3mm string. I am new to this craft so need some advice.
Thank you so much for the detailed instructions on making the Feathers!! I appreciate all the free help and patterns you have shared. I’m just re-learning macrame (did it back in the 70’s??) and then haven’t done any until now. Your sight has been wonderful to me! 🙂 Keep up the great work!!
Peggy