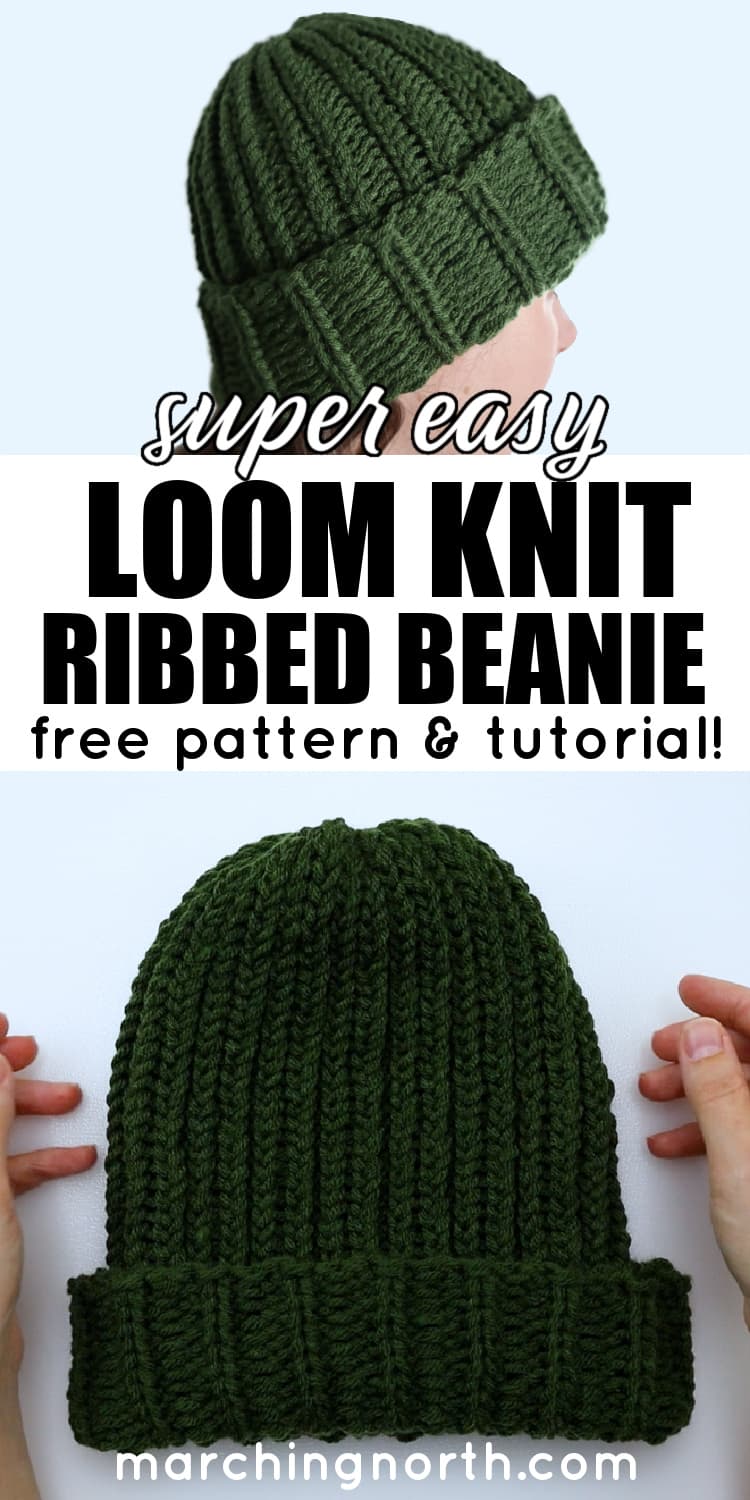
Easy Ribbed Loom Knit Beanie (Tutorial for Beginners!)
Learn how to make this super easy ribbed loom knit hat in today’s step by step free pattern and video tutorial!
Want to remember this? Post this Loom Knit Hat tutorial to your favorite DIY Pinterest board!
(This post may contain affiliate links. If you click one and make a purchase, I may receive a small commission at no extra cost to you. Read the disclaimer here. Thank you for your support!)
Loom knitting is such a fun way to make hats, and once you get the basics down it’s a piece of cake.
I like to use a large gauge loom with bulky weight yarn because it works up nice and fast, but you can also use two strands of worsted weight yarn held together like I did for this pattern.
The finished hat is very warm, looks great, and makes a great gift for men, women, kids, pretty much anyone!
Also, if you like to make hats to donate to charities or homeless shelters, this is a great pattern for that.
Making this hat in different sizes
The pattern below is for an adult size hat, but you can easily adapt this pattern to make other hat sizes as well.
Different size looms
If you want to make a smaller hat, you’ll need to use a smaller loom.
Everyone’s head sizes vary, so it’s hard to say for sure what size you need just going by age.
For instance, my kids all have big heads. Lol. And so do me and my husband.
I always would crochet baby hats for them when I was pregnant, and they never fit when they were born.
It was a standard “newborn” size, but no, they just had big heads.
So, for my family, I just use the 48 peg loom for everyone, including my 5 year old.
The hat is a little big on him, but not so much that it isn’t wearable and it still keeps his head warm.
I could use the 40 peg loom for him, but it’s a little snug and he’ll just outgrow it in no time so I figure what’s the point.
So with all that in mind, these are the size hats that each loom makes (approximately):
- 48 peg (that’s what I used for this hat) – adult (or kids with big heads, lol)
- 40 peg – kids, teens, small adults
- 36 peg – babies
- 24 peg – little tiny newborn babies or preemies
Adjusting the hat length
Another way you can adjust the size of the body of the hat is by adding or subtracting rows.
I wouldn’t recommend adding any rows to the pattern below, because it’s just going to get longer and kind of conehead-ish.
But you could reduce the amount of rows if you want the brim to be shorter, for instance.
And if you’re making a hat on a smaller loom, you’ll definitely want to reduce the number of rows.
Figure out how long you want the hat to be, and you’ll just knit rows until you reach that number (without stretching the hat out).
In this free loom knit baby hat pattern, I have a chart that shows the average hat length for babies up to age 12 months.
If you aren’t sure, take a favorite beanie hat you have, unroll the brim so it’s straight and measure from the top of that to the bottom of the brim edge.
That’s the length you’ll want.
More loom knitting fun
You’ll find several free loom knitting patterns on my site! Here are a few other loom knit hat patterns for you to check out:
- How to Make a Loom Knit Hat (all e-wraps with folded brim)
- Striped Loom Knit Hat (fun texture but still super easy!)
- Ribbed Loom Knit Baby Hat (in 2 sizes!)
- Rolled Brim Loom Knit Baby Hat (easiest hat ever!)
Supplies You’ll Need

This loom knitting set works with chunky yarn and is perfect for making hats, gloves, and slipper socks!
- large gauge 48 peg round knitting loom
- loom hook (should come with your looms)
- two skeins of worsted weight yarn
- stitch markers (several)
- scissors
- yarn needle or tapestry needle
- tape measure
- paper and pencil to mark down rows
Loom Knit Hat Video Tutorial
Check out the video tutorial for this hat on my YouTube channel, Yarn Stash with Marching North, and don’t forget to subscribe!
Step 1: Getting ready to knit
Hold your two strands of yarn together and make a slip knot.
Place a stitch marker on one of the pegs (or if you have an anchor peg on your knitting loom, you can use that) and attach the slip knot to the first peg.
Step 2: E-wrap (foundation row step 1)
Working to the right, e-wrap around each peg until you get all the way around.
Don’t pull too tight, you want the yarn to have enough tension that it doesn’t slip off, but not be crazy tight.
Once you finish wrapping, push the loops to the bottoms of the pegs.
Step 3: U-wrap knitting (foundation row step 2)
For the next row, we’re going to u-wrap knit. This will give us a nice, clean edge for the brim of our hat.
Wrap the yarn around the first peg in a counter clockwise motion, making a “U” shape.
Hold it in place while you use the loom hook to pull the bottom loop up over the top loop and off the peg.
Repeat that around for the row.
Step 4: Knit, knit, purl x 50
For the rest of the hat we’re going to follow this pattern: knit, knit, purl.
For the knits, we’ll be doing an e-wrap, and then we’ll do a purl for the 3rd stitch.
Push the loops for the first two pegs down, and e-wrap both of those pegs.
Knit off the bottom loops.
Now to do the purl stitch, you’ll leave the loop at the top of the peg and hold the yarn in front of the peg and under the loop.
Insert your hook into the top of the loop and scoop up your working yarn.
Pull a loop up of the yarn, then grab it with your fingers.
Pull the old loop off of the peg, and place the new loop onto the peg.
Pull the working yarn to tighten it up.
Continue that for the rest of the round, and then make a little tally mark on a piece of paper to mark that row completed.
Now you just have to repeat that 49 more times for an adult size hat, or however many rows you need to do to get your desired length of hat.
Step 5: Bind off
Wrap the working yarn around the loom and cut it to make the tail for finishing off the hat.
Thread the ends onto a yarn needle.
Insert the needle up through the bottom of the loop on the first peg.
Pull the yarn through, and then slip the loop off of that peg.
Repeat that for each peg going around the loom.
Step 6: Close up the hole
Carefully pull the yarn ends to cinch up the hole, but don’t pull so hard that you break the yarn. Acrylic yarn is pretty strong, but you don’t want to accidentally hulk out and break it off.
Use the yarn needle to sew through the stitches surrounding the hole, and then give it another good pull to tighten it up more.
Insert the needle into the center of the hole, and flip the hat inside out.
Pull it again, and then sew under a couple loops near the hole and tie a couple of knots.
Now to make sure the hole never comes undone, sew across the hole and go under a few loops, then sew under the hole, and then above the hole. Tie another knot to secure it.
Now that hole should stay closed!
Step 7: Finishing up
All that’s left to do now is weave in the ends and trim off the excess yarn.
I just whip stitched around some stitches on the inside of the hat and cut the yarn.
Then I threaded the starting tail onto the yarn needle and did the same thing there.
Make sure you’re weaving the yarn on the outside part that will be folded for the brim so it doesn’t show.
Done!
If you want to add a pom pom to the top of your hat, you can do that now. Or you can just leave the hat as is!
Here are a couple of pom-pom tutorials if you want to add one:
I hope you enjoyed this tutorial and free loom knit hat pattern!
If you make one of these, please share a pic over on Instagram and tag me @marchingnorth so I can take a look. I love seeing all of your awesome creations!
How many rows would I do for a newborn? About 6inches long
It makes a difference in the brand of loom one has. 41 peg Kniffty knitter makes too big of a hat so I use the 36 peg loom. I even tired it twice using chunky yarn.
Hi Crystal, i am not much of a knitter but loved the loom idea and wanting to make hats for soldiers. I have a very specific pattern for needles and wanted to know if this could be done on a loom. Would you be able to look and see?
Loosely cast on 96 stitches. Join work, place
marker, and work in K2 P2 rib until work
measures 9.5 inches / 24 cm.
Shape crown
(Here you begin a series of decrease rounds.
When you find the hat getting too small to
work on the circular needle, switch to double
pointed needles.)
Round 1: K2, P2tog to end of round. 72
stitches remain.
Round 2: K2 P1
Round 3: K2tog, P1 to end of round. 48
stitches remain.
Round 4: K1, P1
Round 5: K2tog to end of round. 24 stitches
remain.
Round 6: Knit
Round 7: K2tog to end of round. 12 stitches
remain.
Round 8: Knit
Round 9: K2tog to end of round. 6 stitches
remain.
Break yarn, leaving a 6-inch / 15 cm. length.
With a tapestry needle, thread the yarn through
the remaining 6 stitches (pull tight).
Hi Gayle,
I’m not sure how to do decreases with the knitting loom, I’m sure there’s some way to do it, but I haven’t figured that out yet. I do have a loom knitting beanie pattern that’s ribbed and more like a regular hat right here: https://www.marchingnorth.com/easy-ribbed-loom-knit-beanie-pattern/
Thanks for stopping by! 🙂