Easy Beaded Crochet Necklace (Free Pattern & Video Tutorial!)
Learn how to make a beautiful beaded necklace (or bracelet) in this free crochet pattern and video tutorial!
Recently, one of my awesome subscribers asked me if I would please do a tutorial for a crochet beaded necklace.
The thought hadn’t crossed my mind before that, but I’m so glad she made the suggestion because this was such a fun project!
Want to remember this? Post this Free Beaded Crochet Necklace tutorial to your favorite DIY Pinterest board!
(This post may contain affiliate links. If you click one and make a purchase, I may receive a small commission at no extra cost to you. Read the disclaimer here. Thank you for your support!)
This lovely necklace pattern is so simple and fast, and you can use different colors of thread and all kinds of different shapes and sizes of beads to make it your own.
It’s the perfect easy crochet necklace pattern for spring or summer when you’re sick of making warm things and a great way to use up some random beads you have laying around your craft room.
Since these necklaces work up so fast, they make a great gift for anyone who would appreciate a pretty necklace that’s comfortable to wear but fancy enough for special occasions.
All you have to do is make simple chains and string on a bead. I just love a quick project like that, don’t you?
Even if you’re new to crochet, you can make one of these colorful necklaces. It’s a perfect pattern for all skill levels!
I don’t normally wear necklaces very often (after years of having young children hanging off of me, I got out of the habit- lol), but this colorful necklace is one that even I love wearing.
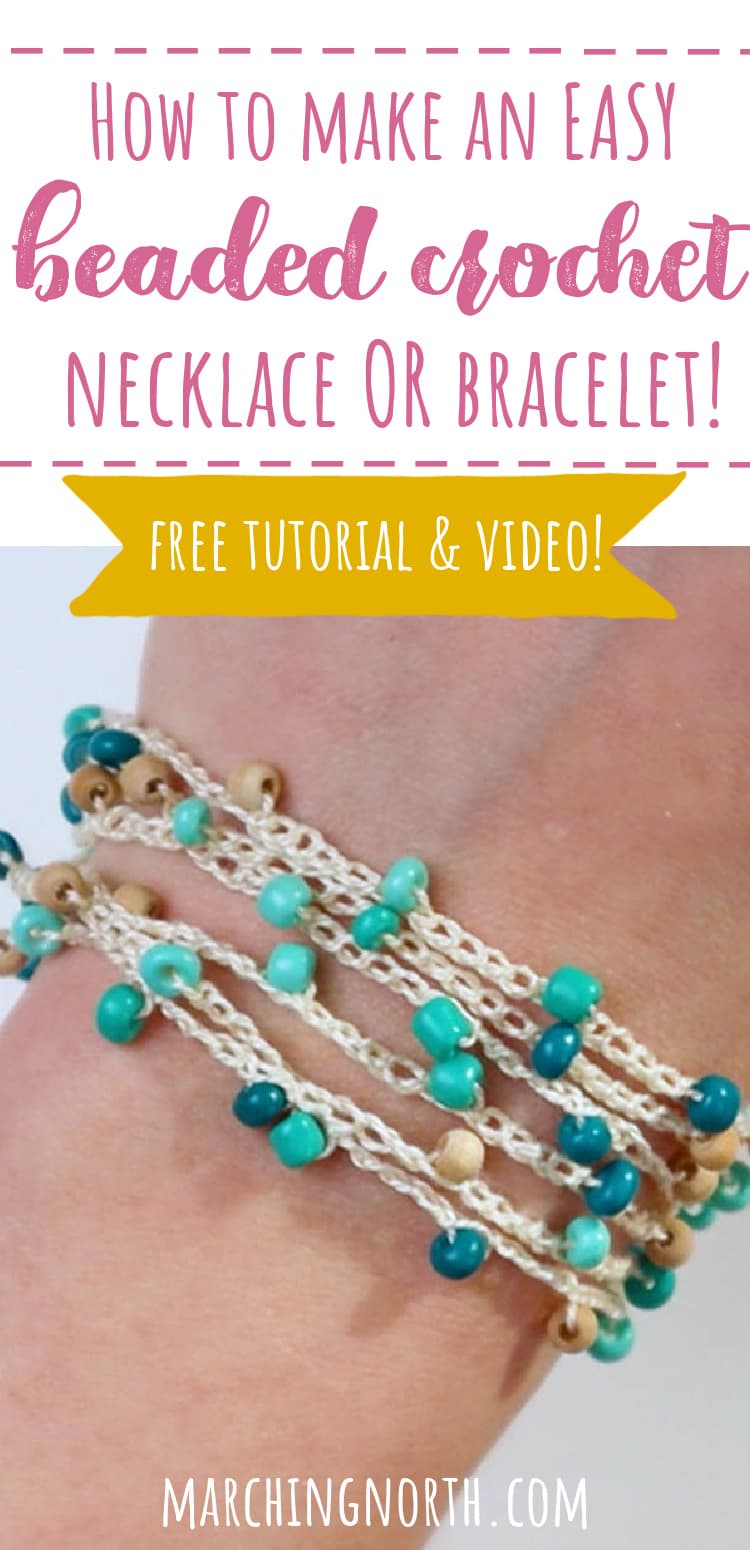
Bonus points: you can loop it over your wrist a bunch of times instead and wear this as a crochet bracelet instead!

Or you could add less beads and make crochet bracelets that only loop over your wrist a few times. Options!
When I was researching free crochet necklace patterns, I saw several different closure ideas. I decided on a simple loop one one end and a large bead on the other to keep things nice and easy.
You could easily swap that out for a lobster clasp or something like that if you want.
Alright, let’s get started on this fun crochet project!
Supplies You’ll Need
- 76 small assorted beads (I used assorted teal glass seed beads size 6/0 and some small wooden beads about the same size)
- 1 larger bead for the closure (I grabbed a strand of large beads about 1/4″ in diameter)
- 1 spool of DMC perle cotton embroidery floss in ECRU or color of your choice
- needle that will fit through your beads
- 2.25mm crochet hook
- scissors
- craft glue (optional)
Beaded Crochet Necklace Pattern
Skill Level: Easy Beginner
Be sure to subscribe to Yarn Stash with Marching North so you don’t miss any new video tutorials!
Step 1: Thread on the beads
Unwind a couple of feet of thread from the spool but leave it attached. Thread your needle onto the end.
Thread it onto your needle and put on about 76 beads. You can use more or less, but that’s how much I used to get a 48″ long necklace.
Once you get all the main beads on, thread one larger bead to use as the closure.
Step 2: Crochet the chain
Remove the needle from the thread, and grab your crochet hook. Attach the thread to the hook using a slip knot.
Slide the first bead up to the hook. This will be the large bead.
Yarn over and pull through the loop to make 1 chain. Now the large bead is attached.
Chain 6.
Slide the next bead up to the hook. Chain 1 to attach the bead, and then chain 5 more times.
Add another bead and repeat that process, making 5 extra chain stitches in between each bead. You’ll do this until all the beads are attached.
Step 3: Make the loop closure
After you attach the last bead, chain 16 times.
Count back 10 chains and slip stitch into that chain. Then slip stitch into the next 3 chains.
Cut the thread leaving a tail a few inches long. Tie a knot and weave the end up through the chain. Cut the excess thread.
If you want, you can add a drop of glue to the knot to make it more secure.
Step 4: Finish the other end of the necklace
Move over to the other side of the necklace where the large bead is.
Put the thread through your needle, tie a knot, and weave the end through the chains.
Cut the excess thread. Again, you can add a drop of glue to the knot if you want. (I didn’t and mine seems to be holding up fine.)
Here’s how it will look when you thread the large bead end through the loop to close the necklace. So simple but it works!
Done!
I hope you made this pretty crochet necklace, and if you did, please share a picture over on Instagram and tag me @marchingnorth so I can take a look.
Seeing your awesome creations is so much fun and really makes my day!
More Free Crochet Patterns