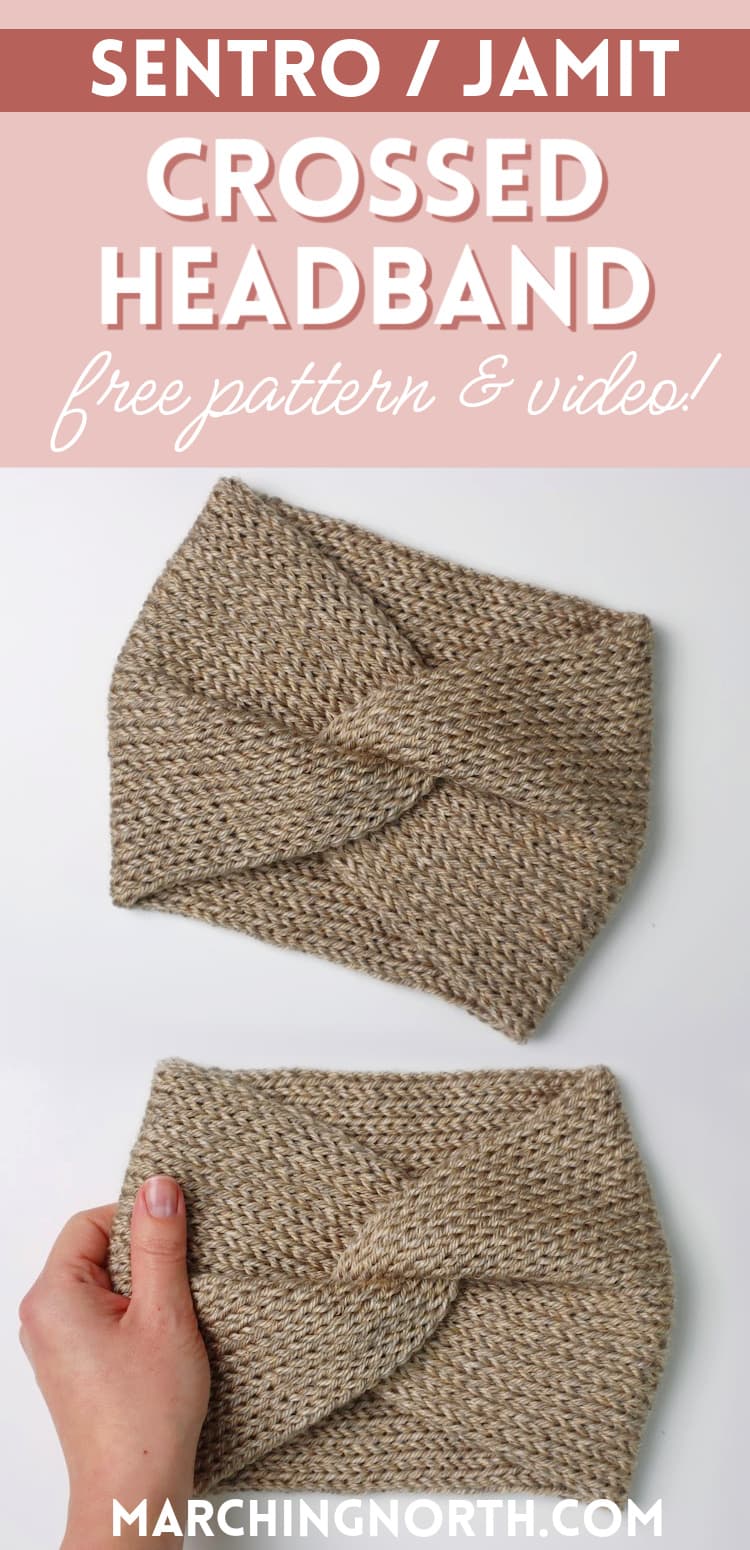
Free Twisted Knitting Machine Headband Pattern (Sentro, Jamit, or Addi)
Learn how to make a cute, cozy and EASY twisted headband on your circular knitting machine in this step by step written pattern and video tutorial!
Want to remember this? Post this Twisted Knitting Machine Headband tutorial to your favorite DIY Pinterest board!
(This post may contain affiliate links. If you click one and make a purchase, I may receive a small commission at no extra cost to you. Read the disclaimer here. Thank you for your support!)
Knitting machines are awesome for things like beanies, ear warmers and headbands because you can make them so fast and they turn out so nice and professional looking.
Even if you’ve never touched a pair of knitting needles, you can use a circular knitting machine to make your own colorful twist knit headbands!
This free knitting pattern is perfect to make headbands for yourself, to give as last-minute gifts, or to sell in a craft show or spring vendor market.
Best Yarn for Sentro and Jamit Knitting Machines
For this pattern, I used Lion Brand Heartland yarn in the color Grand Canyon.

This is one of my favorite yarns to use with my circular knitting machine and it’s perfect for knit headband patterns.
It’s super soft, comes in lots of lovely colors, and it flows through the knitting machine easily and without a lot of headaches.
This knitted headband is so comfy with Heartland yarn and it isn’t itchy or scratchy at all.
Heartland Yarn by Lion Brand is wonderfully soft and it comes in beautiful colors inspired by national parks and nature. It's 100% acrylic and a great choice for all kinds of projects.
Some other great yarns to use with a Sentro knitting machine include:
- Caron Simply Soft
- Lion Brand Pound of Love (knit a bunch of headbands without the extra cost!)
- Yarn Bee Soft and Sleek
Using Waste Yarn with Your Knitting Machine
For this pattern, we’ll be doing the waste yarn technique at the beginning and end of the headband knitting process.
This is a simple way to make sure the ends of your knitting look nice and neat, and it’s really easy to cast off and finish the ends of the headband without dropping any stitches.
All you have to do is use waste yarn to knit the first 5 rows, switch to your main color, and then switch back to waste yarn for the last 5 rows.
You can use any leftover yarn you have that’s the same weight as the main yarn you’ll be using.
We’ll be using worsted weight yarn for this headband, so you’ll want your waste yarn to be worsted as well.
I recommend using a contrasting color so it’s easy to tell which stitches are which. That’ll make the assembly process go a lot smoother!
You won’t need much yarn for the waste yarn, and you can reuse it if you manage to pull it out at the end without having to cut it.
Supplies You’ll Need
- 1 skein Lion Brand Heartland yarn (Yarn weight: worsted or size 4)
- 48 peg circular knitting machine (mine is a Jamit Sentro knockoff)
- Yarn needle or tapestry needle
- Crochet hook (3.5 mm or 3.75 mm)
- Waste yarn (this is a good use for some longer scrap yarn pieces)
Notes
Finished size: Adult (about 22″ to 24″ head circumference)
This headband stretches a LOT.
As written, this pattern is sized to fit an adult with about a 22″ to 24″ head circumference. However, this headband stretches a LOT, and will fit smaller heads as well.
As I write this, my 4 year old son is testing it out and it’s perfectly cozy on him, but it’s a little too wide so it looks like of funny.
The only thing I would change if you’re making it for a child is to reduce the amount of rows so it’s not too wide.
For a little kid (like my 4 year old), you could reduce the number of rows to about half, so maybe 45 to 50 rows would be good.
For older children, I’d probably go for 70 or 80 rows, depending on how you want it to fit.
To customize the fit, measure how wide you want the headband to be and knit rows until it’s twice as long as your measurement and you’ll be good!
NOTE: I have recently updated this pattern to make it a little bit larger because some people found it was too tight as written, and I agree.
After retesting a few times, I think 95 rows is perfect for an adult sized headband if you have a larger head (like me, at about 23″).
If you want to make one a little bit smaller, I’d do anywhere from 85 to 90 rows.
Originally, the pattern said to do 75 rows, which did fit me but was pretty snug. 95 rows fits more comfortably.
Check out the video tutorial on my YouTube channel Yarn Stash with Marching North, and don’t forget to subscribe!
Step 1: Cast on & first 5 rows
Grab your waste yarn.
Turn the crank of your knitting machine until the white hook is at the front and in the up position.
Wrap the waste yarn around the white hook going to the left. This will be the first stitch.
Start cranking and bring the yarn behind the next hook, in front of the next, and continue going back and forth like that all the way around the machine until you get to the hook just to the right of the white hook.
Make sure the yarn is under the plastic part that’s between the hooks, and thread the yarn into the yarn holder slot.
Thread it into the center hole of the tension gauge and begin cranking the 2nd row.
Knit 5 rows with the waste yarn. Cut the waste yarn and place the end in the center of the knitting machine.
Step 2: Knitting the headband
Grab the main yarn, place the end in the center of the knitting machine and thread it into the yarn holder and center hole of the tension gauge.
Knit several stitches, and then loosely tie the waste yarn end and main yarn end together in a half knot.
Continue knitting for 95 rows with the main yarn.
When the headband tube starts to drag on the table, roll it up onto itself so it doesn’t end up all twisted.
Cut the yarn, leaving a long tail. Put the tail in the center of the knitting machine.
Step 3: Last 5 rows and cast off
Grab another piece of waste yarn and thread it onto the knitting machine just like we did at the beginning of step 2.
Knit 5 more rows.
Cut the waste yarn and put the end in the center of the machine.
Knit 2 more rows with no yarn threaded on. The headband will fall off the hooks on the last row.
Step 4: Closing up the ends
Lay the headband on a table and straighten it out.
Now we’re going to use the crochet hook to close each end of the headband.
Starting on one end, find the side with the end of the main color of yarn sticking out.
Go across to the opposite side and insert your crochet hook under the farthest stitch on this side. You’ll be working under the first row of stitches of the actual headband.
Just ignore the loops of the waste yarn, we’ll remove those in a minute.
So at this point you have the hook under the stitch on the end. Insert the hook in the next stitch over on the right of the one you currently have on your hook.
Pull that loop through the first loop.
Insert your hook in the next stitch on the left side this time and pull it through the loop.
Continue going back and forth down the row like this to close up the end.
Once you have all the loops sewn up, pull the yarn end through the last loop to finish this side.
Now you can remove the waste yarn from this side.
If you’re lucky, it’ll just pull right out. Sometimes it doesn’t want to cooperate though and you can just cut it if it’s being difficult.
Be careful not to cut your main headband yarn though!
Repeat that process on the other side of the headband. Make sure you start on the right stitch for the second end so the headband stays flat.
I followed the row from my starting end all the way across and started on that same stitch on the other side to be safe.
Step 5: Sewing the ends into a twist
Lay your headband out on your work surface. You’ll want the long tail of yarn to be on the bottom left corner.
Thread the long tail onto your yarn needle.
Fold the left side of the headband into a C shape.
Take the right side and insert the bottom into the “mouth” of the C shape. Wrap the top around the top of the C.
Now you’ll have a 4 layer thick sandwich to sew through.
Start on the end the yarn is coming out of and sew through all 4 layers.
Continue sewing across going back and forth and making sure you go through all 4 layers with each stitch.
When you reach the end, come back one more time so you end where you started. Tie a knot to secure the yarn.
Step 6: Finishing
Weave the end of the yarn under several stitches. Cut the excess yarn.
Thread the shorter end of the yarn onto the needle and weave it in as well. Cut the excess yarn and your headband is done-
Turn it right side out and it’s ready to wear!
In Conclusion
I hope you enjoyed this simple knitting pattern for this machine knit headband!
If you make one of these, please share a pic over on Instagram and tag me @marchingnorth so I can take a look. I love seeing all of your awesome creations!
Thanks for this. I saw how it was done on a TikTok but figured the written instructions wouldn’t be hard to follow. normally I like videos but this was easy to follow. I did 85 rows and it was slightly too tight for me. But my son said it fit him just fine. He’s. 14 yr old standing at 5’8″-5’9″. lol but has a slightly smaller head than his short mama. I think I’ll try 90 and see how it works. My son was wondering if this could be made into a beanie. I’m still new to the knitting machine so I’m not sure.
I’m so glad the tutorial helped you out! 🙂 I have an easy beanie pattern for the knitting machine right here: https://www.marchingnorth.com/knitting-machine-beanie-pattern/
I like YouTube but sometimes I just want the written instructions y’know. so I appreciate you doing the blog as an extra step and I will be attempting to make my first headband right now ? thanks I hope 75 rows isn’t too long ?