Free Fall Punch Needle Pattern (+ time-lapse video!)
Get ready for fall with this free maple leaf printable punch needle pattern!
(This post may contain affiliate links. If you click one and make a purchase, I may receive a small commission at no extra cost to you. Read the disclaimer here. Thank you for your support!)
I love all things fall. It seems like most people agree, although I know a few people aren’t big fans of the whole “pumpkin spice everything”.
When the weather starts to cool down I get the urge to make all sorts of things out of yarn. Especially yarn in beautiful earthy autumn colors!
I got a gorgeous pack of fall-inspired yarn a few weeks ago as an impulse buy and I couldn’t decide what to do with it at first. It’s pretty small amounts of each color and I didn’t want to end up running out in the middle of my project!
(That pack of yarn isn’t available anymore unfortunately, but this is the shop I got it from and they have lots of beautiful yarns to choose from!)
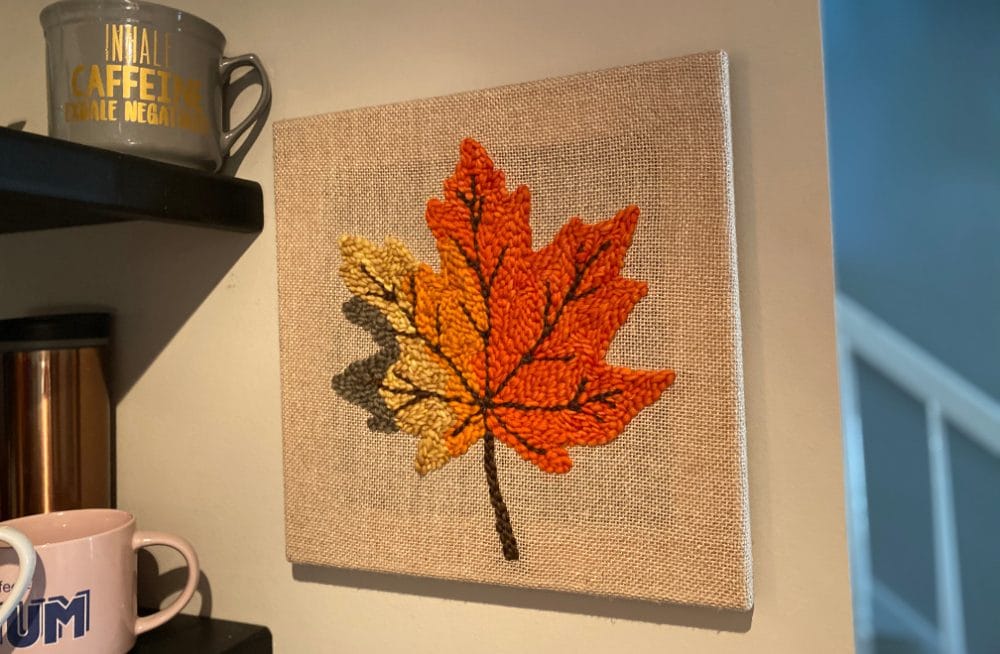
For inspiration, I started looking at fall images and it dawned on me that all of these colors show up on maple leaves in the fall. I sat down and came up with this pattern, punched it, and had it ready to hang on the wall within four hours!
Gotta love when inspiration strikes like that!
I decided to share this pattern with my subscribers for free so you can create your own gorgeous fall maple leaf wall hanging (or whatever other items you decide to make with it.)
For my version, I used the flat stitch side as the “right” side instead of the traditional loop side. I love the modern look of punching that way.
The only thing is I don’t think it’s quite as sturdy to punch this way and the stitches are more prone to getting pulled out, so I turned it into a wall hanging instead of, say, a pillow.
I’m guessing you could put some glue on the backside and it would make it more sturdy, but I have three kids and a dog so I’m not going to chance it!
You could easily do this pattern the other way with the loops on the right side and I think it would make an excellent fall pillow!
The pattern includes the outline and the veins of the leaf. I didn’t mark where I changed colors because honestly I just was winging it.
I traced the pattern and then went in with a different color marker and just marked roughly where I wanted the color changes to happen, and I kind of followed those lines but I just kind of did what felt right as I went.
You can watch the time lapse video down below and kind of see the process.
FYI, its erratic and random, but that’s just me. ?
I have a challenge for you! I’d love to see what kind of color variations YOU will come up with using this fall punch needle pattern.
This is the perfect type of project to play around with the colors and just have fun with it. It would be so cool to do some totally wild and off the wall colors like neon pink or green!
If you want to do the same colors I did (which I totally get, because they’re beautiful!), you can grab that color pack here.
I can’t guarantee it’ll stay in stock because it’s a small shop, but it’s worth a try and I love supporting small businesses like that.
You’ll find the full supply list for the wall hanging I made below, but you could reverse this pattern and make it into a pillow as well! If you decide to do that, I have a tutorial right here showing an easy way to finish a punch needle pillow.
I’m not going to do a full tutorial for this project because it’s made of up things I’ve shown you in other tutorials already. But I will show you the video and photos of the basic steps and link to the tutorials that will explain the techniques!
Are you new to punch needle and feeling overwhelmed?
Check out my Punch Needle ebook that will get you started off right!
Supplies You’ll Need to Make a Punch Needle Maple Leaf Wall Hanging
- Bulky Yarn (I recommend wool)
- Linen Foundation Fabric
- Oxford #10 Regular punch needle
- 12″ Morgan No-Slip Hoop
- 12″ Canvas Stretcher Bars (make sure you get two sets to make a full frame)
- Staple Gun and Staples
- Scissors (these scissors are AMAZING!)
- Printed Maple Leaf Punch Needle Pattern (in the you can grab it here)
Punching the Pattern

To punch this pattern, I started by doing the stem and veins with dark brown. I punched a few rows for the stem so it’s a bit thicker and just one row for the rest of the veins.
Then I started with the green on the left and filled in the sections from left to right. My plan was to make the leaf look like it was in the middle of turning.
Trimming up the Back
After I got all the parts of the leaf filled in, I flipped the hoop over and trimmed up all the long ends sticking up all over the place.
You can see that the back looks like a hot mess. I made my loops really close to ether since the flat side was the front (instead of the loop side) and I didn’t want any gaps.
If you’re planning to have the loop side as the “right” side for your project, leave some space between your rows and it’ll look much nicer.
Honestly, if you’re making a wall hanging like I did, you don’t even have to trim up the back. I just weirdly enjoy it! (Plus, I love using those scissors!)
Mounting the Punch Needle Design on a Wooden Frame
I decided to stretch my maple leaf on a wooden frame to hang on the wall. I used 12″ stretcher bars and attached the fabric using my trusty staple gun.
For a more detailed explanation showing how to stretch and staple the fabric, check out this tutorial I did a while back showing punch needle finishing techniques.
Hang it up!
I absolutely love how this punch needle wall hanging turned out!
It’s going to be making an appearance on our wall every year around the middle of August when we’re totally over summer. (Maybe even by July, we’re sweater weather people in this house)
I hope you enjoy this free punch needle pattern and please share your version on Instagram and tag me @marchingnorth so I can see! I’m so excited to see what you do with it!
Related Posts
- How to Make Punch Needle Coasters (the EASY way!) // Tutorial + Video
- Must-Have Punch Needle Supplies (and Where to Find Them)
- 10 Beautiful Punch Needle Wall Decor Ideas!
Hi Crystal,
Wow you make that look really easy! Can you tell me is there a certain direction you punch to make it look neat and tidy? Also what type of fabric did you use for the leaf wall hanging, I’m having a hard time finding monk cloth in BC, Canada.
Appreciate your website!
Linda