Macraweave Wall Hanging // Tutorial + Video!
Learn how to make a beautifully textured macraweave wall hanging in this tutorial (and video!)

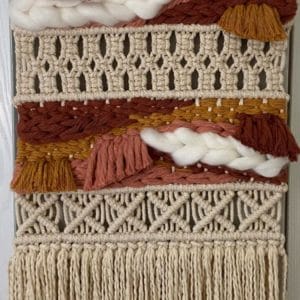
So what the heck is a macraweave, anyway?
Basically, a macraweave is a mash-up of macrame and weaving all in one fun fiber art package.
It seems like weaving and macrame go hand in hand. If you like one, it’s just a matter of time before you want to try the other.
Punch needle (specifically modern punch needle with yarn) seems to follow this trend as well. I’m glad I’m not the only one who falls down craft-related rabbit holes!
I’ve been planning out this macraweave project for months now. I finally decided on the macrame skeleton part, and then I got stuck at the weaving.
I tried a few things and then it sat, staring at me from my macrame rack, for weeks while I worked on other projects.
While I pondered, I binge watched weaving tutorials on YouTube (Spruce & Linen channel has really great ones that I highly recommend).
Finally, I just got brave and decided I’m finishing this, and lo and behold it wasn’t half as scary as I thought it would be!
Dare I say I love the result! And I’m excited to show you how I did it.
(This post may contain affiliate links. If you click one and make a purchase, I may receive a small commission at no extra cost to you. Read the disclaimer here. Thank you for your support!)
Looking for More Free Macrame Wall Hanging Patterns?
Check out this list of 16 free macrame wall hanging patterns with video tutorials and written instructions!
Supplies You’ll Need to Make a Macraweave Wall Hanging
- 4 mm three-strand twisted cotton macrame rope in the following lengths:
- 24 @ approx. 125″ long (main ropes)
- 6 @ approx. 65″ long (filler cords for rows of double half hitch knots)
- 24 @ approx. 32″ long (extra bottom fringe)
- assorted ropes, yarn, and roving for the weaving part (here’s what I used, but you can use whatever you have on hand or prefer):
- 5 mm single strand cotton macrame cord in terracotta and blush
- 3 mm single strand cotton macrame cord in mustard
- white wool roving (I used acrylic in the tutorial, but wool is a lot nicer!)
- my favorite brand of scissors EVER
- 3/4″ wooden dowel – mine was 36″ long and then I cut it down to size after the wall hanging was completed. You could probably start with about a 18″ dowel if you don’t want to cut it down afterward.
Macraweave Wall Hanging Tutorial
Constructing the Macrame Skeleton for the Macraweave
Step 1: Top “X” Design
Have your wooden dowel secured either on a garment rack or however you prefer, and attach your 24 working cords with lark’s head knots.
Now we’re going to make the “X” design at the top. Starting with the cord all the way to the left, do three double half hitch knots down and to the right.
Then, grab the eighth cord to the right and make seven double half hitch knots down and to the left.
Then grab the fifth cord from the left and make three double half hitch knots down and to the right.
That completes one “X”. Repeat that process five more times to the right. You’ll have six “X’s” all together.
Related: Macrame for Beginners // The Ultimate Guide!
Step 2: First and Second Row of Double Half Hitch Knots
Join the Macrame for Beginners and Beyond Facebook Group!
If you’re new to macrame or if you’ve been knotting for a while, connecting with other macrame lovers is always a great idea!
Come check out our Facebook group, Macrame for Beginners and Beyond. It’s a friendly community where you can ask questions, get inspiration, and share your awesome work with other macrame lovers! Come join the conversation today!
Now we’re going to tie a horizontal row of double half hitch knots right under the row of “X’s”.
To keep the knots (mostly) straight, I tied the filler cord tightly to either side of my hanging rack. I still didn’t quite have perfectly straight rows, but it was a lot better than it would of been if I was just holding the filler cord.
Do the row of double half hitch knots, and then skip down about four or five inches, and repeat that process again.
Step 3: Tie the Center Alternating Square Knots
On the left, tie two square knots stacked on top of each other. Repeat that all the way across to the right.
For the next row, skip the first two cords on the left and tie one square knot, then repeat that all the way across to the right, skipping the last two cords as well.
Now tie two more stacked square knots on the left and repeat them all the way to the right.
Related: Must-Have Macrame Supplies (and Where to Find Them!)
Step 4: Two More Rows of Double Half Hitch Knots
Repeat the same process from step two, making one row of double half hitch knots right under the previous row of square knots, then skipping down four or five inches and making another row.
Step 5: Bottom Row of “X’s”
Repeat the same process you did in step one right underneath the second double half hitch row from step four.
Then tie one last row of double half hitch knots under the “X” row.
OK, now we have the macrame “skeleton” done, and it’s time to start weaving!
Weaving Part of the Macraweave
This part of the tutorial is a lot more free form and I’m not going be too precise with instructions because half of the fun is playing around with it and seeing what you like.
The weaving techniques I used were plain weave, soumak weave, and Rya knots. I wanted to keep it simple because A. I’m a novice weaver and B. I used different textured rope and roving to weave with and I didn’t want it to get too busy with too many crazy techniques.
Plain Weave
For the plain weave parts, I did a pattern of “over three, under one”. When I used plain weave with the thinner mustard yellow cord, I doubled it or tripled it to make it fill in the spaces quicker.
When I turned around to weave back in the other direction, I made sure to alternate which cord I went under so the pattern would be staggered from the previous row. In the second picture, the rope I have my finger behind is where I’m going to go behind with the yellow cord.
This is a great video tutorial showing different techniques you can do with plain weave.
One word of advice, the soumak rows stick out further than the plain weave, and I had a row or two of plain weave that got lost under some soumak rows. I don’t recommend wedging a row of plain weave in between two rows of soumak (like I did, lol).
Soumak Weave
When you see a braided effect on a woven tapestry, it’s probably the soumak weave.
To do this technique, you’ll bring your rope (or roving, or whatever fiber) in front of a few warp strings, and then wrap it around one, then go in front of a few more and wrap it around one.
You can change up how many strings you go over depending on how thick your fiber is.
In the fifth picture above, I’m getting ready to turn around and go back the other way. To do that I just did my last wrap going to the left, then went back to the right and wrapped my rope around the same strings I had wrapped around going to the left so the braid would line up.
Rya Knots
Rya knots are a great way to make fringe with short pieces of fiber, or you can use a long piece and make loops.
I did little short patches of fringe, plus I used Rya knots at the bottom to add an extra row of long fringe.
If you aren’t sure how to do a Rya knot, here’s an example of me making one in my macrame wall hanging tutorial.
Tucking in the Ends
Once you fill in the woven areas, you need to weave in all your loose ends on the back.
Most likely, no one will see the back of your macraweave so just tuck the ends into the warp strings on the back and then trim off the excess.
I also tucked the ends of the filler cords from the rows of double half hitch knots in and I tied them to the warp strings on the back before I trimmed them off, just to be safe.
Mine still looks like a hot mess on the back, but the front looks good so I’m cool with it!
Adding Bottom Fringe
Now that you have the weaving part finished and all tidied up, it’s time to address the fringe at the bottom.
I decided the amount of fringe I already had from the working cords just wasn’t enough. I had already untwisted the rope, but I decided to do another row of double half hitch knots below the last row, leaving enough of a gap to add more fringe via Rya knots.
You can do this row without unraveling your fringe first if you want, because it’ll be a lot easier!
Then I added 24 pieces of rope in the space between the rows of double half hitch knots.
After you get all the fringe added on, it’s time to untwist it and give it a trim.
Cutting the Bottom Fringe
To help me cut the fringe straight, I tied a piece of rope across my rack (like I did with the double half hitch knot rows), made sure it was straight, and cut just below where the string hit the fringe.
You will want to use super sharp scissors for this or its hard to cut it as straight (ask me how I know). My favorite brand is linked in the supply list above!
Done!
I hope you enjoyed this tutorial and you try making your own beautiful macraweave wall hanging.
If you do, take a pic, share it on Instagram, and tag me @marchingnorth so I can see it!
Related Posts
- DIY Macrame Market Bag // Tutorial + Video
- Large Boho Macrame Wall Hanging // Tutorial + Video
- Semi-Circle Macrame Wall Hanging in Two Colors // Tutorial + Video
How much macramae yarn do I order? I’m getting 4,158″ or 116 yards so i think I am not doing the math right. Could you elaborate?
This pattern is GORGEOUS! I have a very narrow wall and was wondering if I were to decrease by 4 or 8 strands if the pattern would still work. Thank you 🙂
Oh my goodness, this is a work of art and it is so incredible of you to share it! Thank you! I can’t wait to make it once I get the rest of the materials!
Love love it been looking for ever for tutorial that inspired me to do one.this one did it for me thanks for sharing g
Love this, thank you for sharing!
Wondering how long your dowel is? I’m hoping to use my own driftwood, and the link you provided takes me to a 48” long pieces – what length would you recommend for your macraweave? Thanks again, excited to get started!
After starting this project on a 36″ dowel, 16″-17″ will work. Hope this helps.
I would like to make this approx 3 times bigger. Do I keep my number divisible by 4 or can I just triple your numbers? Thank you.