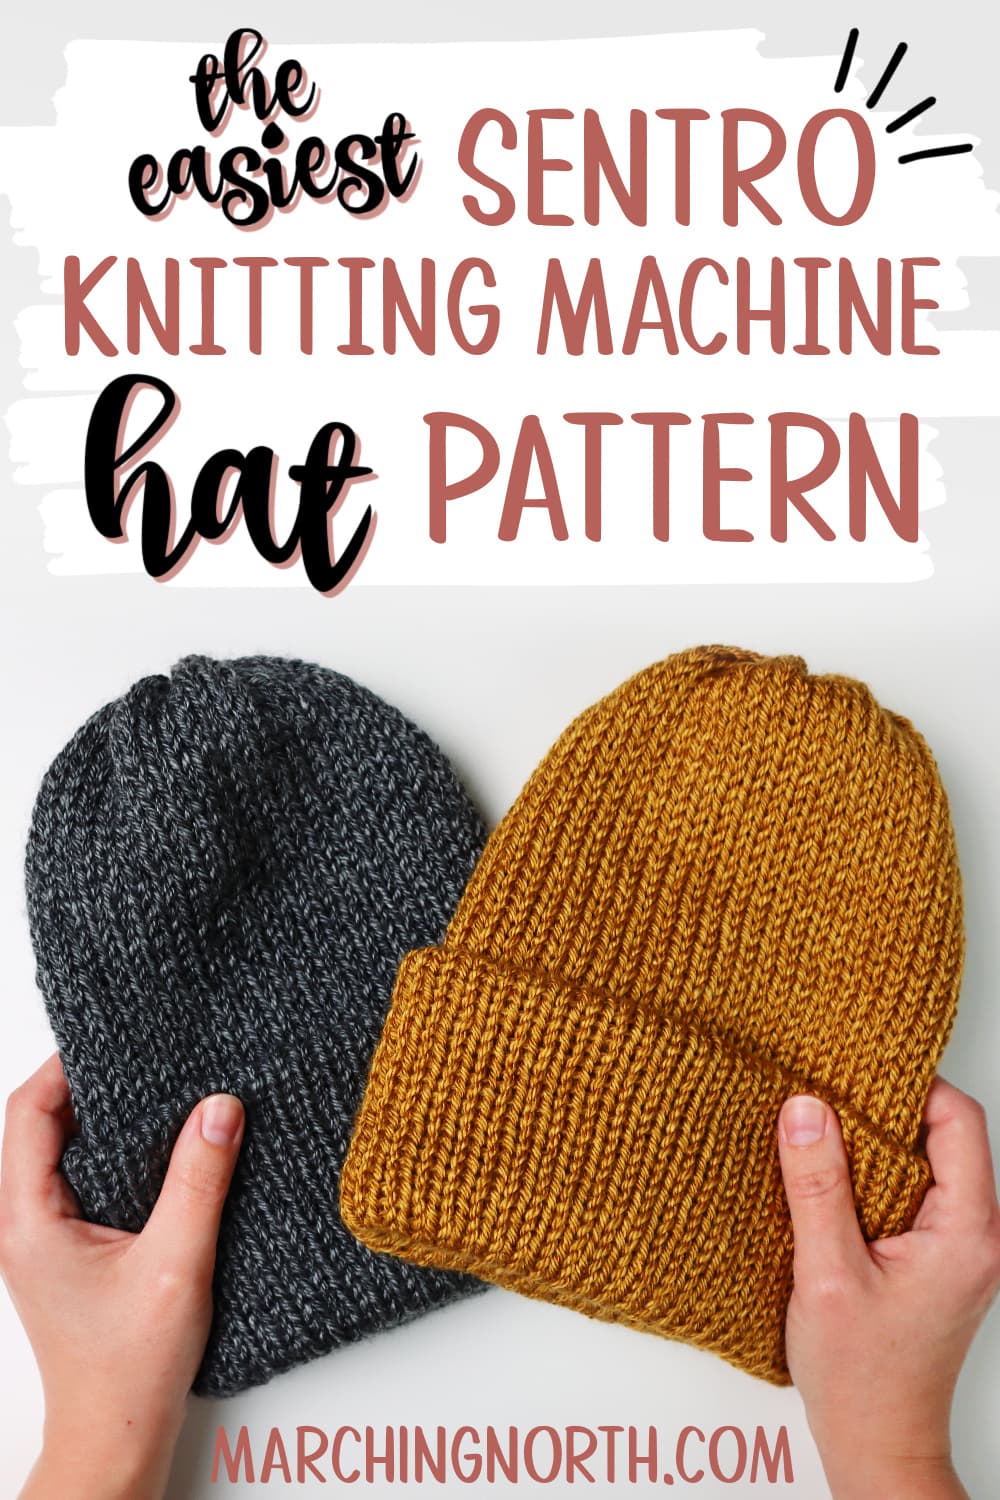
Easiest Knitting Machine Beanie Hat Pattern (Sentro, Jamit, or Addi!)
Learn how to make a super warm and cozy knitted beanie with your circular knitting machine in this step by step tutorial and video!
Want to remember this? Post this Knitting Machine Hat tutorial to your favorite DIY Pinterest board!
(This post may contain affiliate links. If you click one and make a purchase, I may receive a small commission at no extra cost to you. Read the disclaimer here. Thank you for your support!)
Have you been looking for an easy machine knitting pattern to try?
Whether you have a Sentro knitting machine or a Jamit (which I suspect is the same thing with a different name), or even an Addi knitting machine, this simple hat tutorial is for you.
There’s no color change involved in this quick project, and you don’t have to worry about learning a stitch pattern or waste yarn or anything.
It’s so much faster to make beanie hats using one of these handy machines instead of circular needles, straight needles, double-pointed needles, or even a knitting loom!
Sorry hand knitters, but it’s true.
You can seriously crank out an easy hat in 20 minutes once you get the hang of it. And that includes finishing it and adding a pom pom!
Even avid knitters can appreciate how quickly you can make hats for gifts, to donate, or for a craft fair booth.
It’s a great way to use up some yarn super quick and keep your head warm in record time.
If you’ve struggled with learning how to knit because it takes too long or you’re impatient, the circular knitting machine will definitely beat out hand knit patterns for you.
Let’s talk a little bit about knitting machine basics and common techniques and then we’ll jump into the free pattern down below.
Circular Knitting Machines
The most popular circular knitting machines at the moment are the Sentro machine and the more expensive Addi machine (the large ones are called the Addi King or Addi Express King Size machines).
When I purchased my Sentro from Amazon, I ended up with a machine that says Jamit on the side instead.
The first thing I noticed was it looks just like the Sentro, but it has a somewhat unfortunate name.
Jamit just doesn’t seem like a good choice for something that could theoretically get jammed, ya know?
Luckily, the Jamit seems to be just as good as the Sentro, so don’t worry if the same thing happens to you.
These machines have 48 pins (or hooks) and you can knit the stockinette stitch in the round or in panels.

That means the number of stitches for your hats will be 48. You can also get smaller size knitting machines if you want to make a hats in different sizes for kids or babies.
There’s a switch on the side where you can change it from T (for tube) or P (for panel).
Tube is how you make a hat or anything else that starts as a tube, and you can do back and forth knitting to make flat panels with the P setting.
First you do a cast on row, and then you just keep spinning the handle to knit. It’s super easy!
There are drill attachments you can buy so you don’t have to keep cranking away, but you’ll want to go slow because it can burn out the plastic crank mechanism pretty easily.
These machines come with a row counter, but unfortunately they tend to break. Mine broke before I finished my first project.
I did some research and figured out a replacement counter that’s so much better than the one that came with it, and I made a video showing the easy way I installed it if you want to give it a try.
It looks daunting but it was actually super simple and having a functioning counter is crucial for machine knitting.
Using a knitting machine takes a little getting use to, so it’s a good idea to stick to a simple pattern like this one and get the hang of it.
Best Yarn for a Knitting Machine Beanie
For this pattern, I used Lion Brand Heartland acrylic yarn. It’s a worsted weight yarn, super soft and makes great hats.
Plus it’s washable, which is always a plus! One ball of yarn is enough for one beanie with a bit left over.
Heartland Yarn by Lion Brand is wonderfully soft and it comes in beautiful colors inspired by national parks and nature. It's 100% acrylic and a great choice for all kinds of projects.
Experienced machine knitters will tell you that these lovely machines are somewhat picky when it comes to yarn, so it’s good to stick with tried and true weight of yarn options.
At least for your first few projects.
If your yarn is too thin, it’ll leave gaps in your work, and if it’s too thick it’ll make turning the crank of your machine next to impossible.
Some yarns will cause you to have slipped stitches and other issues as well.
But Heartland from Lion Brand seems to work exceptionally well in my Jamit, so I recommend it for new knitters for sure.
If you have super bulky yarn you were hoping to use, it’s not gonna work in your knitting machine.
I recommend saving your bulky weight yarn one of my free loom knitting beanie patterns instead.
I’ve also heard people say they can use Red Heart Soft and Lion Brand Scarfie.
More Beanie Sizes
If you want to make these beanies in smaller sizes, no problem!
And there’s a handy chart with all the row amounts to make it extra convenient!
OK, now that we’ve covered the basics, let’s make a knitting machine beanie!
Supplies You’ll Need
- 48 pin circular knitting machine (Jamit, Sento, Addi, etc.)
- 1 skein Lion Brand Heartland Yarn
- Yarn needle or tapestry needle
- Scissors
- Pom Pom (optional)
Knitting Machine Beanie Pattern
Check out the video tutorial over on my YouTube channel, and be sure to subscribe!
Step 1: Casting on
First, make sure your machine is set to T (for Tube) on the side switch. Also, make sure to turn on and clear your stitch counter.
Turn the knob until the white pin is right in front of the yarn holder and lifted up. You’ll be sitting in front of your knitting machine.
Pull about a foot of yarn out of your skein. If you can get the center pull end out, it’ll make your life easier.
Hook the yarn under the white hook, moving from right to left.
The tail of the yarn will go in the center of the knitting machine and you want to make sure you have a tail that’s about a foot long.
Turn the crank slightly so the white needle moves to the right, and you’ll pass the yarn behind the next pin.
Continue slowly cranking and you’ll hook the yarn in front of the next pin.
Repeat this, alternating going in front of and behind each pin until you get back to the pin just to the right of the white pin.
This is your first row.
Make sure the yarn goes under the divider between the white pin and the pin to the right of the white pin, and then feed your yarn into the yarn holder groove.
I threaded my yarn into the tension gauge on the hole closest to my machine.
If you prefer a looser tension, you might go for the second hole, but the first one had the right tension for me.
Step 2: Knitting the beanie
For the first few rows, go slowly and keep an eye out for anything weird going on, like dropped stitches.
If you’re having problems, this blog post has some tips for fixing most of the issues you’ll run into.
After you get a few rows done, you can relax and just crank away.
Make sure your yarn doesn’t get hung up while you’re knitting.
You’ll want to knit 140 rows all together. This will make a nice slouchy beanie.
As your hat starts to get long and drag on the table, roll it up inside itself so it doesn’t cause any problems.
Step 3: Casting off
Once you finish your last row, stop right after you get past the white pin.
Cut your yarn, leaving about a foot long tail, and put in the center of the machine, making sure it’s hooked around the white pin.
Crank your knitting machine almost all the way around one more time, stopping about when you have 4 pins left before the white one gets back to the front.
Make sure you stop in time or the stitches will start dropping!
Grab your yarn needle and thread the yarn tail onto it.
Carefully turn the crank until the white pin is just to the left of the yarn holder, and scoop up the loop on the pin to the left of the white one.
Continue scooping up the live stitches off the pegs going around to the left.
When you get all the way back around to the pins that are raised, slowly crank the handle and catch the remaining loops one at a time until they’re all removed.
Set your knitting machine aside and it’s time to finish the hat!
Step 4: Finishing the beanie
At this point, you’ll have a long tube.
I like to lay it out flat and stretch it a bit to even out the stitch tension.
Then pick one side (I started on the left), and pull the yarn tail to cinch up that side.
Sew the needle with the yarn tail around the edge of the hole so the yarn is doubled up around it and tie a knot to secure.
Thread the tail through the hole into the inside of the hat.
Now you’re going to feed this side of the hat up inside the middle and bring it to the other side.
Take the needle off the yarn from the first side and thread it onto the yarn on the other side.
Cinch it up the same way as you did the first, sew through the stitches surrounding the hole and tie a knot.
Now take both yarn tails and tie a tight knot. This will ensure that the two layers of your beanie will stay together.
Thread both yarn tails onto the needle and feed them in between the two layers of the hat. Cut the excess yarn.
Step 5: Add a pom pom (optional)
If you want to add a pom pom to the top of your beanie, you can do that now.
I have two tutorials for making pom-poms that are super easy!
Done!
I hope you enjoyed this Easy Knitting Machine Beanie Pattern!
I’ve had so much fun making hats for my family with this pattern and they look amazingly professional. No one has to know how easy they are to make!
If you make this knitting machine project, please share a picture over on Instagram and tag me @marchingnorth so I can take a look.
I love seeing all of your awesome creations, it makes my day!
Looking for more projects? You’ll find tons of patterns on my site! Here’s a few of the latest.
Thank you so much! I have been battling for weeks. Yours is the best explained and I have finally made my first beanie.
Thanks for the charming graphic. rows! that’s all we need. The row count. we used you utube video, too.
pat
the tutorial is great! It is easy to follow.
The only problem I have is that my machine did not come with a row counter. About how long should the tube be before I take the stitches off the machine?
Thank you for your very comprehensive video. I just bought a Sentro machine for my grand daughter. The machine lacks instructions. This is her first time trying to knit so your instructions are a tremendous with to me, her grans mother, who is trying to help her. Now, I think I have a fighting chance of showing her how to make a beanie. Thank you. We’ll be watching more of your videos. Again, thank you.