Free Macrame Hat Hanger Pattern (Easy DIY Tutorial!)
Learn how to make a beautiful macrame hat hanger for your wall in this step by step pattern and tutorial!
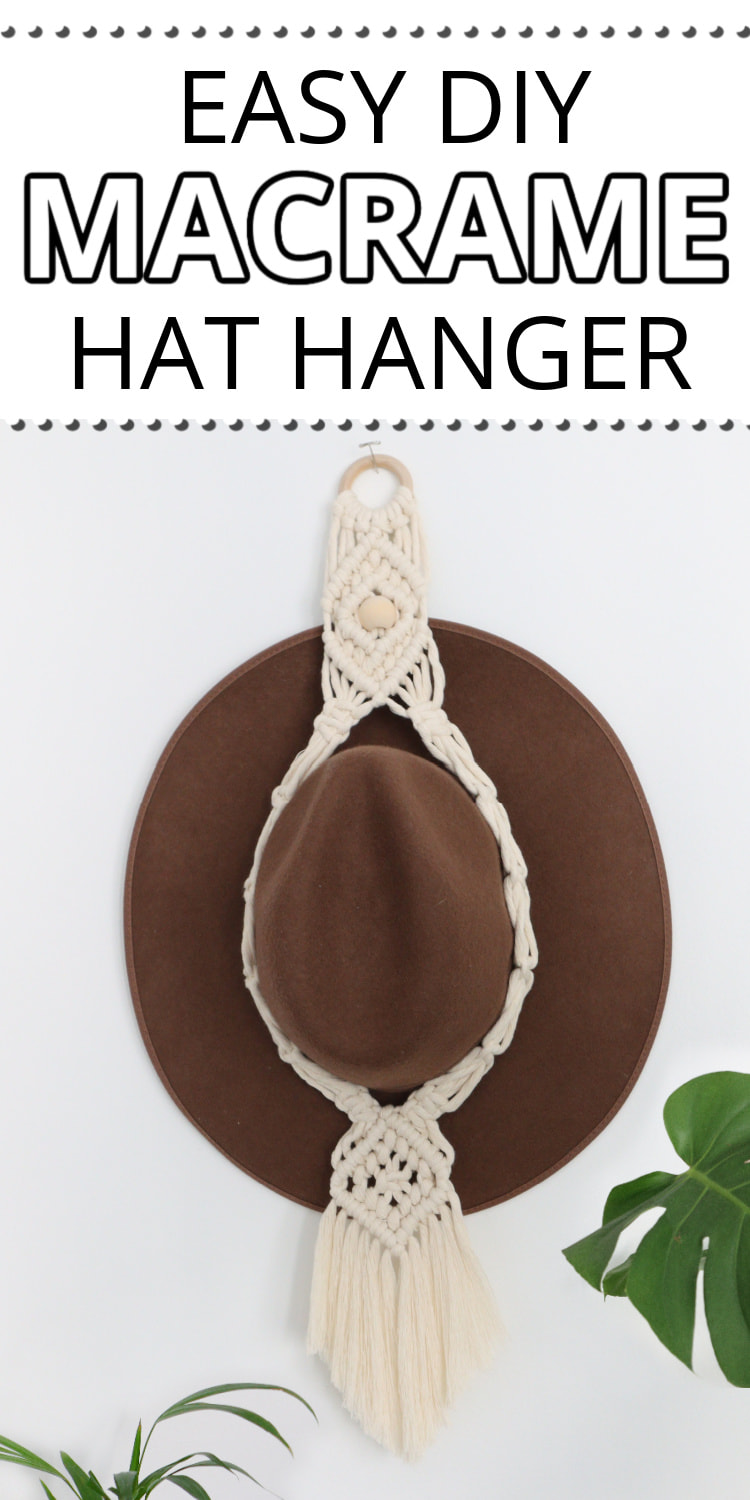
Have you seen these amazing boho macrame hat hangers yet?
Ever since I started seeing them pop up I’ve been wanting to make one, and this free hat hanger pattern is the result. I hope you love it as much as I do!
Want to remember this? Post this Macrame Hat Hanger tutorial to your favorite DIY Pinterest board!
(This post may contain affiliate links. If you click one and make a purchase, I may receive a small commission at no extra cost to you. Read the disclaimer here. Thank you for your support!)
I almost hate to admit this, but I actually went to Target last year and bought a brimmed hat specifically to hang on the wall. Is that weird?
My kids have had a lot of fun using it to play dress up and I was starting to become concerned for the hat’s well being.
I didn’t want it to look all beat up for pictures, lol.
I finally got around to making this macrame hat hanger pattern so I could get the hat on the wall where it belonged (and off the floor in the kid’s room!)

If you’re looking for hat storage ideas, this is a super clever way to display your favorite hat right on the wall. You’re getting storage and wall art all in one project!
You gotta love decor that is beautiful and functional, it’s such a great way to add some personality to small spaces!
Looking for a macrame gift idea? This macrame hat hanger is a great gift for the hat lovers in your life!
You can customize your hanger with different colors of cotton cords, use it to hang up different types of hats (maybe even baseball caps!), there are so many ways to make your own unique creations.
Grab the ad-free, printable PDF version of this macrame hat hanger pattern in my shop right here!
The pattern for this hat hanger is beginner friendly, and we’ll only be using three basic macrame knots: the lark’s head knots, double half hitch knots, and square knots.
I’ll show you a few super easy ways to jazz up those knots that’ll make people say “whoa, what knot is that?!”
Below you’ll find the supply list, video tutorial and the written tutorial to go along with it. Let’s get started!
BONUS: How to Make this a Double Hat Hanger
I’ve had loads of people ask if it’s possible to make this pattern into a double hat hanger, and the answer is YES!
Note: At the time of this writing I haven’t personally done this yet, but I helped someone estimate the cord lengths to turn it into a double and she confirmed that it worked beautifully! I’ll show you a picture of her finished hat hanger in just a moment.
INSTRUCTIONS: Add an extra 48″ to each of the main cords – so you’ll have 6 cords that are 168″ long (or you could just round up to 170″ which I would probably do, I like round numbers).
I recently made a new, double version of this hat hanger (with a few changes) using the same type of 5 mm string and the cord lengths for that ended up being 217″ long. I’m afraid 170″ would be too short.
I would recommend approx. 217″ long cords if you want to do a double hat hanger following the pattern below, or you can check out the new pattern as soon as I get it posted (which should be soon!)
You’ll start the pattern like normal, and once you do the bottom diamond pattern you’ll repeat the hat holder portion again (by dividing the cords into two sections and making the switch knots).
And then finish it off with the bottom diamond (again) and you’re done!
Here’s a picture of the double version that Emily made- she’s a member of our awesome Macrame Facebook group and her hat hanger turned out awesome!
She repeated the top diamond pattern for the bottom diamond (the one with the bead) and did the one without a bead in the center, and I think that was a great choice.
Supplies You’ll Need
- 5 mm single strand cotton macrame string
- 6 pieces @ 120″ long each
- 2″ wooden ring
- 1″ large hole wooden bead
- sharp scissors
- pet slicker brush or comb
- stiffening spray (optional)
Macrame Hat Hanger Pattern
Subscribe to Marching North on YouTube so you don’t miss any new macrame tutorials!
Step 1: Attach the cords to the ring
Attach your 6 pieces of cord to the wooden ring using lark’s head knots.
Then, hang the ring on your macrame rack, or you can even hang it on a nail in the wall. You just need to secure it somewhere while you work.
Step 2: Make the top of the first diamond shape
Cross the two center cords right over left.
The right cord you crossed over is going to be the filler cord for a row of 6 diagonal double half hitch knots going down and to the left.
Use the 6th cord from the right as the filler cord to tie a row of 5 diagonal double half hitch knots going down and to the right.
Flip the whole thing around to the back.
Use the right center cord as the filler cord and tie a row of 5 diagonal double half hitch knots going down and to the left. You’ll skip the last cord.
Grab the 6th cord from the right and use it as the filler cord to tie a row of 4 diagonal double half hitch knots going down and to the right. You’ll skip the last cord on this side as well.
Flip the whole thing back around to the other side.
Use the right center cord as the filler cord for a row of 4 double half hitch knots going down and to the left.
Then use the 6th cord from the right as the filler cord to tie 3 double half hitch knots going down and to the right.
Step 3: Thread on the bead
Now we’re going to thread the wooden bead onto the two center cords.
To make this part easier, I used a small scrap of thin braided cord as a threader.
Loop it around the two center cords, thread the bead through the ends of the threader cord, and use that to pull it onto the two center cords. This keeps you from shredding up the ends of your working cords.
Push the bead up until it’s touching the last row of double half hitch knots we made, and now it’s time to make the bottom half of the diamond.
Step 4: Make the bottom of the top diamond shape
Use the 3rd cord from the left as the filler cord and tie 3 double half hitch knots going down and to the right.
Then use the 3rd cord from the right and tie 4 double half hitch knots going down and to the left. Now we’ve completed the innermost diamond.
Flip the whole thing around to the back again.
Use the 2nd cord from the left as the filler cord and tie 4 double half hitch knots going down and to the right.
Then use the 2nd cord from the right and tie 5 double half hitch knots going down and to the left.
There will be a small gap on the right and left side of this diamond and that’s OK.
Flip the whole thing around again.
Use the far left cord as the filler cord to tie 5 diagonal double half hitch knots going down and to the right.
Then use the far left cord as the filler cord to tie 6 double half hitch knots going down and to the left.
You’ll notice a gap on each side of the diamond, don’t try to close it up or it’ll get all puckered. Just let it be.
That completes the top diamond shape. Now on to the straps!
Step 5: Make the straps
Separate the cords so you have 6 on the left and 6 on the right.
Pick a side to start on (I started on the left), and tie 2 square knots stacked on top of each other. You’ll use the 2 outer cords as the working cords and the 4 inner cords will be the fillers.
Repeat that on the other side.
Now we’re going to tie a series of switch square knots to make the straps.
To tie a switch knot, you take the 2 inner cords and bring them to the outside. Then use those cords to tie the square knot around the other cords.
Repeat that until you have 5 switch knots with about 2 inches in between each one. Then do the same thing for the other strap.
After the last switch knot, tie one last square knot right under it like we did at the beginning. Do that on both sides.
that makes it a “switch” knot
repeat on the other side
Step 6: Make the bottom diamond shape
Now we’re going to connect the two sides and make the bottom diamond.
Use the far right cord from the left strap as the filler cord to tie a row of 6 double half hitch knots going down and to the right.
Then use the 6th cord from the left as the filler cord and tie 5 double half hitch knots going down and to the left.
Flip the whole thing around again.
Use the 6th cord from the right as the filler cord and tie 4 double half hitch knots going down and to the right.
Then use the 6th cord from the left as the filler cord and tie 3 double half hitch knots going down and to the left.
Now we’re going to use the center 4 cords to tie a square knot.
I flipped mine around to the front again before I tied the square knot, but I realized afterwards that it looks the same from both sides so you don’t have to flip it around for that part if you don’t want to.
We’re going to flip it back around to the back to tie the next row of double half hitch knots, so if you flipped it, flip it back now. If you didn’t flip it, you’re good!
Use the 3rd cord from the right to tie a row of 3 double half hitch knots going down and to the left.
Then use the 3rd cord from the left to tie a row of 4 double half hitch knots going down and to the right.
Flip it around to the front one last time.
Use the right most cord as the filler cord to tie 5 double half hitch knots going down and to the left.
Then use the left most cord as the filler cord to tie 6 double half hitch knots going down and to the right.
Alright, all the knotting is done! Now let’s tackle the fringe.
Step 7: Trim and brush out the fringe
I just eyeballed it when I cut the fringe, but feel free to use one of these fringe cutting methods to get it really even.
Then if you want to brush yours out you’ll do that now, and give it another trim after it’s brushed.
If you want to use stiffening spray or hairspray to keep it from curling that’s a good idea. I haven’t put any on mine yet, but I probably will eventually.
Done!
I hope you enjoyed this macrame hat holder tutorial! If you make one of your own, please share it on Instagram and tag me @marchingnorth so I can see. I love seeing all of your awesome creations!
Note: If you’re looking for a double macrame hat hanger pattern to hold a couple of cool cowboy hats, you could easily add an extra 24″ or so to your cords and repeat that part of the pattern that holds the hat.
I have made these for the past 2 years, I have found your tutorial really easy to follow, thankyou for allowing us to access it?
Would this pattern still work on a dowel rather than a ring?
I am confused with how long each strand needs to be in order to make it hold two hats. Is it 120 inches each, or 217 inches each? Thank you for your time!
I love this hat holder! Thanks for sharing! Some of the cords are too short to finish the diamond at the bottom. Did I tie some of the knots incorrectly? Thanks!
Oh no! My first thought is that your cord might of been slightly thicker than the cord I used- which can happen because different manufacturers do things a little different sometimes. I’m so sorry about that!
You can add some extra cord for the bottom of the diamond, and I have a video here that shows how to do that: https://youtube.com/watch?v=fA0suh9nMZE&si=EnSIkaIECMiOmarE&t=278
Just ignore the part where I tie it to the dowel- instead you can just pin it to the back where you can’t see it, or just hold the cord in place while you tie the first double half hitch with the new cord and afterward turn the hat hanger around and tie the short end of the new cord to the short end of the old cord.
I hope that makes sense! If it doesn’t let me know and I’ll see if I can make a video to demonstrate it. Thanks so much for stopping by!
Thanks for the great pattern and tutorial. I macramed some in the 70s and I am trying it again. I used a different kind of cord, a 4.5mm rope instead of the single strand cotton you used….I ran out of cord at the bottom. It would be good to add a couple feet to each cord if you use this kind of rope. Also, I found the end of the rows in the lower half of the diamond shape very challenging. Perhaps a little more detail on which cords to use to complete the bottom point of the diamond. Otherwise came out great!
Thank you for posting this tutorial. The instructions were super easy to follow!
Thank you for making this look so easy. I am excited to make it!