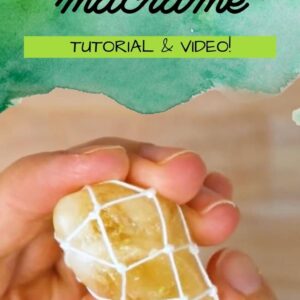
How to Wrap a Stone with Macrame Netting (Tutorial & Video!)
Learn how to wrap a stone in macrame in this step by step tutorial.
I’ll show you how to macrame around your stones or crystals so you can add them to your macrame wall hangings or make them into pretty key chains and other fun stuff!
Don’t forget to pin this for later!

(This post may contain affiliate links. If you click one and make a purchase, I may receive a small commission at no extra cost to you. Read the disclaimer here. Thank you for your support!)
Macrame for Beginners
If you’re new to macrame and still looking to learn the basics, be sure to check out my Macrame for Beginners guide.
It’ll explain everything you need to know like where to get macrame cord and supplies, the basic macrame knots (like square knots and the double half hitch), where to get patterns, plus links to lots of free tutorials!
Also come check out our community on Facebook!
Join the Macrame for Beginners and Beyond Facebook Group!
If you’re new to macrame or if you’ve been knotting for a while, connecting with other macrame lovers is always a great idea!
Come check out our Facebook group, Macrame for Beginners and Beyond. It’s a friendly community where you can ask questions, get inspiration, and share your awesome work with other macrame lovers! Come join the conversation today!
How to Wrap a Stone with Macrame
This macrame stone wrap pattern is pretty simple and only requires a few basic knots: the overhand knot, half knot spiral, square knot, and a wrapping knot.
The half knot spirals and square knots are for the hanging cord at the end and the actual crystal wrapping is done with overhand knots.
After you finish wrapping your stone, you can add it to macrame wall hangings or turn it into a hanger for your car’s rear view mirror. Or you can make it into a keychain or a crystal pendant necklace!
Personally, I find this method easier than a wire wrap stone pendant, but I have a hard time with wire. String and rope seem much more forgiving!
Materials you’ll need to wrap a stone in macrame:
- a stone or crystal
- cotton crochet thread (or a similar size of string or cord)
- 4 pieces @ approx. 60″ long
- 1 piece @ approx. 20″ long
- craft glue
- sharp scissors
Related: The Best Macrame Cord & Supplies (and Where to Find Them)
Macrame Stone Wrapping Tutorial:
Step 1: Cut your cords
First you’ll need to cut four pieces of cord to wrap your stone. I made mine about 60″ long, which is way longer than necessary but I wanted to make sure we didn’t run out of cord at the end.
Step 2: Make a loop with one cord and tie the first knot
Take one of your cords, fold it in half and hold the looped side with your fingers. Take the end of your stone and decide how big the loop needs to be so that it sits properly on the end of your crystal or your stone.
You want it to be small enough that the stone won’t fall through. Then, hold that spot with your fingernails and tie an overhand knot in the cord, making sure that the loop stays the same size.
Test it again before you tighten the knot super well just to be sure it’s the right size, then pull the knot tight.
Related: 15 Macrame Plant Hanger Kits (for Beginners)
Step 3: Attach the next three cords with lark’s head knots
Now take your three other cords and attach them to the loop with lark’s head knots.
Space them out evenly and do a test fit over your stone to decide where to tie the first row of knots.
Step 4: Tie the first row of overhand knots
When you have the cords fitted on your stone, estimate where you want the first row of knots to be positioned.
Hold two of the adjacent cords together with your fingers, remove the stone, and tie the first overhand knot where your fingers were pinched.
Then use that first knot as a guide to tie the remaining three knots. It’ll look like a flower with four petals when you get all the knots from this row tied.
Test fit the netting on your stone again and make sure everything looks right.
Related: How to Make a Macrame Plant Hanger (Ultimate Guide!)
Step 5: Tie the second, third, and fourth row of overhand knots
Now you’re going to repeat that process for the rest of the rows. I did four rows for my stone, but depending on the size of yours it may be different.
Just test fit, decide where the next row should go, tie one knot and the use it as your guide for the rest of the knots in that row.
Step 6: Tie the last overhand knot at the end
Once you get the stone covered in netting, we need to tie an overhand knot at the end to secure everything.
This part is a bit tricky. You need the knot to be super tight with no slack.
In the video I show you my trick to getting the knot extra tight. It’s really hard to figure out how to explain it here!
Related: The Best Loom Weaving Kits for Beginners
Step 7: Create a hanging cord if desired
You can make the hanging cord however you like. I decided to make some spiral knots going about an inch or so down.
Then, I left a space of about half an inch and tied a row of square knots that was about an inch and a half long.
Next, I looped the square knot section in half and tied a wrapping knot around to make a loop. The wrapping knot will be tied in the space we left between the two knotted sections. (Again, if that’s confusing, please watch the video!)
After I tied the wrapping knot, I cut the excess cords and added a bit of glue to the ends to keep everything secure.
Done!
I hope you enjoyed this tutorial for how to wrap a stone in macrame netting!
Be sure to check out some of these other fun macrame tutorials:
Related Posts
- Macrame Wine Tote DIY Tutorial
- DIY Macrame Clutch Purse Tutorial
- Macrame Wristlet Keychain Tutorial
- How to Make a Macrame Lamp Shade (Tutorial & Video!)
Hi,
I loved your tutorial on wrapping a stone with macrame netting. It’s detailed enough that I think I could give it a try.
One question I have is what size crochet cord would I get to cover a small stone like in your video? On Amazon I see 1, 2, 3 mm and I think I saw there were even choices of how many strands too.
Also, I would like to make a necklace. Will the loop at the top be strong enough to have probably a leather strap as the necklace?
Thank you
Don