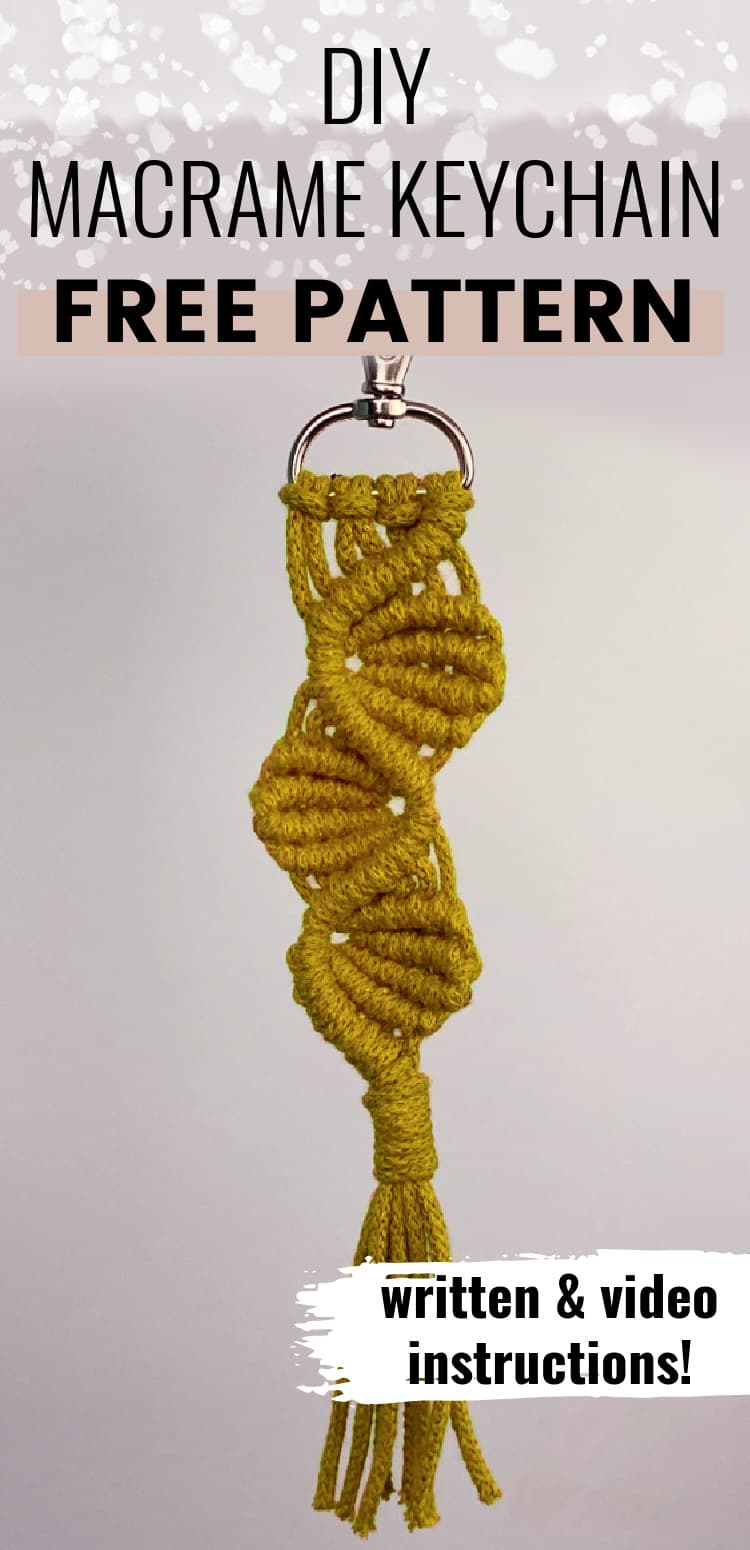
Leafy Vine Free Macrame Keychain Pattern
Learn how to make this simple DIY macrame keychain with a leafy vine pattern in this step by step tutorial and video!
Macrame key chains are a really fun project and they’re mostly beginner friendly. This adorable macrame keychain makes a great handmade gift and it’s also a great idea if you’re looking for a craft project for teens!
Want to remember this? Post this free Macrame Keychain tutorial to your favorite DIY Pinterest board!
(This post may contain affiliate links. If you click one and make a purchase, I may receive a small commission at no extra cost to you. Read the disclaimer here. Thank you for your support!)
The knot pattern for this keychain is mostly horizontal and diagonal double half hitch knots. The double half hitch is sometimes tricky for beginners, but it doesn’t have to be.
If you’re struggling to get the double half hitch (or clove hitch) right, check out this double half hitch knot guide before you make the keychain below.
Once you get it down, this keychain is a great way to practice your knotting!
Join the Macrame for Beginners and Beyond Facebook Group!
If you’re new to macrame or if you’ve been knotting for a while, connecting with other macrame lovers is always a great idea!
Come check out our Facebook group, Macrame for Beginners and Beyond. It’s a friendly community where you can ask questions, get inspiration, and share your awesome work with other macrame lovers! Come join the conversation today!
Here are a couple more free DIY macrame keychain tutorials on my site!

Supplies You’ll Need to Make this Macrame Keychain Pattern…
- 3mm braided macrame cord in the following lengths
- 1 piece @ 20″ long (far right cord)
- 3 pieces @ 52″ long (3 left cords)
- 1 piece @ 20″ long (for wrapping knot)
- 1″ lobster keychain clasp
- cork board and T-pins or tape to secure your work
- sharp scissors
Abbreviations: DHHK = double half hitch knot
Leafy Vine Macrame Keychain Pattern & Tutorial
Subscribe to Marching North on YouTube!
Step 1: Attach the cords to the keychain ring
Attach the 3 pieces of 52″ cord to the key ring using lark’s head knots. (If you’re not sure how to tie a larks head knot, check out this beginner knots tutorial.)
Scoot them over to the left and attach the 20″ pieces all the way to the right. Secure your keychain to your work surface either by pinning it to a corkboard or macrame board, or just tape it down to your work surface.
Step 2: Tie the main knot pattern
Bring the far right 2 cords across the rest of the cords at an angle and use them as a filler cord to tie 6 double half hitch knots going down and to the left.
Lay the filler cords you just used off to the left. You won’t need them for the next few rows. Now we’re going to make the first leaf.
Take the 3rd cord from the left and use it as the filler cord to tie a row of 5 DHHK’s going to the right.
Again, take the 3rd cord from the left and use it as the filler cord to tie a row of 5 DHHK’s going to the right.
Now, use that same filler cord and bend it back to the left. Tie 5 DHHK’s going to the left.
Use the farthest cord to the right as the filler cord and tie 5 DHHK’s going to the left.
Pick up the original 2 filler cords that have been off to the left and tie a row of DHHK’s going around the bottom of the leaf to the right.
The first knot will cinch up the space on the left side of the leaf, so you’ll need to pull it kind of tightly to get it up in the right spot.
Leave the 2 filler cords you just used off to the right, and we’re going to make the second leaf.
Take the 3rd cord from the right and use it as the filler cord to tie a row of 5 DHHK’s going to the left.
Again, take the 3rd cord from the right and use it as the filler cord to tie a row of 5 DHHK’s going to the left.
Now, use that same filler cord and bend it back to the right. Tie 5 DHHK’s going to the right.
Use the farthest cord to the left as the filler cord and tie 5 DHHK’s going to the right.
Pick up the original 2 filler cords that have been off to the right and tie a row of DHHK’s going around the bottom of the second leaf to the left. Again, the first knot will cinch up the space on the right side of the leaf.
Leave the 2 filler cords off to the left, and it’s time to make the last leaf. This part is the same as the first leaf.
- Take the 3rd cord from the left and use it as the filler cord to tie a row of 5 DHHK’s going to the right.
- Again, take the 3rd cord from the left and use it as the filler cord to tie a row of 5 DHHK’s going to the right.
- Now, use that same filler cord and bend it back to the left. Tie 5 DHHK’s going to the left.
- Use the farthest cord to the right as the filler cord and tie 5 DHHK’s going to the left.
Step 3: Finishing off the vine
Pick up the 2 filler cords that are on the left and tie one DHHK to cinch up the leaf.
Then, before you tie the next DHHK going to the right, you’re going to add the working cord you just used to the filler cords. Then tie the next knot around all three cords.
Repeat that with each knot going to the right.
Step 4: Tie the wrapping knot
Grab the other 20″ piece of cord. Fold it into a U shape and hold it against the bundle of cords at the bottom.
Wrap the long end of the cord around the bundle 7 times. Then thread the working end through the loop sticking out the bottom.
Pull the top piece of cord and bring the loop up halfway through the wraps.
Cut off the excess cord from the wrapping knot and poke the ends in with your scissors.
Now you just have to cut the fringe and you’re done!
Since we used braided cord we don’t have to brush out the fringe. If you use single strand or 3 ply cord, you could use a pet brush to brush out the tassel at this point if you want.
More Macrame Keychain Ideas
If you’re looking for more macrame keychain ideas, there are a lot of ways to get creative with them!
First, tie a sennit of basic macrame knots, like the square knot or spiral knot (which is a half square knot repeated over and over).
Then add in some wooden beads (or maybe even some fun colorful beads) and finish it off with a wrapping knot for an easy DIY.
Another idea is to make mini macrame rainbows and attach them to key clasps.
The possibilities are endless!
I just (sort of) finished the leafy vine macramé key chain. I ran out of cord! I’m a beginner, and I am very disappointed after all the trouble learning the knots and doing the work. Any ideas where I went wrong. I used the same MM cord you did, but it is cotton twisted.
Oh no! It’s because the braided cord is a bit stretchy and twisted cotton isn’t. Because of that, it takes less braided cord to make the design than it would take of 3 ply or single strand cotton.