DIY Macrame Hanging Fruit Basket | Easy Tutorial & Video!
Learn how to make a DIY macrame hanging fruit basket in this step by step tutorial and video!
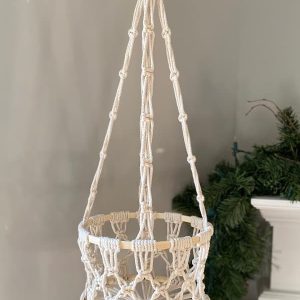
This handy multipurpose macrame basket can be used as a fruit basket or a plant hanger and it’s really easy to make. Keep reading to see how you can make one of your own!

Want to remember this? Post this Macrame Hanging Fruit Basket tutorial to your favorite DIY Pinterest board!
I love making useful things that are beautiful at the same time. This hanging macrame basket is a perfect example of that!
You can use it to hold fruit in your kitchen, or stick a potted plant in it (which is how I’m using mine). It would look really pretty with a bunch of apples, lemons or oranges in it!
To make it a little extra decorative, I used the switch knot throughout the pattern. Don’t be intimidated, the switch knot is super easy. You just tie a square knot, switch the outer and inner cords and then tie another one!
If you aren’t familiar with the switch knot, check out this short YouTube video to see how it’s done. I’ll also show you in the video below!
Are you new to macrame? Check out my Ultimate Guide to Macrame for Beginners! You’ll learn everything you need to know to get started with this awesome craft!
(This post may contain affiliate links. If you click one and make a purchase, I may receive a small commission at no extra cost to you. Read the disclaimer here. Thank you for your support!)
Supplies You’ll Need
- 3 mm 3 strand twisted cotton rope
- 8 pieces @ approx. 10.5 feet long (126 inches) for main working cords (3.2 meters)
- 1 piece @ approx. 33 inches long for top wrapping knot (83.82 centimeters)
- 16 pieces @ approx. 67 inches long for basket part (170 centimeters)
- 1 piece @ approx. 50 inches long for bottom wrapping knot (127 centimeters)
- 2 8″ wooden rings
- Sharp scissors (see my favorite ones here!)
Macrame Hanging Fruit Basket Tutorial
Related: Learn the Basic Macrame Knots!
Step 1: Make the Braided Hanger
For the top of this hanger, I made a 4 strand braid loop.
First, take the 8 working cords, fold them in half and decide where you want the braid to start and end.
In the first picture below, I was estimating where the loop would be. Then in the second picture, I tied a knot on the right side, marking where the braid would start.
In the third picture, I tied the ropes up to the rack with a temporary knot. You want to tie it so the section that will be braided is facing down. Then separate the ropes into four sections with two ropes in each section.
To tie the four strand braid, you cross the second section over the first (right to left), cross the fourth section over the third (right to left), and then cross the second section over the third (left to right).
Continue tying the four strand braid until it’s the length you want. Mine was about 6 or 7 inches long.
Once it’s the length you want, untie it from your rack and carefully untie the overhand knot on the right side of the braid, being careful not to untie any of your braid.
It’ll look like this when you get the knots untied.
Fold it in half and line up the ends of the braid, then tie a wrapping knot around all the cords right at the base of the braid. Use the 33″ piece of cord for this wrapping knot.
Here’s how it will look when you’re finished. (We’ll do the part under it in a minute.)
Step 2: Make the Arms of the Hanging Macrame Basket
Separate out four strands and tie a square knot about an inch down from the wrapping knot.
Then bring your working cords behind the center cords on each side and switch the center cords to the outside. Now tie another square knot about three inches down. That’s how you tie a switch knot!
Tie four more switch knots going down the arm spaced evenly about three inches apart. Repeat that for the remaining three arms of the macrame hanging basket.
Step 3: Attach the First Wooden Ring
Now it’s time to attach the first wooden ring to the arms. You’ll bring the cords inside the wooden ring, and tie a double half hitch knot around the ring.
I wanted the cords to cross the way they did in the switch knots, so first I attached the second cord, then the first, then the fourth and the third.
Repeat this for the three other arms and space them evenly around the circle.
Here’s how it’ll look when you get all the arms attached.
Step 4: Attach More Cords to the Wooden Ring
Now we need to attach the extra cords in between the arms.
Take one of the 67″ pieces of cord, fold it in half and attach it to the wooden ring using a cow hitch knot.
Then, take the right cord and wrap it in front of and over the ring and pull the end through the loop. Do the same thing with the left cord in the other direction.
Repeat that with the remaining 15 cords. You’ll attach four cords in each section between the arms.
You’ll want to space them out as shown in the picture below.
Step 5: Tie 3 Rows of Alternating Square Knots
Now we’re going to tie three rows of alternating switch knots for the body of the basket.
Start by tying a row of square knots about an inch down from the ring in each section around.
Then tie an alternating row of switch square knots about an inch beneath the first row of square knots and tie one more row of alternating switch square knots under that.
You’ll have three rows of alternating switch square knots all together.
Step 6: Attach the Cords to the Second Wooden Ring
Grab your second wooden ring and now we’re going to attach all the cords to it using double half hitch knots.
This time you can just attach them in the order they are already in all the way around. Make sure the ring is positioned about an inch below the last row of switch knots.
Step 7: Tie the Bottom Wrapping Knot
Now to finish off the basket, gather up all the cords and tie a wrapping knot to hold them all together. Use the 50″ long cord for this wrapping knot and wrap it around 8 times.
Then you’ll need to pull each cord to tighten the bottom of the basket through the wrapping knot.
Make sure while you’re tightening them that the wrapping knot stays in the center and doesn’t get all out of whack.
Step 8: Cut the Fringe
Cut the fringe about 4 or 5 inches below the bottom wrapping knot. If you want to unravel the fringe you can do that now.
I really like how the three ply rope looks unraveled!
Done!
Now you can put some fruit or a cute little plant in your hanging macrame basket!
In Summary
I hope you enjoyed this DIY macrame hanging basket tutorial!
If you make one of these using this tutorial, please share a pic over on Instagram and tag me @marchingnorth so I can see, I love seeing your creations!
Join the Macrame for Beginners and Beyond with Marching North Facebook Group!
If you’re new to macrame or if you’ve been knotting for a while, connecting with other macrame lovers is always a great idea!
Come check out our Facebook group, Macrame for Beginners and Beyond with Marching North. It’s a friendly community where you can ask questions, get inspiration, and share your awesome work with other macrame lovers! Come join the conversation today!
Hi Crystal. I’ve done plant hangers before but not like this”fruit basket” kind. I love it. Question though… I have 5 mm twisted cotton rope. The pattern calls for 3 mm. Do I have to adjust the length s of any of the parts to accommodate the wider rope?
Thanks so much.
Deb Richard
Hi, Deb!
Did you ever get an answer to this question or figure it out?
Celeste
I have a question. Could you tell me what the length of this hanger is when finished?
Hi Colleen, I don’t know the author, but my guess is this hanging basket is approximately 30-38” long. Length is in the hands of the creator, that would be you ???