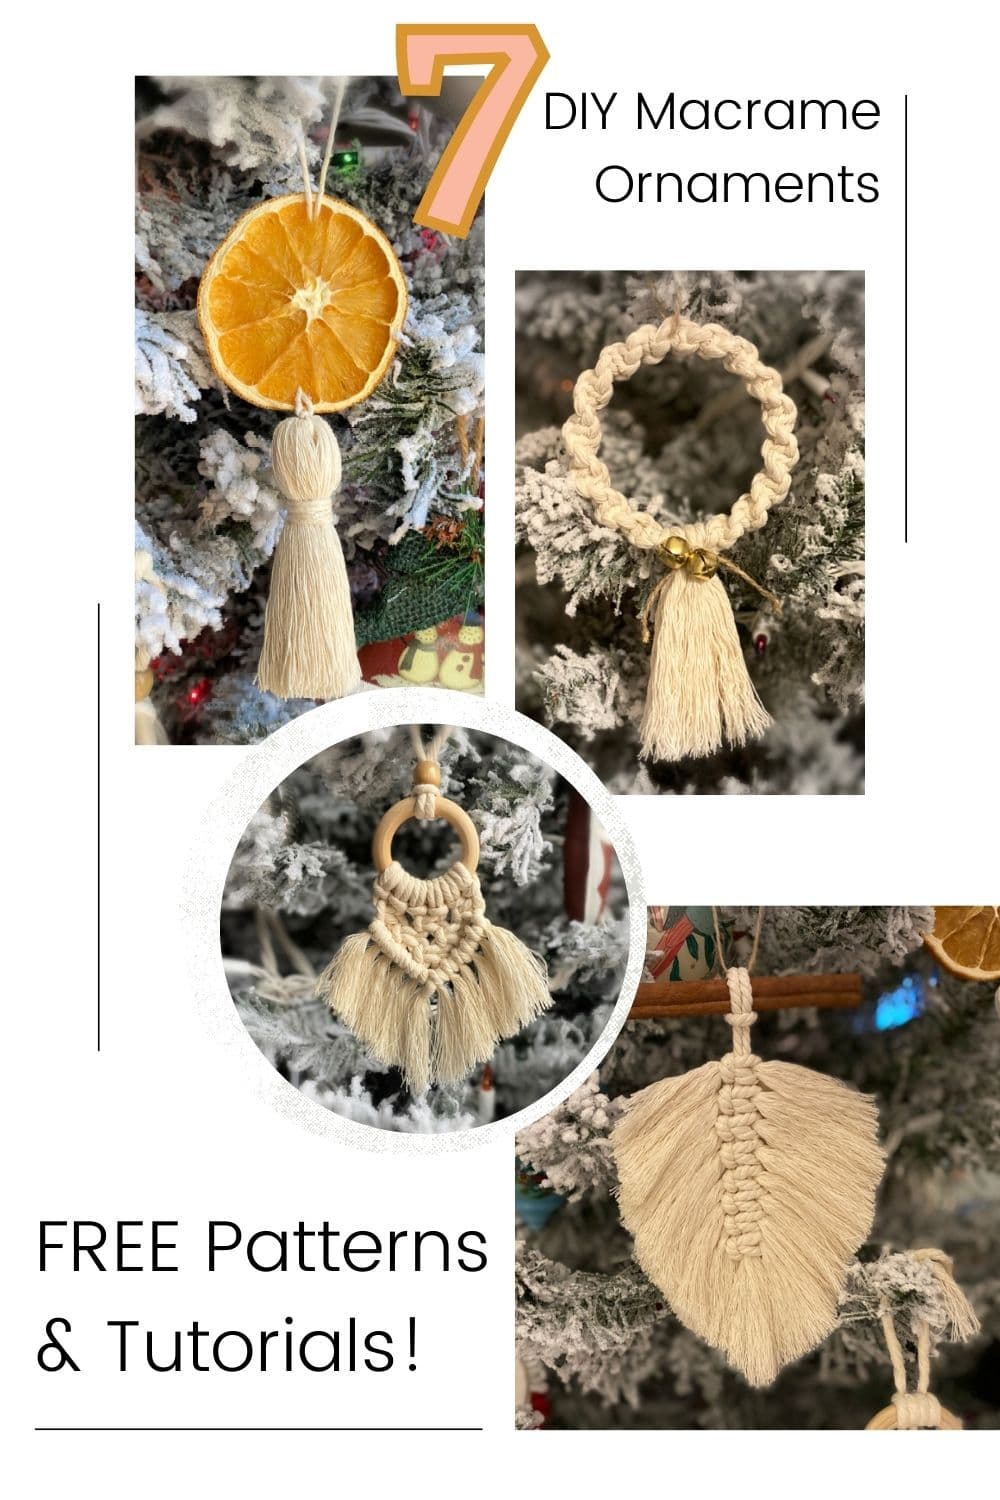
7 Easy Macrame Christmas Ornaments (with Free Patterns!)
Are you looking for some simple but beautiful macrame Christmas ornaments to make for your tree this year?
I’ve got 7 easy (and free!) macrame ornament DIY tutorials for you that even beginners can make. Keep scrolling to learn more!
Want to remember this? Post these 7 Macrame Christmas ornament tutorials to your favorite DIY Pinterest board!
(This post may contain affiliate links. If you click one and make a purchase, I may receive a small commission at no extra cost to you. Read the disclaimer here. Thank you for your support!)
If you’re new to macrame or a seasoned knotter, you have to check out these free (and easy!) Christmas ornament patterns!
They’re simple enough for a beginner to make, and a fun quick project for more advanced macrame enthusiasts.
New to macrame? Be sure to check out my Guide to Macrame for Beginners!

Inside, you’ll find out how to get started with macrame, what supplies you need, the basic knots, and more!
Below you’ll find the written tutorials with a photo walk through for each of these macrame Christmas ornaments, plus links to see the step by step video tutorials on my YouTube channel!
Related: 13 DIY Macrame Gift Ideas for Everyone on your List!
Here are the 7 macrame Christmas ornaments we’ll be making in today’s tutorial:
Keep scrolling to see each written, step by step tutorial down below!
Also be sure to check out this post with 5 more boho DIY macrame ornaments!
They include an adorable gnome, and wooden bead star, and more!
Macrame Feather Ornament
These DIY macrame feather ornaments are so fun to make and a great way to use up scrap macrame cord!
Attaching a piece of felt to the back will help these boho beauties hold their shape, and the cinnamon stick adds a nice natural touch.
Supplies You’ll Need
- 4 mm 3 strand twisted cotton
- 1 piece @ 16” long –
- 16 pieces @ 7” long
- Cinnamon stick
- Twine for hanger
- Felt
- Hot glue gun
- Cork board or macrame board
- T-pins
- Sharp scissors
How to Make It
First, fold the long piece of cord in half and attach it to the cinnamon stick with a lark’s head knot.
Now, you’re going to take one of the short pieces and fold it in half. Hold it perpendicular to the long center cord, and put the looped end under the center cords with the loop pointing to the left.
Then grab another short piece and your going to lay it on top of the first piece, with the ends facing in the opposite direction. The loop will be facing right.
Basically, you’ll have a sandwich situation going on with the right short piece on the bottom, the center cords in the middle, and the left short cord on the top.
Then, thread the ends of each short cord through the loop of the opposite cord, and pull the ends to tighten it up.
Repeat that process for the remaining short cords.
Grab your macrame brush or comb, and brush out the fringe really well on both sides.
Now we’re going to cut a small piece of felt to go on the back of the feather to help hold it’s shape. This is optional, but it really helps keep your ornament looking good for years to come.
You want to make sure the felt piece isn’t going to show from the front. I eyeballed mine and just trimmed it down until it was how I wanted it to look.
Make sure the feather is neatly brushed, and use your hot glue gun to attach the felt to the back of your feather.
Now you can flip your ornament back over and cut the edges to shape the feather.
Add a small piece of jute or twine to the top of the ornament to make a hanger and you’re done!
See the full macrame feather ornament video tutorial here!
Easy Boho Macrame Ornament
If you have some wooden rings that aren’t strong enough to use for plant hangers, these simple macrame ornaments are a great use for them!
You can use a simple wooden bead at the top, or add a pop of color if you want. Feel free to customize it!
Supplies You’ll Need
- 3 mm single strand cotton string
- 6 pieces @ 24” long
- 1 piece @ approx. 8” long for hanger
- 2” wood ring
- Cork board or macrame board
- T-pins
- Sharp scissors
How to Make It
Attach the six pieces of cord to the wooden ring with lark’s head knots. Then pin or tape it down to your workspace to hold it while you knot.
Tie three square knots going across.
Tie two more square knots, alternating from the first row.
Tie one last square knot in the center.
Use the far left cord as the filler cord and tie 5 double half hitch knots going down and to the right.
Use the far right cord as the filler cord and tie six double half hitch knots going down and to the left. The last knot will connect the two sides.
Attach the hanging cord to the top of the ring with a lark’s head knot.
Thread the wooden bead onto the hanging cord at the top. I used a large eye needle and threaded one piece through at a time.
Tie an overhand knot a couple inches above the bead and trim off the excess cord to make the hanging loop.
Cut the fringe in the shape you want, brush it out, and give it a final trim.
See the video tutorial for boho macrame wood ring ornament here!
Join the Macrame for Beginners and Beyond with Marching North Facebook Group!
If you’re new to macrame or if you’ve been knotting for a while, connecting with other macrame lovers is always a great idea!
Come check out our Facebook group, Macrame for Beginners and Beyond with Marching North. It’s a friendly community where you can ask questions, get inspiration, and share your awesome work with other macrame lovers! Come join the conversation today!
Mini Macrame Wreath Ornament
I just love this cute little macrame Christmas wreath! You can easily make several of these, and they look great on a flocked tree!
You could use other colors of macrame cord as well and make some bright, cheery wreaths for your tree. There are so many options!
Supplies You’ll Need
- 4 mm 3-strand twisted green cotton
- 24 pieces @ 12” long
- 3” metal ring
- 40” long sparkle yarn (I used Wool-Ease Thick and Quick)
- Twine for hanger
- Cork board or macrame board
- T-pins
- Sharp scissors
How to Make It
Attach all the green pieces of cord to the ring using lark’s head knots. They should fill up the ring. If your ring is larger, you might need more pieces (or less if it’s smaller).
Lay the piece of yarn around the ring. This is going to be the filler cord for a row of double half hitch knots going all the way around.
Starting at the bottom center, tie a double half hitch knot going to the right. This is what the first half will look like…
…and here’s the second half.
Continue tying double half hitch knots with each piece of cord going all the way around.
Once you get all the knots tied, pull on the filler cord ends to even them up a bit. We’re going to tie a bow with them in minute.
Brush out the fringe all the way around.
Trim the fringe down as short as you want, I went with about 3/4″ or so long.
Tie a neat looking bow with the ends of the filler cord yarn.
Isn’t it cute?!
Grab a piece of twine and attach it with a lark’s head knot to the metal ring at the top of the ornament. Just scoot the cord apart to make a little gap.
Then pull the ends up and behind the ornament so you can’t see the hanger from the front.
Tie an overhand knot in the end of the hanging loop and trim off the excess twine.
See the video tutorial for mini macrame wreath ornament here!
Dried Orange Macrame Tassel Ornament
Making these dried orange slices is so fun and I love the natural look of them.
The only bummer is all the orange-y scent fades once they’re dried out. You can add a few drops of citrus essential oils to make it smell great again!
Also, these tassels are another awesome way to use up scrap macrame cord. Win win!
Supplies You’ll Need
- Dried oranges (see instructions below to make your own, or buy some here)
- 3 mm cotton macrame string
- 8 pieces @ 9” long
- Butcher Twine to hang
- Large eye needle
How to Make It
Slice your oranges about 1/4″ thick. Discard the end pieces and try to make them all the same thickness so they dry out evenly.
Lay the orange slices out on an absorbent dish towel or paper towels.
Fold the towel over the slices and press on them with your hands to get some of the excess juice out. You want to get them pretty dry.
Set your oven to 180 F.
Lay the orange slices on your oven rack to dry.
If you have a metal cooling rack, I would recommend putting them on there and then putting it in the oven so they don’t fall through the rack.
My cooling rack got all rusty and I had to throw it away though, bummer!
I had to be extra careful not to drop all the orange slices into the bottom of my oven.
Let the oranges dry in the oven for 3 to 5 hours, checking every hour or so. Yes, it takes a while, but it’s a good project for a cold day since the oven will keep the kitchen warmed up!
Once they’re done in the oven, I recommend letting them cool overnight before making the ornaments.
I didn’t, and they were still a bit gooey and messy to work with but they dried more by the next day.
OK, now on to the tassels! Lay out 8 pieces of macrame cord that are about 8″ long. This is a great way to use up scrap cord, btw.
Take a piece of butcher twine and loop it up under the bundle of cords. Oh, I brushed out the center of the cord bundle a bit before I did this part. It makes it easier to brush out later.
Tie a tight knot around the bundle of cords.
Brush the tassel out really, really well. It should look like a little tassel ghost or Cousin It, whichever you prefer.
Grab another piece of twine and we’re going to tie a wrapping knot around the head of the tassel.
Bring the end of the twine through the little loop of the wrapping knot and pull the top cord to tighten it.
If you aren’t familiar with the wrapping knot, check out this basic macrame knots post to see a step by step tutorial.
Now, trim off the excess fringe at the bottom of the tassel.
Grab a large eye needle, thread the cords from the top of the tassel through it, and then thread the cords through the bottom of an orange slice.
Now, bring the needle up to the top of the orange slice and pass it back through to the front.
On the back you’ll be able to see the cord, like this.
And here’s how the front will look.
Remove the needle, tie an overhand knot in the top of the cords, leaving about 2″ of space to hang it on the tree, and you’re done!
See the video tutorial for dried orange tassel ornament here!
Macrame Cinnamon Stick Ornament
This adorable macrame Christmas ornament looks like a mini wall hanging!
Since you can make this with regular old butcher twine plus a couple of cinnamon sticks, you can pretty much get all the supplies at the grocery store while you’re picking up holiday food supplies!
If you can’t find cinnamon sticks, regular wooden sticks from your yard will work too (or even a couple of skewers cut down to size.)
Supplies You’ll Need
- 2 cinnamon sticks
- Butcher twine or 1 mm cotton string
- 12 pieces @ 36” long
- Cork board or macrame board
- T-pins
- Sharp scissors
How to Make It
Attach the 12 pieces of twine to one of the cinnamon sticks using lark’s head knots. Then secure it to your workspace.
You’re going to tie square knots to create the pattern below. To make it easy to explain, imagine the cords are number 1-24 going from left to right. Here’s the pattern:
- Row 1: tie one square knot in the center
- Row 2: using the eight cords in the center, tie two square knots
- Row 3: tie a square knot with cords 7-10 and another one with cords 15-18
- Row 4: tie a square knot with cords 5-8 and another one with cords 17-20
- Row 5: tie a square knot with cords 3-6, one with the center four cords, and another one with cords 19-22
- Row 6: tie a square knot on the far left, two knots using the center 8 cords, and one on the far right
- Row 7: tie a square knot with cords 3-6, one with the center four cords, and another one with cords 19-22
- Rows 8-11: repeat rows 1-4 in reverse
Now you’re going to attach the cords to the other cinnamon stick using double half hitch knots.
Hold the cinnamon stick straight while you knot, and it’ll look like this when you’re finished.
To attach the hanging cord, I used the constrictor knot. You can see a tutorial of how to tie that knot right here if you’re unfamiliar with it.
You could also just tie a hanger on with a regular knot, I just think this look nice and tidy.
Trim the ends down a bit and glue them to the back of the cinnamon stick to hide them.
Now just cut the fringe into a triangle shape, brush it out, and you’re done!
See the video tutorial for macrame cinnamon stick ornament here!
Macrame Angel Ornament
I just love this macrame angel ornament, and it’s really easy to make!
Most of this ornament is made using double half hitch knots, so it’s a great way to practice those while also decorating your tree.
Supplies You’ll Need
- 3 mm single strand cotton string
- 2 pieces @ 25” long
- 16 pieces @ 22” long
- 2” wood ring
- Wooden bead with a large hole
- Gold embroidery thread for bow
- Cork board or macrame board
- T-pins
- Sharp scissors
How to Make It
Attach the 2 pieces of 25″ cord to the wooden ring with lark’s head knots. Then pin or tape it down to your workspace.
Attach 5 cords to the left most cord on the left side of the ring. Do the same thing on the right, with the right most cord.
Over on the left side, use the right most cord that you originally attached to the wooden ring (the part we didn’t attach the cords to) as the filler cord for a row of double half hitch knots going to the left.
If that’s confusing as all get out, watch the video. It’s kind of hard to explain with words!
Tie two more rows of double half hitch knots going to the left. The rows will naturally shift towards the left.
Repeat that on the right side, but going to the right.
Attach another piece of cord to the center bottom of the wooden right with a cow hitch knot. The ends will be facing up.
Thread a wooden bead onto those cords and position it in the center of the wooden ring. This is our little angel’s head.
Now to attach the cords to the wooden ring, we’re going to tie the first half of a double half hitch knot and then the second part.
I know that sounds confusing, but bear with me.
Bring the right cord behind the wooden ring, loop it over and bring it through in the center.
Do the same thing with the left cord, but in the opposite direction. Both ends will be coming up in the center and mirroring each other.
Then finish the double half hitch on the right, going to the right.
Finish the double half hitch knot on the left, going to the left.
It’s amazing how something super simple can sound so complicated when you try to explain it with words, lol.
Alright, attach two cords between the left wing and the center cord of the wooden ring using cow hitch knots. Repeat that on the right side, too.
Tie two square knots using the outer most left and right cord as the working cords and the six cords in the center as filler cords.
Take a piece of gold thread, wrap it around a couple of times and tie a pretty bow in the center of the square knots.
Now it’s time to trim all of the fringe, brush it out, and trim it again.
I recommend adding a drop of glue on the center of the gold bow, so it doesn’t come undone when you put all your Christmas ornaments away.
(I have three kids ages 3-11 that do all the Christmas decorating, so this step is crucial!)
Tie an overhand knot at the top to make a hanging loop and cut off the excess. Now your macrame angel ornament is ready to hang on the tree!
See the video tutorial for macrame angel ornament here!
Macrame Christmas Wreath Tassel Ornament
This ornament is super simple and the little jingle bells add a festive touch.
You can easily make several of these to decorate your tree pretty quickly.
Supplies You’ll Need
- 3 mm single strand cotton string
- 1 @ 150”
- 1 @ 60” for tassel
- piece of twine for hanger & to attach bells
- 2 small bells
How to Make It
The easiest way I found to make this ornament is to hold the metal ring between your knees while you’re knotting.
Start by threading the long piece of cord through the ring and matching up the ends so it’s even.
Tie a regular knot to attach it to the ring.
Now you’re going to start tying half knots around the ring to make the spiral part.
A half knot is the first part of a square knot, so instead of going back and forth like you do for square knots, you just tie the first half over and over again to get it to spiral.
If you’re new to macrame or need a refresher on the basics, check out my article with the basic macrame knots for beginners!
Continue tying the spiral knots all the way around the ring. You’ll want to leave a small gap for the tassel.
Now we’re going to make the tassel. Take the 60″ piece of cord and fold it back and forth to make a bundle about 8 or 9 inches long.
Drape the bundle over the ring where the gap is and even it out so there’s the same amount of tassel on each side.
Grab a piece of twine or jute cord and wrap it around the tassel at the base. Make your wraps nice and neat. Then tie a knot on the front.
Thread a bell onto each end of the twine.
Tie another knot to secure the bells into place.
Tie an overhand knot on both ends of the twine for a decorative touch. Then trim off the excess twine.
Cut the ends of the tassel, brush it out, and trim it so it’s nice and neat.
Add another piece of twine to the top of the ornament to use as a hanger.
Now your ornament is ready to go on your tree.
See the video tutorial for macrame tassel wreath ornament here!
Click the thumbnail image below to see all the video tutorials in this post in one convenient YouTube playlist!
In Summary
I hope you enjoyed these macrame Christmas ornament patterns.
If you make some of your own, please share them on Instagram and tag me @marchingnorth so I can see them!
Hi.. love your projects! Do you have a free pattern for a round bohuemian macrame hanging cat bed with fringe? Plus directions would be nice too! Thank you♡
Thanks so much, Crystal I love all these ideas.