3 Free Punch Needle Christmas Patterns (& Tutorials!)
Are you looking for some fun punch needle ornaments to make this holiday season?
I’ve got three free punch needle Christmas patterns for you to try, plus video tutorials showing how to put them together.
Don’t forget to pin this for later!

Keep scrolling to find out more and get your free patterns!
(This post may contain affiliate links. If you click one and make a purchase, I may receive a small commission at no extra cost to you. Read the disclaimer here. Thank you for your support!)
I made these punch needle Christmas patterns as part of my 12 Days of Christmas DIY’s video series for 2020, along with several macrame ornaments and a couple fun glitter projects!
These ornaments are simple enough for a beginner to make, and a fun quick project for more advanced punchers.
The buffalo plaid snowflake and the Scandinavian inspired ornaments are both done with the Ultra Punch needle and 6-strand embroidery floss, and the candy cane ornament is done with the Oxford #10 fine punch needle and cotton yarn.
Fill out the form below to get your free printable patterns!
Related: Must-Have Punch Needle Supplies (and Where to Find Them!)
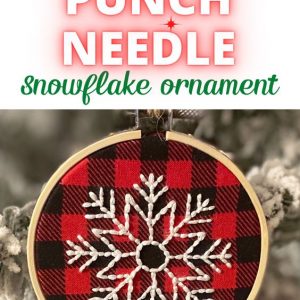
Buffalo Plaid Snowflake Punch Needle Ornament
Supplies You’ll Need to Make a Punch Needle Buffalo Plaid Snowflake Ornament //
- Buffalo plaid cotton fabric (approx. 5″x5″)
- Piece of weaver’s cloth (approx. 5″x5″)
- 3” wooden embroidery hoop
- White cotton embroidery thread
- Ultra Punch needle (with the medium needle inserted)
- Twine to hang
- Felt
- Tacky glue
- Needle and thread
>>See the video tutorial here!<<
How to make it:
The full tutorial is in the video above, but I’ll give you the basic rundown here as well.
Prepping
For this punch needle Christmas ornament, you’ll need to cut a piece of Weaver’s cloth and buffalo plaid cotton fabric to about a 5″x5″ square. You need it to fit snugly in the 3″ wooden embroidery hoop with enough extra to finish the back.
Tracing
Before you put the fabric in the hoop, you need to print out and trace the pattern onto the buffalo plaid fabric square.
Make sure you line it up how you want it to lay on the plaid, I centered my snowflake on one of the black square in the center and made sure it was aligned with the plaid pattern.
I recommend tracing the pattern with a white gel pen, at least that’s what I used. It shows up a lot better on the dark fabric.
Stretch in the hoop
Once the pattern is traced onto the front of the fabric, lay the buffalo plaid square on top of the Weaver’s cloth square with the traced pattern (front side) facing up, and stretch them into the wooden hoop.
You’ll want to make sure it’s centered nicely, and tighten it as much as you can. These little wooden hoops don’t hold the fabric perfectly drum tight, but since this is a small project it still works pretty well.
You could always punch it in a no-slip hoop and then transfer it to the wooden frame, but I just did the whole thing in the tiny hoop.
Punching
You’re going to punch this pattern from the front, and the stitch or flat side will be the “right” side instead of the loops. Set your Ultra Punch to a stitch height of 5, make sure you have the medium needle inserted, and thread it with all 6 strand of white DMC embroidery floss.
Punch over all the outlines of the pattern, keeping your stitches even and fairly close together. No need to make long stitches, it’ll be more secure if they’re shorter.
Finishing
Once you get the whole thing traced, trim the excess fabric leaving at least a 1″ border.
Thread a sewing needle with some thread and make a running stitch along the boarder and pull it tight to cinch the fabric closed on the back. (If that doesn’t make sense, definitely watch the video. It’s kind of hard to explain in words!)
Last, grab your tacky glue and spread it around the back of the hoop, trying to not let it go on the sides of the hoop, and press your piece of felt firmly to the back. Put a heavy book on it and let it dry overnight.
The next day, use a sharp pair of scissors and cut the felt out all the way around the hoop as close to the edge as you can get. You don’t want the felt to stick out from behind the hoop.
Make a hanger with a piece of twine and attach it to the screw with a lark’s head knot and you’re finished!
Candy Cane Punch Needle Ornament
Supplies You’ll Need to Make this Punch Needle Candy Cane Ornament //
- Red cotton yarn
- White cotton yarn
- Monk’s cloth
- Morgan No-Slip hoop (I used the 10″)
- Oxford #10 Fine punch needle
- Felt
- Tacky glue
- Large eye needle
- Twine for hanger
>>See the video tutorial here!<<
How to make it:
The full tutorial is in the video above, but I’ll give you the basic rundown here as well.
Prepping:
Print out the candy cane pattern and stretch your Monk’s cloth in the embroidery hoop. Tape the pattern to the back of the fabric and trace it.
Remove the paper pattern from the back (I say that because I almost always forget, lol) and thread either the red or the white yarn into your punch needle. It doesn’t matter which one you start with, each stripe will just alternating like a candy cane does.
Punching
Punch each stripe of one color, and then go back and punch the other color in between. For each segment, outline it and then punch in a spiral to the center.
Keep a small amount of space between each row and make your stitches nice and even. It doesn’t have to look perfect on the back, it’s more important that there aren’t any gaps on the front side.
One quick tip: when you’re punching a new color in between the previous color, leave a small gap between the colors to prevent the loops from getting all intermingled on the front.
Finishing
Once you get the pattern completely punched, use the tip of your punch needle to straighten all the loops out on the front and make it look nice and neat.
Cut around the candy cane, leaving at least a 3/4″ border. Paint some tacky glue around the border and let it dry.
Now you need to cut into the border fabric on all the curves so it’ll be easier to fold over and glue in place.
Apply a layer of tacky glue around the whole inside edge of the back of the candy cane and start wrapping the fabric border to the back. You may have to hold the flaps in place for a few seconds so they stay.
Once you get all the border fabric glued down, let it dry for a few minutes and then it’s time to add the felt backing.
Put one more layer of tacky glue on the back of the candy cane, spread it around evenly, and press the piece of felt firmly to the back.
Lay a heavy book on the ornament and let it dry several hours or overnight.
When it’s dry, use a sharp pair of scissors to trim the felt all the way up to the edge all the way around.
Then, thread the twine onto a large needle and poke it through the top to make a hanger. Your candy cane punch needle ornament is complete!
Scandinavian Inspired Punch Needle Ornament
Supplies You’ll Need to Make this Punch Needle Ornament //
- Weavers cloth (approx. 12″x12″ or big enough to fit in your hoop)
- Ultra Punch needle
- Morgan No-slip hoop (I used the 10″)
- DMC 6 strand embroidery floss in the following colors and amounts
- 2 Gray #648
- 2 Lt. Blue # 747
- 1 ECRU (1 skein was just enough, I recommend 2 to be safe)
- 1 Red #304
- Gold embroidery thread to hang
- Needle
- Felt
- Fabric glue
>>See the video tutorial here!<<
How to make it:
The full tutorial is in the video above, but I’ll give you the basic rundown here as well.
Prepping
Stretch your Weaver’s cloth in a no-slip hoop, cut out the pattern and tape it to the back. Carefully trace the pattern onto the fabric with a pen, and then remove the paper pattern.
Insert the medium needle in your Ultra Punch, set the stitch height to 3 and thread it with your first color of floss.
Punching
For this pattern, the loops will be on the front finished side, so you’ll be working from the back. Fill in the areas one at a time. Begin by outlining the shape, and then fill it in going around in a spiral.
You can see which colors I put where in the video above, or you can do it however you prefer.
Finishing
Remove the fabric from your hoop and lay it down on your work surface face down. Now you’re going to apply a fairly generous layer of fabric glue all over the back and spread it evenly.
You want to put enough glue to cover, but not so much that it seeps through the felt.
Then, press your piece of felt firmly to the back, stick it under a heavy book, and let it dry overnight.
The next day, cut the excess fabric all the way around the ornament with sharp scissors. You want to cut right up next to the loops, but not into the loops.
Thread a piece of gold embroidery thread onto a sewing needle and insert it into the top of your ornament to make a hanger. Your Scandinavian inspired punch needle ornament is complete!
In Summary
I hope you enjoyed these punch needle Christmas patterns. If you make some of your own, please share them on Instagram and tag me @marchingnorth so I can see them!
More Recent Posts!