Punch Needle Pillow // Easy DIY Tutorial
Looking for a super fun DIY home decor project? Try making a punch needle pillow!
This punch needle pillow project is super easy, even if sewing isn’t your strong suit (like me).
Don’t forget to pin this for later!

When I was planning this project out, I originally was going to do a no-sew version.
My sewing machine has been on the fritz lately and since everything non-essential is closed, I figured I’d have to just do without sewing until life goes back to normal. (Note: I originally wrote this back in 2020. 🙂
On a whim, I decided to try my machine out one more time and lo and behold it worked!
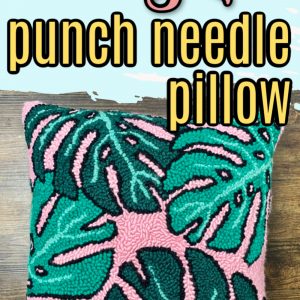
Do you like the Monstera Leaf punch needle design on my pillow?
If you don’t have a sewing machine, you can do a no-sew version of this and I’ll put a link in the supply list to the stuff I was going to use to no-sew the pillow together.
I didn’t use it, but I’m sure it would work fine, too. The directions for assembly would be mostly the same, but instead of the sewing machine part, you’d just follow the instructions on the package.
Are you thinking “wait, I need to know how to do the punch needle part, first!”
Don’t worry, I got you covered! Check out my Punch Needle with Yarn tutorial right here!
Note: This pillow does not have a removable cover and is stuffed using poly-fil stuffing.
It’s basically a throw pillow that I will be very protective of and my kids, husband, and dog are not allowed to use ?.
Doing it this way is easier, but you could also make an envelope style closure on the back. You would have to use a pillow form instead of poly-fil, but the good thing is you could take it off to hand wash it if needed.
(This post may contain affiliate links. If you click one and make a purchase, I may receive a small commission at no extra cost to you. Read the disclaimer here. Thank you for your support!)
Supplies Needed to Make a Punch Needle Pillow
- Finished punch needle project (I made mine with wool yarn punched on Monk’s cloth)
- Cotton backing fabric in a coordinating color that’s the same size as punch needle piece (I used dark green Kona cotton)
- Poly-Fil stuffing (get more than you think you’ll need)
- Sewing Machine equipped with a zipper foot and matching thread
- Optional: if you don’t want to sew it, use some of this no-sew iron-on tape
- Sharp scissors
- Needle and thread
- Fray Check
Punch Needle Pillow Tutorial
Step 1: Steam your punch needle design
Before you start assembling the pillow, you need to steam your punch needle piece so it lays flat.
To do that, turn your iron on high heat and turn off the steam (if you’re using wool yarn. If it’s acrylic, use a cooler iron so you don’t melt it!)
Then, get a tea towel or another thin towel (a receiving blanket works well too) and get it completely wet. Wring it out so it isn’t dripping, but is still plenty wet.
Lay your punch needle piece on your ironing board with the loop side facing up. Lay the wet towel evenly over the top of it.
Once the iron is ready to go, press it down one spot at a time and hold it for five or six seconds at a time. Don’t move it back and forth, instead pick it up and move it to the next spot.
There will be a lot of steam so watch your face! Do this all over the top of the punch needle design until the towel is dry.
Now your punch needle piece should lay nice and flat.
Step 2: Pin the cotton fabric to the punch needle fabric
Put the cotton fabric and punch needle fabric together with right sides facing each other.
Line it up nice and straight and put a few pins around the sides to hold it all in place.
On one side, you’ll need to mark an area large enough to flip and stuff your pillow. Just put a pin on each side of where the opening will be and remember not to sew that part.
For my 16” square pillow, I made the opening about seven or eight inches long.
Step 3: Sew the pieces together
You’ll be sewing right up against the ridge made by the loops, so it’s easy to keep a mostly straight seam.
At first, I was sewing with the cotton fabric facing up, but then I realized it’s a lot easier to get the stitches nice and close to the loops if you flip it over and sew with the punch needle fabric on top (you’ll be looking at the back of your punch needle piece).
I recommend starting at one side of the opening mark and sewing all the way around to the other mark. Don’t forget to leave that gap open!
Now, I’m no professional sewist (far from it), but I have a few tips if you’re a sewing newbie.
- Always backstitch at the beginning and end of your seam (there’s a lever or button on most machines to do a few backstitches easily). This will make your seams much more secure.
- When you come to a corner, use the wheel to move the needle into the down position, then pull up the presser foot and rotate the fabric with the needle still down.
- Once you have it rotated, put the presser foot back down and continue sewing along. It keeps things in line and it’s easier than starting and stopping a new seam after each corner.
Once you have everything sewn together, clip off the excess threads.
Step 4: Trim the excess fabric
Now you’ll want to trim down the excess fabric so it’s not too bulky inside the pillow. Also, clip the fabric in the corners off on a diagonal.
Add some Fray Check to the edges of the Monk’s cloth (or whichever punch needle fabric you’re using) so it doesn’t unravel.
I know it’s inside the pillow and it probably won’t matter, but it never hurts. I don’t want this thing coming apart down the road!
Step 5: Flip your pillow
Ok, this seems like it would be super easy, but since the punch needle fabric and yarn combo is super thick, it takes a little patience.
It’s kind of like having a baby, once you get the head out everything’s mostly smooth sailing.
(I’ve had three babies naturally and I know full well that it’s a lot harder than flipping a pillow right side out, but you know what I mean, right?)
Gently pull and push the fabric through the opening a little at a time, and eventually, you’ll get enough fabric through that it’ll flip easily.
At first, it’ll seem like there’s no way this is going to work, but it will, I promise!
Be careful that you don’t accidentally pull out any punch needle loops. If you used wool to punch like I did, it’s pretty sturdy and you shouldn’t have any problems.
Step 6: Add the stuffing
Now it’s time to stuff!
One thing I was telling my daughter while I was working on this was you need to add more stuffing than you think.
It may look like the pillow is filled enough, but you want it to be REALLY filled.
Otherwise, you’ll end up with a saggy pillow, and no one wants a saggy pillow.
Shove the stuffing all the way into all the corners and do your best to make it even so the pillow doesn’t come out too lumpy.
Step 6: Sew the opening closed
To sew the opening closed, you’ll need a needle and thread with matching thread (I used the same stuff I had loaded in my sewing machine).
We’ll be doing a ladder stitch to sew it shut, that way the seam won’t be very noticeable.
To do this stitch, you take tiny stitches along the crease on either side of the fabric back and forth. It’s hard for me to explain, so if you aren’t familiar with it I highly recommend watching that part of the video.
Step 7: Give your punch needle pillow a massage
This step is optional (and weird sounding) but I massaged the filling around inside the pillow so it wouldn’t be lumpy.
The filling got squished down while I was sewing the opening closed and needed some adjustment.
Done!
I hope you enjoyed this tutorial! I’ve never done a sewing tutorial before, so please let me know if anything was confusing.
Remember, that monstera leaf punch needle pattern is available in my shop. Be sure to check it out!
Related Posts
- 8 Essential Punch Needle Tips You Need to Read BEFORE You Try It! (+ free patterns!)
- DIY Boho Punch Needle Wall Hanging // Tutorial + Video
- Super Easy Macrame Plant Hanger // Tutorial + Video
- How to do Embroidery Stitches with a Punch Needle // Tutorial + Video
Hi … i love the tutorial. I have a question . Are these punch needle pillows machine wash ?
I wouldn’t recommend machine washing, mainly because in this tutorial I used wool yarn and it would get felted. If you want to make one like this but need it to be washable, you could do an envelope style pillow cover instead of sewing it straight on the way I did in this tutorial. In that case, I still wouldn’t machine wash the punch needle part (I’d hand wash it). I’ll post a tutorial for that technique in the future (it’s on my to-do list), but if you search in Google for “diy envelope pillow cover” you should be able to find instructions. I hope that helps! Thanks for stopping by!