DIY Punch Needle Art Wall Hanging Tutorial
If you’ve been scrolling through Pinterest lately, you’ve probably come across one of those gorgeous woven fiber art wall hangings.
You know the ones, with the fringe and the beautiful textures and colors.
Don’t forget to pin this for later!

(This post may contain affiliate links. If you click one and make a purchase, I may receive a small commission at no extra cost to you. Read the disclaimer here. Thank you for your support!)
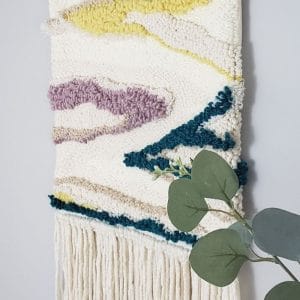
Today I’ll show you how to make a punch needle art wall hanging that has a very similar look but minus the whole weaving part.
Nothing against weaving. Woven fiber art is amazing and one of these days I’d love to try my hand at it.
The loops of punch needle somewhat resemble weaving (or at least I think so). I think it looks really close!
The great thing about this piece of DIY wall decor is it only took me a few hours to make from start to finish, and that was even with the added work of videoing the process.
Since this was sort of an abstract art design, I didn’t create a printable pattern. Instead, I’ll show you exactly how I drew it out and then the process of punching the design.
I made two videos, one of the punching and one of the assembly. And don’t worry, they’re sped up a lot.
There’s no voiceover this time, just subtitles and music. It’s a pretty straight forward tutorial so I think it works.
I encourage you to come up with whatever design you like for this project, although you’re more than welcome to do the same thing as I did.
My main goal was to have lots of texture, so I mixed up yarn weights and punch needle sizes, and I punched part of the design with the flat side showing and part with the loop side showing.
You can just go with the flow and find what you like!
As always with punch needle, if you don’t like it you can just pull it right back out.
I’ve seen people describe punch needle art as painting with yarn or thread, and that’s a great description of this DIY wall hanging.
You’ll find the videos for part one and part two down below under the supply list. I’ll also write a brief tutorial under the videos.
Please like and subscribe to my YouTube channel! I’m really working on adding to my video library and it’s been quite a learning experience. I truly appreciate your support!
Supplies You’ll Need to Make Your Own Punch Needle Art Wall Hanging
- Punch Needles (size will depend on what type of yarn you’re using)
- Monk’s cloth (I used my 18”x18” gripper frame, so I used a piece of Monk’s cloth about 20”x20”)
- Yarn in various weights, textures, and colors (I used some bulky wool yarn, some fine acrylic, and some thin wool yarn. This is a great stash buster project.)
- ⅞” wooden dowel (I sawed mine in half so I have another piece for a future project)
- Craft glue or Fray Check to keep the fabric from unraveling (or you could zigzag stitch around the edges)
- Hot glue gun and glue sticks
- Jute Twine to hang your finished piece
Part 1: Punching the Punch Needle Art Wall Hanging
Step 1: Make a Rough Pattern
First, roughly sketch out your design.
I did mine on my iPad in Procreate, but paper and pencils work just as well.
Decide where you’ll want your colors to go and what colors you want to use. This doesn’t have to be exact, but I think it helps if you have an idea of what you want to do before you start.
Step 2: Draw Pattern on Stretched Monk’s Cloth
Once you have your design figured out, stretch your Monk’s cloth and draw the design on the fabric.
If you use basic shapes it’ll be easier to do this part. Don’t worry about making it perfect, this is just a basic guideline.
I used my 18”x18” gripper frame that I made to stretch my Monk’s cloth, and I highly recommend something similar in size.
You can go smaller if you want, I really like how it looks as a larger hanging though.
You could also use a smaller lipped embroidery hoop, but you’ll have to move your piece several times so keep that in mind.
Step 3: Needle Punch the Design
Punch your design. I recommend doing a mix of punching on the front and back and varying the loop length. This will add lots of texture and interest to your finished piece.
Once the punching is all finished, it’s time to move onto the assembly.
Part 2: Assembling the Punch Needle Art Wall Hanging
Step 1: Fold and Glue the Side Fabric
First, fold back and glue down the extra fabric on the sides. I folded it over twice so that the raw edge was concealed. Hot glue the fabric in place. Repeat that with the other side.
Step 2: Glue the Wooden Dowel to the Top
Next, glue the wooden dowel to the fabric on the top of the piece.
To do this, line up the dowel so it’s straight and add some hot glue where it meets the fabric.
Continue adding hot glue and attaching the fabric to the dowel until it’s totally secure. (The video shows this much better than I’m explaining.)
Step 3: Fold and Glue the Bottom Fabric
Flip the piece around and fold up the bottom fabric toward the back and glue it down, but leave an inch of fabric exposed on the bottom. This is where we’ll add the fringe.
Step 4: Add the Fringe
To make the fringe, decide how long you want the finished fringe to be. Cut pieces of yarn twice that long, plus an extra inch or two.
I used the same yarn that I used for the majority of the background for the fringe. (It’s Lion Brand Wool-Ease Quick and Thick in an off white color.)
My wall hanging ended up needing 49 pieces of yarn for fringe, but yours will most likely be different. I cut several pieces, attached them, and then cut more as I needed them.
To attach the fringe, I used a 3.5mm crochet hook and poked it through the fabric and pulled the yarn through. Then I made a larks head knot to secure it.
Do this all the way across the bottom.
After all the fringe is on, trim the bottom so all the pieces are even. I did this part after I hung my wall hanging up because it was easier and I used the trim on my wall as a guide to keep it straight.
Step 5: Attach the Hanger
To hang it up, cut a piece of jute twine. Tie the jute to each end of the wooden dowel.
Hang it up and trim your ends. Done!
I hope you enjoyed this tutorial and make your own beautiful punch needle wall hanging fiber art!
If you do, take a picture and share it on Instagram and be sure to tag me @marchingnorth!
Related Posts
- 8 Essential Punch Needle Tips for Beginners
- How to Make a DIY Gripper Frame for Punch Needle
- DIY Rainbow Fiber Art Wall Hanging
- Must Have Punch Needle Supplies (& Where to Find Them)
Please tell me where you purchase your Monks cloth. I live in a very rural area and not one store sells it around here. Thanks!
This looks amazing! Do you have any recommendations for where to find reasonably priced punch needle supplies in New Zealand, besides North Shore Crafts? All the sites I have looked at seem ridiculously expensive!