Chinese Crown Knot Macrame Plant Hanger (Simple Tutorial & Video!)
Learn how to make a macrame plant hanger featuring the Chinese crown knot in this step by step tutorial that’s easy enough for a beginner!
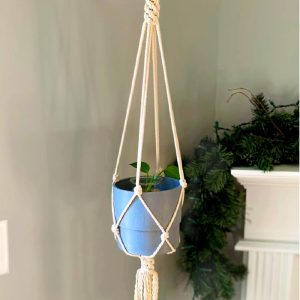
This crown knot macrame plant hanger is such an elegant and simple design. It has a clean minimalist look, but it’s still a little fancy!
Don’t forget to pin this for later!

(This post may contain affiliate links. If you click one and make a purchase, I may receive a small commission at no extra cost to you. Read the disclaimer here. Thank you for your support!)
If you’re new to macrame, this is a great project to learn the Chinese crown knot. Once you have that down, you can use it to start plant hangers and incorporate it into all sorts of designs!
The other knots used in this macrame plant hanger are the overhand knot and wrapping knot. That’s right, just three knots!
Supplies You’ll Need to make a Chinese Crown Knot Macrame Plant Hanger //
- 4mm twisted cotton rope
- 4 pieces @ 11 feet long (3.35 meters) each
- 1 piece @ approx. 30 inches long (approx. 76 centimeters)
- 2″ sturdy wooden ring
- 5″ flower pot (or adjust overhand knot placement to work with what you have, as long as it’s close to 5″)
- the BEST scissors ever
Related: Basic Macrame Knots for Beginners
Macrame Plant Hanger Tutorial //
Check out the video tutorial below, and scroll a little further for the written tutorial!
Don’t miss a video – Subscribe to Marching North on YouTube!
Want a printable version of this pattern?
Click here to grab the printable, AD-free version of this macrame pattern in my shop!
Step 1: Tie the Top Crown Knots
Cut your four working cords and thread them through the wooden ring. Hang it up on your macrame rack or somewhere secure and make sure there’s an equal amount of cord on each side.
Separate the cords into four sections like I did in the photo below.
Then you’ll start tying your Chinese crown knots.
First, grab the two cord sections closest to you (in the front), cross the left section behind the right section in the shape of a number 4.
Then pull the right cord up behind the crossed over left cord, hold it and let go of the left cord. It’ll look like the second picture below.
Continue doing that with the right back cords and then the left back cords.
After you’ve wrapped all the cords around each other and it looks like the last photo above, it’s time to take the cords in your right hand, bring them around the back and pull them through the first loop you made.
Tighten the knot by pulling on all the cords. It’s easiest to pull two sections across from each other at a time, then pull the other two sections.
Now you’ve tied your first Chinese crown knot!
Continue tying 12 more crown knots, you’ll end up with 13 all together for the top of the plant hanger.
Related: Best Macrame Cord and Supplies!
Step 2: Tie the Overhand Knots
This part will depend on what shape and size of pot you are using and what kind of plant you plan to put in the plant hanger.
I’m using a 5″ pot and my plant will be a drapey Pothos plant, so I made my first row of overhand knots 11.5″ down from the crown knots.
To determine that, I just held my pot in place and eyeballed where I wanted it to sit, then I marked where the top row of knots would be with my fingers and measured it.
You can do the same as me, or customize it to fit your pot better.
Either way, once you decide where you want to put your knot, tie an overhand knot in each section at that same height. You’ll have four all together.
Now for the next row, you’ll tie four more overhand knots alternating from the first row 3.5″ down.
Then for the last row tie four more overhand knots alternating from the previous row. Mine are 2.5″ from the middle row.
I wanted the last row of knots to rest just under the pot so that’s why the distances are different.
Step 3: Tie the Bottom Crown Knots
To tie the bottom crown knots, you’ll make the first crown knot the same way as you did at the top.
When you go to tighten it, leave about an inch or an inch and a half of space between it and the last row of overhand knots.
Then you can continue to tie the rest of the crown knots as normal. Make seven crown knots all together.
Step 4: Wrapping Knot (Optional)
When I originally finished this plant hanger, I didn’t tie a wrapping knot at the bottom.
I just trimmed it and unraveled the fringe and left it as is.
But after hanging it in my living room for a few days I decided I’d like it better with a wrapping knot under the bottom crown knots.
This is totally optional and if you prefer it without, that’ll be fine too!
Check out this short video to see how to tie a wrapping knot.
Done!
Here’s a sneak peak of the adorable little baby plant I’m going to be putting in mine.
Yes, I actually propagated this cute little guy from my other Pothos plant- I’m finally getting better at this houseplant stuff!
In Summary
I hope you enjoyed this Chinese Crown Knot Macrame Plant Hanger tutorial!
If you make one of these, please share a pic over on Instagram and tag me @marchingnorth so I can see it. I love seeing your creations, it makes my day!