How to Make a Mirror Rug {DIY Punch Needle Mirror} Full Tutorial & Video!
Learn how to make a super trendy mirror rug in this step by step tutorial and video. I’ll show you how to make this groovy Tik Tok wall art the easy way!
Don’t forget to pin this for later!

(This post may contain affiliate links. If you click one and make a purchase, I may receive a small commission at no extra cost to you. Read the disclaimer here. Thank you for your support!)
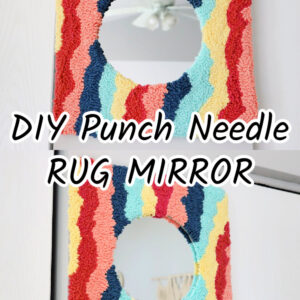
What is a mirror rug you may ask? It’s basically a punch needle mirror frame. You punch the design, glue it to your mirror and add a backing material for added strength. It’s a really fun and easy DIY!
As soon as I saw the punch needle mirror rugs trending on Tik Tok, I new I had to make one. Have you seen them? So many beautiful colors! And the texture is to die for. I just love it!
How do you make a mirror rug?
One thing I noticed in these tutorials was they added an adhesive to the back of the punched fabric. If you’re new to punch needle, that step might trip you up and it doesn’t need to!
Punch needle loops seem like they would come out easily, but once you’ve punched the whole design they actually stay in really securely.
This is because the pressure of all the loops of yarn pushing against each other locks them into place.
Related: 10 Beautiful DIY Punch Needle Decor Ideas
If you went out of your way to pull them out, you could, but generally that isn’t an issue (unless you have a pet or toddler that will be able to reach your mirror).
People have been making punch needle rugs for years with no backing glue and they hold up just fine! So for this mirror, it’s definitely not necessary.
Also, you’ll be hot gluing the punched fabric down to a piece of cardboard, so that’ll keep things in place if you’re worried. No need to glue it twice.
Supplies you’ll need to make a DIY punch needle mirror rug:
- Assorted yarn: bulky and worsted weight, acrylic, wool, and cotton, or any combo you have on hand. This project is a great way to use up random bits of yarn you have laying around! Here are a couple of my favorite places to get yarn:
- Punch Needle(s): Since I was using bulky and worsted weight, I alternated between my Oxford #10 regular and #10 fine. The regular works with bulky yarns and the fine works with finer ones. You can use a different punch needle, as long as it works with your yarn.
- Oxford #10 Regular
- Lavor 4 mm adjustable (comparable to Oxford fine)
- Monk’s cloth: I used a piece large enough to fit in my 18″ x 18″ frame, so about 20″ x 20″
- Gripper frame to stretch your fabric (or a wooden canvas frame and thumb tacks): my gripper frame is 18″ x 18″ and I made it myself.
- How to Make a DIY Gripper Frame (this is how I made mine)
- Where to Buy a Gripper Frame
- 9″ Round Mirror (these have a hanger on the back)
- Craft glue
- Hot glue gun & glue sticks
- Pen
- Scissors
- Straight edge and measuring tape
- Cardboard for the back
- Small piece of string for hanging
Related: Best Punch Needle Supplies (& Where to Find Them!)
Punch needle mirror rug tutorial:
Step 1: Drawing the guide lines
First, you’ll need to stretch your Monk’s cloth onto your gripper frame or onto a wooden frame with thumbtacks. You want your fabric to be drum tight, or tight enough that you can bounce a coin on it.
Once you have it nice and stretched, lay your mirror face down in the center and trace around it.
Then, draw another circle inside that circle about 1/2″ or 3/4″ from the edge. This is where you’ll punch to and you need it to be far enough in that you have room to glue down your mirror to the back.
Now it’s time to draw the outer borders of your mirror rug. For the left side and the top, I just eyeballed where I wanted the edges to be and I used a wooden frame I had nearby as a straight edge.
Since the Monk’s cloth has guide lines every two inches it was easy to make sure my line was straight.
Then I used my tape measure to see how far away those lines were and marked that distance on the other sides so it was even.
After that I decided to round off the corners and I did that freehand. You could also use a glass or something to help make the curves straighter.
OK, now it’s time to start punching our design!
Step 2: Punching the rug mirror
I wanted this mirror frame to be organic and freeform, so I found some colors in my stash that I liked together and started punching layers of color.
At first I started with some gray velvet yarn, but I didn’t like it with the other colors so I pulled it back out and started over (which is why you can see all those holes in the fabric).
If you’re new to punch needle, check out this free tutorial I made that will show you the basics and get you started. If you want to get more in depth, I also have a Modern Punch Needle with Yarn video course!
Keep punching along until you get the whole area filled in.
Then, flip your work over and cut all the long ends flush with the loops. If you find some random long loops, you can just trim them down too.
If you find some of your loops have intermingled where the colors change, go through and untangle them with the end of your punch needle. It’ll look a lot neater if you do!
Step 3: Cutting out the rug mirror
Grab your pen again and draw a circle in the middle that’s about an inch away from the punch needle loops.
Then draw a border around the outside of the mirror rug about an inch away from the edge.
Now, grab your scissors and pinch the center fabric so you can cut into it.
Cut out the center circle you just drew and then cut slits into it every inch all the way around.
Be careful that you don’t cut into the punch needle loops! I’ll admit I did in one spot, and to fix it I just added extra glue there and it held together fine.
Grab your craft glue and squirt a bunch of it all the way around the circle. Then fold down the flaps to glue them down.
Make sure the fabric is folded over enough that you can’t see it from the front side.
Step 4: Attach the mirror
Fire up your glue gun and now it’s time to glue down the mirror!
Make a bead of hot glue all the way around the opening. Don’t make it too close to the inner edge or it’ll show through on the front.
The center your mirror BEFORE you put it on the glue, and press it down firmly all the way around. Just not too firmly… we don’t want it to break!
Just to be extra safe, I ran another bead of hot glue around the edge of the mirror to really seal it in place.
Step 5: Finishing up the rug mirror
Cut the excess fabric from the edges following the lines you drew a bit ago. Grab your glue gun again and glue the edges down one at a time.
Leave an inch on each side unglued so you can fold down the corners neatly.
Once you get all the edges glued down, fold the corner fabric neatly and glue it in place like in the fourth and fifth pictures below.
Step 6: Adding the cardboard backing
To give your rug mirror some more rigidity, you need to glue some cardboard onto the back.
I just found a random Amazon box from the garage and cut out a piece to fit the back of mine. I also rounded the corners to match my mirror frame.
The back of my mirror has a little hook to hang it from.
I tied a piece of string to it using a lark’s head knot and I wanted to use it as a hanger, so I had to cut a small slit in the back of my cardboard so I could pull it through.
Grab your glue gun again, make sure it’s loaded with a fresh glue stick and it’s had a while to heat up, and glue the heck out of the back of your mirror rug QUICKLY.
Then, carefully center the cardboard on the back and push it down before the glue dries.
This part was a little tricky. If you don’t want to use hot glue, you could use another kind of craft glue instead. It’ll just take longer to dry and I was feeling impatient, lol.
If you missed a few spots around the edges (like I did), go back and add extra glue and press the layers together.
I wanted the hanger to be short enough that it wouldn’t show at the top, so I tied another overhand knot lower down and trimmed off the excess string.
Done!
I hope you enjoyed this punch needle rug mirror tutorial! If you make one, please share a pic over on Instagram and tag me @marchingnorth!
Seeing your creations really brightens my day!