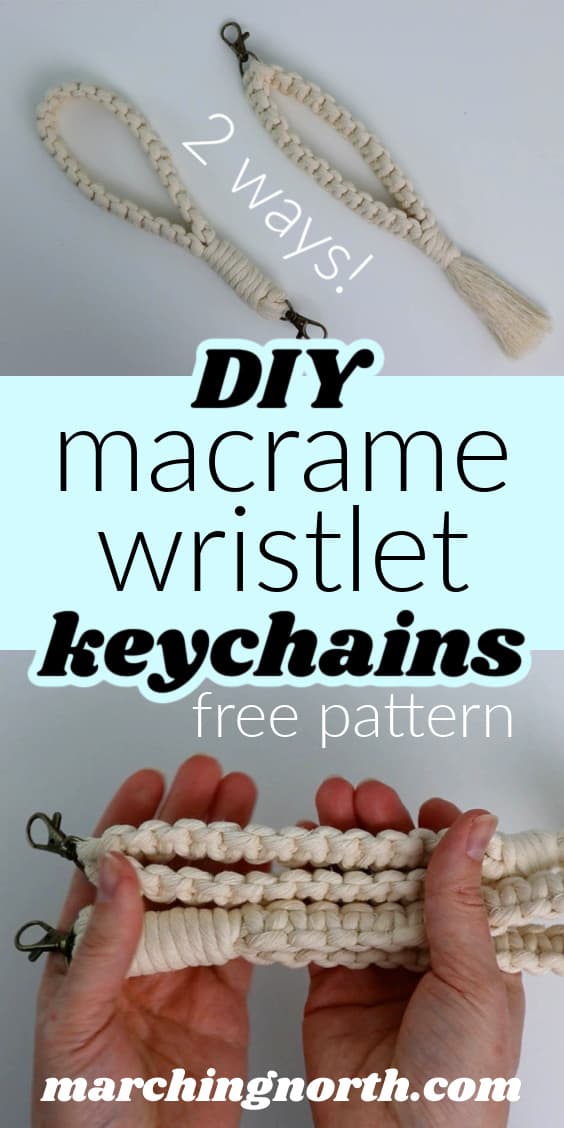
DIY Macrame Wristlet Keychain (2 Ways!) Easy Tutorial
These cute macrame wristlet keychains are a fun and functional accessory you can easily make yourself!
They add a beautiful boho touch to your everyday items and help keep your keys within easy reach when you have your hands full.
Want to remember this? Post this Macrame Wristlet Keychain tutorial to your favorite DIY Pinterest board!
(This post may contain affiliate links. If you click one and make a purchase, I may receive a small commission at no extra cost to you. Read the disclaimer here. Thank you for your support!)
In this step-by-step photo tutorial, I’ll show you how to make these 2 different versions of a DIY macrame keychain wristlet. There’s also a full video tutorial if you prefer to learn that way!
These DIY macrame keychains are really easy to make, they make great gifts, and are a great project for all skill levels.
Getting Started with Macrame
If you’re new to macrame, be sure to check out my Macrame Knots for Beginners tutorial first and learn the basic knots.
You’ll only need to know a few knots to make one of these easy macrame wristlet keychains, and in that beginner macrame knots tutorial I’ll teach you all of them and more, plus you can grab your free printable knot guide!
The basic macrame knots you’ll learn include the lark’s head knot, square knot, spiral knot, double half hitch knot, and the wrapping knot (sometimes called the gathering knot).
Choosing the Right Macrame Materials
You’ll need some single strand cotton cord and a couple lobster keychain clasps to make these patterns.
This is my favorite macrame cord that I used for this project.
Grab some beautiful macrame cord, rope or string over at Niroma Studio!

In addition to that, you’ll also want to have a good pair of scissors, a measuring tape, and a comb if you’ll be making the tassel version.
Also, I recommend using craft glue for the first version of the wristlet keychain to make sure it stays together for the long run.
I’ve heard of people making these and having issues with them coming apart eventually.
I have one on my keyring that I made 3 years ago and used ever since and it hasn’t come apart at all. I think the big difference is that I used glue to hold it together under the wrapping knot, so I definitely recommend not skipping that step.
Macrame Wristlet Keychains | Video Tutorial
Check out the YouTube video tutorial for these wristlet keychains over on my channel, and don’t forget to subscribe!
Macrame Wristlet Keychain | Version 1
Supplies You’ll Need
- 5 mm single strand cotton macrame string in the following lengths
- 2 pieces @ 84″ long
- 1 piece @ 30″ long
- 1.5″ long lobster keychain clasp
- macrame board and T-pins (optional) to hold your work
- sharp scissors
- craft glue
Step 1: Attach cords to the key ring and adjust the lengths
Take one of the 84″ long pieces of cord, fold it in half and attach it to the key ring with a larks head knot.
Do the same thing with the other piece of cord.
You’ll now have 4 cords hanging from the keyring.
Adjust them so the 2 inner cords are 17″ long, and the outer cords are much longer.
Step 2: Tie square knots
Secure the key chain clasp down to your desk (I like to use a macrame board and pin it in place) and tie the first square knot about 2 inches down from the clasp.
It’s important to keep that 2″ space so you can tie your wrapping knot there later.
Once you get the first knot in place, tie the rest of the knots right underneath it. There will be 25 knots all together, which should be about 11″ long.
Step 3: Fold keychain in half and secure
Trim the working cord ends so they’re the same length as the center cords. They should be about 4″ long at least.
Fold the knotted portion of the keychain in half, and thread the ends through the key ring, overlapping the lark’s head knots we tied at the beginning.
Make sure everything is laying nice and neat.
Grab your glue and put a generous amount of it where you’ll be folding the ends down over cords in the 2″ space we left.
Take the 30″ long piece of cord and use it to tie a wrapping knot that fills in the whole 2″ space.
Cut the excess cord off and push the short ends up underneath the wraps.
Done!
Macrame Wristlet Keychain with Tassel | Version 2
Supplies You’ll Need
- 5 mm single strand cotton macrame string in the following lengths
- 2 pieces @ 30″ long
- 2 pieces @ 60″ long
- 1 piece @ 25″ long (for wrapping knot)
- 1.5″ long lobster keychain clasp
- macrame board and T-pins (optional) to hold your work
- comb to brush out fringe
- sharp scissors
Step 1: Thread cords through the key ring and pin down
Take the first two 30″ pieces of cord and thread them through the key ring.
These pieces will be the center cords and are shorter.
Now take one of the two 60″ pieces of cord and thread it through to the right of the center short cords.
Then take the other 60″ piece and thread it through on the left of the center cords.
You want each piece to be folded in half evenly and lined up with the short cords in the middle.
(That sounds complicated but it’s actually very simple, just hard to explain in words. Check out the video if you need some clarification!)
Lay the clasp and cords down on your work surface with the cords sticking out in both directions.
Pin them all down (or tape them) and now we can start tying the knots.
Step 2: Tie square knots
Starting on the side facing you, tie one square knot carefully right up next to the clasp.
Don’t pull too hard so you don’t pull the pinned cords loose.
I went ahead and tied one more square knot on this side.
Now flip the whole thing around (this is where a macrame board comes in handy).
You may need to adjust the pins so you can tie knots on this side.
Tie a square knot on this side the same way as you did on the other side.
Now you can finish tying the knots on this side- you’ll tie 12 square knots all together.
Flip the keychain around to the other side and tie a total of 12 square knots on that side as well.
Step 3: Tie wrapping knot at bottom
Unpin the keychain and now it’s time to tie the wrapping knot.
Grab your last 25″ piece of cord and use it to tie a wrapping knot around all the cords at the base of the square knots.
Cut the excess from the wrapping knot cord and use the ends of the scissors to poke the ends up under the wraps.
Step 4: Cut tassel fringe and brush out
Trim the tassel to however long you like and use your comb to brush out the fringe.
Give it another trim after you brush it out.
Done!
I hope you enjoyed these macrame patterns, and if you make one of these wristlet keychains I’d love to see!
If you make one of these, please share a pic over on Instagram and tag me @marchingnorth so I can take a look. I love seeing all of your awesome creations!
Looking for more free macrame patterns and tutorials?
I have lots of macrame projects and free patterns available on my site for plant hangers, wall hangings, and loads of other fun projects! Here are a few of the latest ones: