How to Crochet a Classic Granny Square for Beginners (Step by Step!)
Learn how to crochet a basic granny square with these step by step instructions for beginner crocheters!
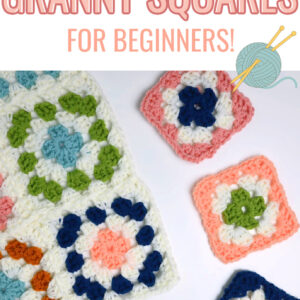
Crochet granny squares are so much fun to make and they have so many uses.
One of the first things I learned to make as a new crocheter was a good old granny square. They’re a great way to learn the basic stitches!
Want to remember this? Post this Basic Granny Square tutorial to your favorite DIY Pinterest board!

(This post may contain affiliate links. If you click one and make a purchase, I may receive a small commission at no extra cost to you. Read the disclaimer here. Thank you for your support!)
You can make a classic granny square blanket, turn them into a fun tote bag, make a granny square pillow, there are so many different ways to use them.
One of my favorite things about granny squares is you can make them when you have little bits of spare time.
Plus you can use up any scrap yarn you have laying around to make a fun, colorful granny square project.
Keep scrolling to learn a little more about granny squares, and learn how to make some of your own with this free crochet pattern!
What is a Granny Square, Anyway?
Granny squares are a traditional square crochet motif that’s made by crocheting rows going from the center outward.
You might also see them called an afghan square.
The amount of rows varies, but usually there are at least 4.
Granny squares are usually joined using one of the following methods:
- whip stitch join
- single crochet join
- slip stitch join
- flat braid join
- JAYGO (join as you go)
- CJAYGO (continuous join as you go – my personal fav!)
Types of Granny Squares
There are a lot of different granny square variations to try, but today we’ll be making traditional granny squares.
This is the classic crochet granny square pattern you’ve probably seen in an old blanket your grandma or great grandma made.
Some other types of granny squares include:
- solid granny squares
- sunburst granny squares
- daisy granny squares
- continuous granny squares
- spiral granny squares
- mitered granny squares
- appliquéd granny squares
The possibilities are endless!
How to Crochet a Classic Granny Square
This basic granny square pattern uses clusters of double crochet stitches, with chain 2 spaces in the corners and chain 1 spaces in between the clusters.
Below you’ll find the written instructions and there’s also a video tutorial to walk you through step by step.
Supplies You’ll Need
For this project, you’ll need the following supplies:
- Yarn – I’m using a worsted weight acrylic yarn in this example, but you can use any type of yarn you prefer
- Crochet Hook sized for your yarn – I’m using a size 5.0 mm hook in this example
- Scissors – these are my favorite
- Tapestry needle or yarn needle to weave in your ends
You can make this granny square with multiple colors like I did, or you can use one color if you want.
Either way is fine, just make sure if you’re using multiple colors that the yarn weight and type is the same.
Abbreviations
- ch – chain
- ch sp – chain space (ch1 space)
- st(s) – stitch(es)
- sl st – slip stitch
- sc – single crochet
- hdc – half double crochet
- dc – double crochet
Notes
US crochet terms.
When you join new yarn, crochet over the loose ends for that chain space and it reduces the amount of ends you’ll have to weave in when you’re finished.
Special Stitches
Granny clusters – Make 3 dc stitches in chain space.
For this pattern, you’ll make a chain 1 in between each granny cluster, and a chain 2 in the corners of the granny square.
Video Tutorial
Here’s the video tutorial for this classic granny square. Don’t forget to subscribe to Yarn Stash with Marching North so you don’t miss any new videos!
Make the Center Ring
Attach yarn to your hook with a slip knot.
Ch 4, insert hook into first chain you made and join with a sl st. We’ll be working into the center of this ring for the first round.
NOTE: This method will leave a pronounced hole in the center. You could also start this granny square with a magic circle or magic ring.
Round 1
- Ch 3 (counts as first dc of this granny cluster.)
- Make 2 dc in the center of the ring. Ch 2. (First cluster made)
- Make 3 dc in center of the ring, Ch 2. (Second cluster made)
- Make 3 dc in center of the ring, Ch 2. (Third cluster made)
- Make 3 dc in center of the ring. DON’T Ch 2 (Fourth cluster made)
- To join the round we’re going to make a half double crochet into the top of the 3rd ch from the beginning of the round. Yarn over, insert hook into the top of ch 3. Yarn over, pull through all three loops.
If you’re making each round a different color like me, cut the yarn leaving about a 5 inch tail, and pull the end through the loop on your hook to finish off the round.
Now it’s time to start the next round!
Round 2
- Tie next color of yarn to the corner space you finished on. Make sure it’s attached on the far right side of the corner space.
- Insert hook into corner ch sp and pull up a loop. Yarn over and pull through to make the first sl st. Ch 2 more times. This is how your first ch 3’s will look for the rest of the rounds.
- In same ch sp, make 2 dc, ch 2, 3 dc, ch 1. (First corner made)
- In next corner ch sp, make (3 dc, ch 2, 3 dc, ch 1). (Second corner made)
- Repeat step 4 two more times for the other corners.
- Join to top of ch 3 with a single crochet to complete the round. Cut yarn and finish off.
Round 3
- Tie the next color of yarn in the same ch sp that you finished on. Make sure it’s attached on the far right side of the corner space.
- Insert hook into space and pull up a loop. Yarn over and pull through to make the first sl st. Ch 2 more times.
- In same ch sp, make 2 dc then ch 1.
- In next corner ch sp, make (3 dc, ch 2, 3 dc, ch 1).
- In next ch sp, make 3 dc, ch 1.
- Repeat steps 4 and 5 around. When you reach your starting point, join with a sc to the top of starting ch 3. Cut yarn and finish off.
Making More Rounds
For this granny square, I stopped at 3 rounds.
The reason for that is I’m going to be joining my squares with a Continuous JAYGO join, and the fourth round will be made when I do that.
If you’re making a granny square blanket, you gotta check out that joining method. You only have to weave in 2 ends!
After all the loose yarn ends you have to deal with after making all those squares, it’s a no brainer.
To make your granny square larger, just continue repeating the pattern from round 3, there will just be more ch 1 spaces to work into for each round.
Thank for for the numbered steps – I actually did it!!