Easy DIY Macrame Plant Hanger (with NO Tassel!)
Looking for a way to add some extra greenery to your home decor?
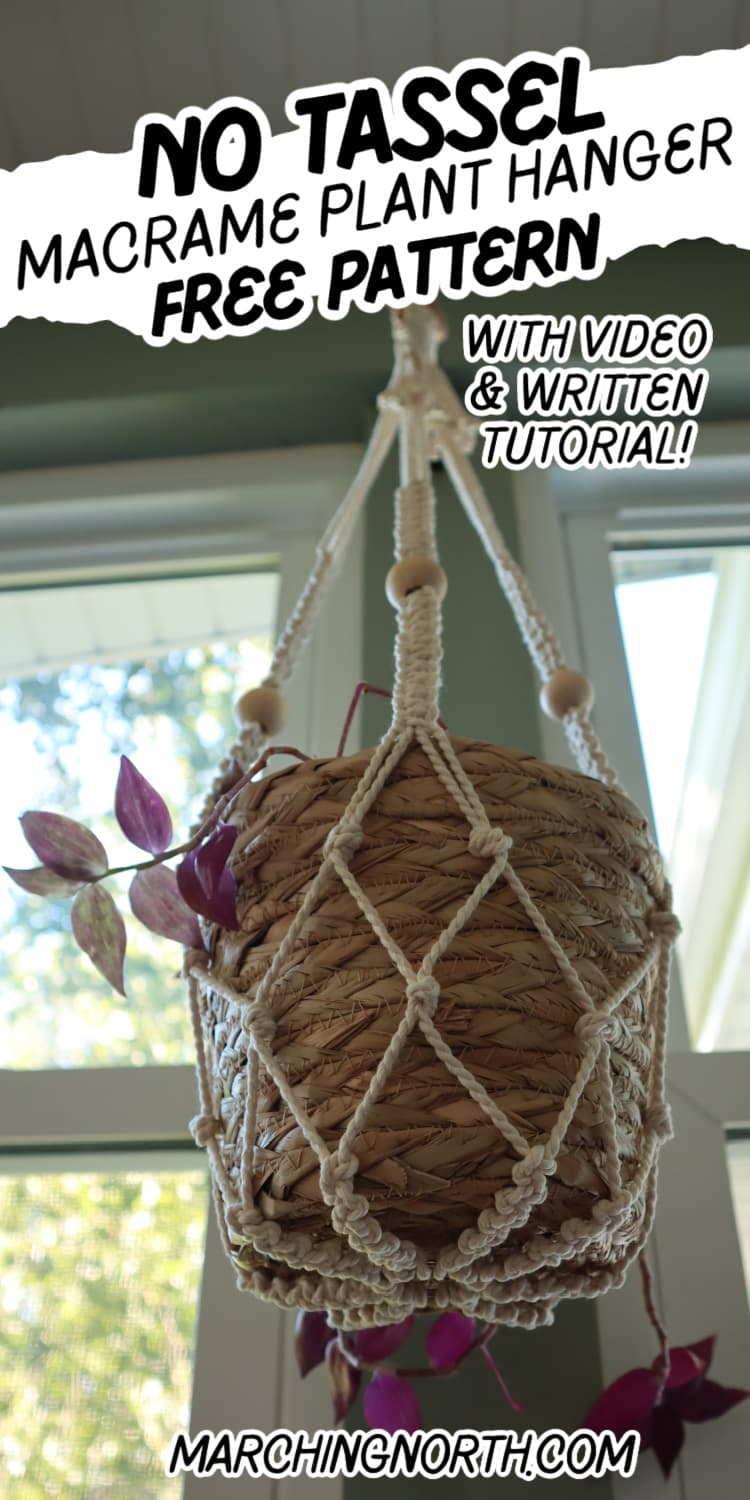
This no-tassel macrame plant hanger is the perfect simple project to bring some life into any room. Not to mention, it’s a fun and easy DIY to make!
Don’t forget to pin this for later!
(This post may contain affiliate links. If you click one and make a purchase, I may receive a small commission at no extra cost to you. Read the disclaimer here. Thank you for your support!)
Most macrame planters have a tassel at the bottom, but not this one!
In this tutorial, I’ll show you how to make a macrame plant hanger without a tassel using a few simple knots and cotton macrame cord.
Whether you’re a beginner or an experienced macrame maker, this project is perfect for anyone looking to add some boho-chic vibes to their space.

Grab your PRINTABLE copy
No Tassel Macrame Plant Hanger – Printable PDF Pattern!
Reference this pattern any time you want with the printable PDF version! It’s ad free, and includes the written pattern and step-by-step photo tutorial!
Basic Macrame Knots
Are you new to macrame?
If so, be sure to check out my basic knots guide for macrame beginners!
In this step-by-step tutorial, I’ll show you how to tie all the important knots you’ll need for all sorts of macrame projects.
Plus, it includes a video and a printable PDF to help you get started!
How to Make a No-Tassel Plant Hanger
Sometimes you just want a cleaner look without the tassel, and this DIY plant hanger is perfect for that.
Instead of starting from the top and working your way down, we’ll be starting at the bottom and working our way up!
We’ll end the plant hanger with a sturdy wooden ring that can support the weight of your plant hanger on a ceiling hook.
Not all wooden rings work for this, I’ve had some of them break on me in the past which is no fun.
The ones listed down in the supply list below are good ones that shouldn’t break on you. At least they haven’t broken for me yet!
Plant Pot Size Considerations
The plant pot that I used for this plant hanger was 7″ across and about 6.5″ tall.
You could go a few inches bigger and probably a couple inches smaller and they would all work fine.
If you go larger, you might want to make your plant hanger arms a bit longer than I did.
This macrame pattern is pretty flexible and you can customize it to fit different sizes of flower pots.
Supplies You’ll Need
- 3 mm twisted cotton macrame rope in the following lengths:
- 8 pieces @ 134″ long (or 2 arm spans long)
- 1 piece @ 67″ long (or 1 arm span)
- 1″ to 2″ ring to start for the base of our planter- I used a 1 1/4″ metal ring
- 2″ sturdy wooden ring for hanger
- 4 large hole wooden beads
- scissors
Video Tutorial
Check out the video tutorial for this no tassel macrame plant hanger over on my YouTube channel, and don’t forget to subscribe!
Step 1: Starting from the bottom
Take one of your long pieces of cord, fold it in half evenly and attach it to the metal ring with a lark’s head knot.
Repeat that with the rest of the long pieces of cord (8 total).
Step 2: Alternating half hitch knots
Grab one of your cord pairs (both strands from one attached piece of cord) and we’re going to tie 10 alternating half hitch knots.
Start by crossing the left cord in front of the right cord in a number 4 shape.
Bring the end of the left cord around and behind the right cord and bring the end through the loop of the left cord.
Pull it to tighten it up to the top.
Now take the right cord and cross it in front of the left cord in a reverse 4 shape.
Bring the end of the right cord behind the left cord and pull the end through the loop.
Tighten that knot up to the top right under the first knot you tied.
Repeat those steps, going back and forth from right to left until you have a chain of 10 alternating half hitch knots.
Repeat that whole process with each pair of cords. You’ll end up with 8 “spokes” of alternating half hitch knots.
Step 3: Alternating overhand knot mesh – row 1
Take two of your spokes, and you’re going to use just the right cord of the left spoke, and the left cord of the right spoke.
Tie an overhand knot with those cords about 2 inches down from the half hitch knot section.
Do the same thing with the next pair of cords and repeat that process around until all the pairs of cords are connected.
Step 4: Alternating overhand knot mesh – row 2
For the next row, you’re going to do the same thing we just did, but alternating from the previous row.
So take two of your overhand knotted sections, and tie an overhand knot with the two cords in the middle about 2 inches down from the last row of knots.
Repeat that around.
Note: If you want the basket section of your plant hanger to be a bit taller, feel free to do one more row of alternating overhand knots.
Step 5: Square knot sennits
Now we’re going to do the square knots sections that form the arms of the plant hanger.
Start by grabbing two of the overhand knotted sections that are next to each other. You’ll have 4 cords to work with.
Tie a square knot with those 4 cords about 2 inches away from the last row of overhand knots.
Take your time and get everything nice and straight. This first square knot is a little tricky but once you get it done the rest will be easy.
Repeat that around the plant hanger and be careful to tie the knots the same distance away from the overhand knots. You’ll tie 4 square knots all together.
Once you get the first square knot tied for each arm and you’re happy with the placement, you’ll tie 9 more square knots for each arm.
That way you’ll have a total of 10 square knots.
Step 6: Beads and more square knots
Thread a large hole bead onto each of the plant hanger arms. I used one that all my cords could fit through, but if yours is smaller you could just thread two of the cords through and that should also be fine.
At this point, we’re going to tie 10 more square knots, and before we do that we’re going to switch the inner two cords to the outside.
You’ll notice that the two cords we used to tie the first 10 square knots are a bit shorter than the other two, so you’ll want to use the longer cords as the working cords for these next 10 knots so it gets evened out a bit.
Otherwise you might run short on cord by the time you get done.
The large wooden bead hides the switch, so you won’t even notice it in the finished plant hanger.
If you use a smaller bead that only 2 cords fit through, it might not hide it as well, but it’s still going to look fine.
Once you switch the inner 2 cords to the outside, tie 10 square knots on the other side of the wooden bead.
Repeat that with the other plant hanger arms.
Step 7: Final knot section – Attaching the hanging ring
Decide how long you want the plant hanger arms to be between the wooden ring and the square knot sennits.
I originally went with about 16 inches, but I later decided that was too long and changed it to probably closer to 12 inches.
(I recommend testing it before you cut off the excess cord, just in case.)
Line up the tops of the square knot sections of each arm and then run your hand up the cords so they stay even.
Hold the spot where you want to put your ring with your hand, and then thread the wooden ring onto the cords.
Fold the cords over the ring.
(This part will be a lot easier if you tape your ring down to your desk to secure it.)
Grab your shorter piece of cord (67″), fold it in half to find the center point, and use that to tie 5 square knots around all the cords, right under the wooden ring.
Be sure to pull the working cords as tight as you can between each half of the square knots. You want these knots to be super tight since they’re holding the whole plant hanger to the ring.
Step 8: Finishing the fringe ends
Note: Test fit your plant hanger before you do this part! That way if you want to go longer or shorter, you still can adjust.
Once you’re sure you are happy with how everything is done, it’s time to deal with the cord ends at the top.
Tie an overhand knot in each cord, about 3 or 4 inches away from the square knots that are holding them to the wooden ring.
Then cut the excess cord off right under the overhand knot.
You can make this fringe longer or shorter if you want. I don’t recommend cutting the fringe completely off, because the plant hanger could come undone.
If you want no fringe, I recommend replacing the 5 square knots at the top with a wrapping knot instead.
I’d make it at least 4 inches long, and then you should be able to cut the excess cords right at the bottom of the knot if you want no fringe whatsoever.
Done!
Now your no tassel macrame plant hanger is ready to hang in your living room, kitchen, or wherever you want to hang it!
FAQ’s
What type of cord should I use for a no tassel macrame plant hanger?
For this pattern we used 3 mm cotton rope, but you could probably use other types of cord like single strand cotton string, braided cord or even t-shirt yarn!
The finished look would be different and you would probably end up with more leftover cord if you use those other options. But it’s certainly worth a shot!
Can I make a no tassel macrame plant hanger if I’m a beginner?
Absolutely! I’d recommend you head over to my beginner macrame knots tutorial first to learn all the basic knots so you don’t get frustrated.
This plant hanger only uses easy knots, so you could probably do this for your first project with a little patience!
What are some tips for making a no tassel macrame plant hanger look neat and tidy?
Take time making your knots. That is a huge part of getting it neat and tidy.
And don’t be afraid to unknot a section and redo it if you aren’t happy with how it’s turning out!
Can I customize the design of a no tassel macrame plant hanger?
Yes, you can! You can add more rows of overhand knots to make the basket part of the plant hanger taller so it goes up to the top of the pot, or you could use a wrapping knot (or gathering knot) at the top instead of 5 square knots.
And an easy way to customize it is to use a different color of cord! Or use different beads, or swap out the square knots on the arms with spiral knots- There are lots of ways to make this design your own!
In Summary
I hope you enjoyed this simple plant hanger pattern and make a few of your own!
If you make one of these, please share a pic over on Instagram and tag me @marchingnorth so I can take a look. I love seeing all of your awesome creations!
More Macramé Plant Hanger Patterns
Looking for more simple DIY macrame plant hanger patterns? Check out this list of free patterns here on my site!
To:Crystal
From: Penny
January 20, 2025
Making this Plant hanger was easy; but I took my time with each step, reread and watched the directions to be sure I did it correctly. It was my first time making a project this size. My first project was making wristlets for family members for Christmas. I am new to macrame this year, starting in November and wasn’t sure I could pull this project off, but it was easy with patience. I learned my knots from your instructions for beginners, made the wristlets and then found this plant hanger. I only had problems with the half hitch knots, had to keep redoing them, think I was not switching sides each time probably forgetting where I was, I was constantly trying to straighten them to look better. All in all I was proud of my efforts and the finished product.
Thank you for your excellent instructions; I will make more of these and anything else I see of yours due to your great instructions.
Penny
I made this plant hanger, and it is both as easy as promised, and insanely cute! I’ll be making many, many more. Thanks, Crystal!