Crochet Velvet Scrunchie // Free Pattern & DIY Tutorial!
Learn how to make an easy crochet velvet scrunchie in this step by step DIY tutorial (with video!)
This free pattern is so quick to crochet and velvet scrunchies make a great last minute DIY gift idea.
Don’t forget to pin this for later!

(This post may contain affiliate links. If you click one and make a purchase, I may receive a small commission at no extra cost to you. Read the disclaimer here. Thank you for your support!)
Have you seen these adorable velvet scrunchies everyone is wearing lately? It’s always crazy to me when something that I remember from my childhood is suddenly popular again.
Not only are they super stylish and trendy, but they’re also so quick and easy to make!
And did you know that velvet scrunchies are way easier on your hair than regular elastic ties? It’s true!
My daughter has gorgeous, long hair and she’s very tender-headed. Usually she’s not a big fan of ponytail holders because they pull on her hair and are uncomfortable.
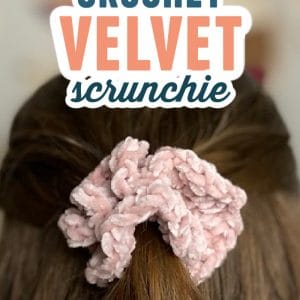
This velvet scrunchie (shown on her beautiful hair in the photo above) stays in place without being too tight and it’s been a game changer around here!
Note: You’ll see that I don’t have a specific number of stitches that you need to make around the pony tail holder in the pattern below.
That’s because there are different sizes of elastic pony tail holders and you just need to make enough stitches to fill it in.
I used a smaller pony tail holder in the one I made, so if you use a full size elastic, you’ll need more stitches.
Supplies You Need to Make a Crochet Velvet Scrunchie
Crochet Velvet Scrunchie Free Pattern and Tutorial
Row 1:
Make a slip knot on your crochet hook. Single crochet around pony tail holder until it’s totally covered with stitches.
You’ll want to stretch the elastic out a few times to make sure the stitches are really packed in tight so there aren’t big gaps when the pony tail holder is stretched.
Once you’ve made the amount of single crochet stitches that you want, slip stitch into the first single crochet to join. Chain 2, don’t turn.
Row 2:
Make 1 half double crochet in the same stitch that you joined to. Then make 2 half double crochets in each single crochet around.
As you crochet around, you’ll notice the scrunchie getting ruffled and wavy (which is what you want). Once you’ve made 2 half double crochets in each stitch, join to the first half double crochet with a slip stitch. Cut the yarn.
Finishing:
Use your crochet hook or a tapestry needle to weave the end of the yarn down through the stitches until it meets up with the starting end.
Tie a knot (without cinching down the side of the scrunchie), weave in the ends and trim them off.
Done!
I hope you enjoyed this crochet velvet scrunchie tutorial! These scrunchies are so cute and they really hold a ponytail in place better than a plain elastic band.
You could make a whole bunch of these in one evening and use them as stocking stuffers this Christmas!
Would you do me a quick favor and share this post to your favorite social media? It really helps me out and I’d appreciate it a ton.
If you make some of these, take a picture and share it on Instagram! Tag me @marchingnorth so I can see, I love seeing all of your awesome creations. It makes my day!
Crochet Velvet Scrunchie
Learn how to make a crochet velvet scrunchie in this easy step by step tutorial and free crochet pattern!
Instructions
- Single crochet around the elastic pony tail holder. Stretch it as you go and make as many single crochets as you can fit. Join to the first single crochet using a slip stitch. Chain 2 and don't turn.
- Make a half double crochet in the same stitch as the chain 2, then make two half double crochets in each single crochet around. Join to the first half double crochet with a slip stitch. Cut yarn.
- Weave the end of the yarn down through the scrunchie to meet up with the beginning end of the yarn. Tie a knot (being careful not to cinch the scrunchie down), then weave in the ends and trim.
- Done!
Notes
I didn't include a number of stitches because it really doesn't matter and will vary based on the size of your pony tail holder. Just make sure you cram as many single crochets in the first row as you can!
Related Posts
- Simple Crochet Baby Booties // Free Pattern & Tutorial
- Macrame Mermaid Tail Keychain // Tutorial & Video
- Punch Needle for Beginners: The Ultimate Guide!
- Easy Solid Granny Square Crochet Pattern (Free Pattern & Video!)
- Classic One-Color Granny Square Crochet Pattern (Free Pattern & Video!)
- Perfect Granny Square Crochet Pattern (Free Pattern & Video!)
- DIY Cowrie Shell Macrame Bracelet (Free Pattern + Video Tutorial)
- Easy Crochet Mesh Headband | Free Pattern & Video!
- How to Organize Your Crochet WIPs (+ Free Printable Planner!)