Free Crochet Christmas Stocking Pattern (+ Video Tutorial!)
Looking for a new crochet Christmas stocking pattern that’s as fun to make as it is beautiful? You’re in luck, my friend!
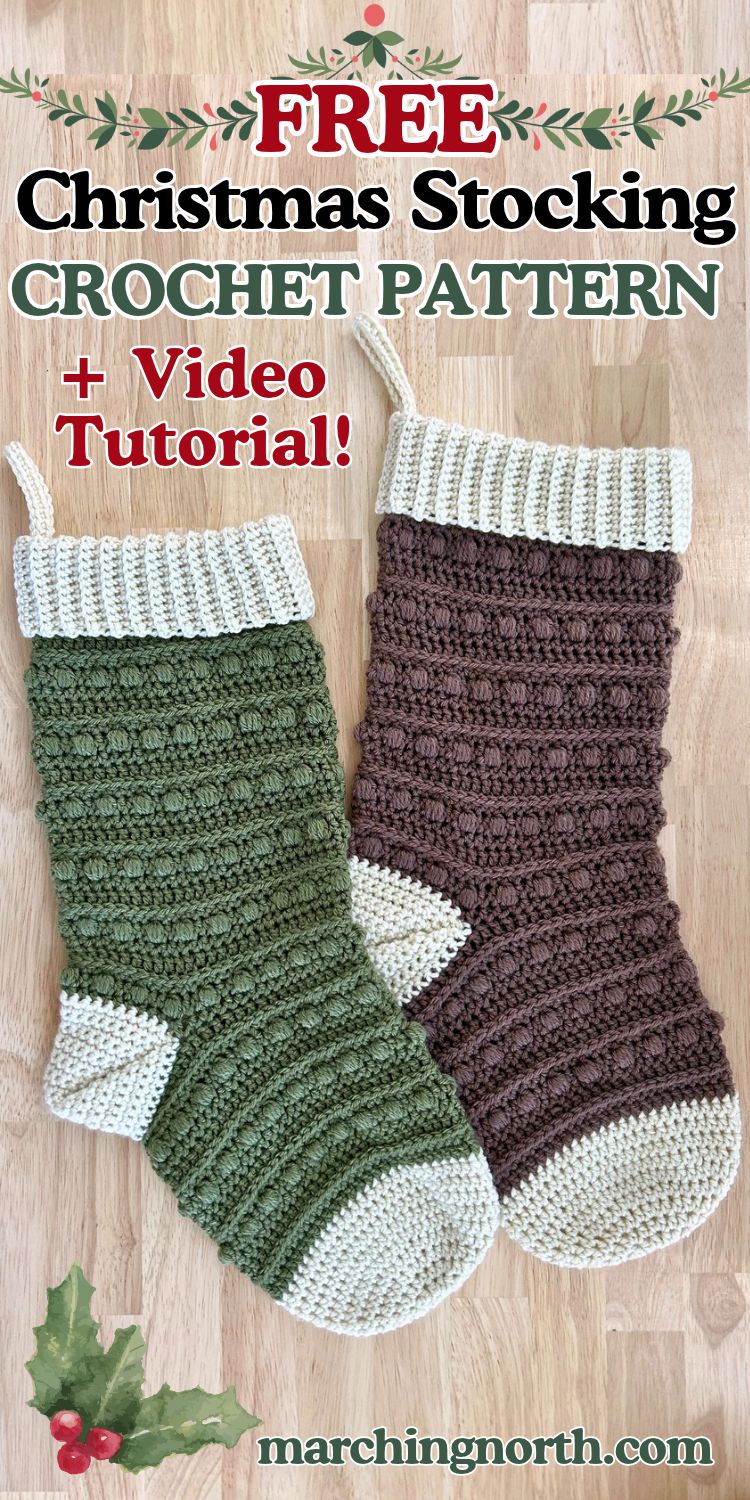
The Emberglen Crochet Stocking is worked from the toe up, with cute little rows of puff stitches and raised ridges that give it a warm and cozy texture.
It finishes with a folded ribbed cuff and a sturdy hanging loop, so it’s ready to hang by the fireplace (and hold a whole lot of goodies).
Don’t forget to pin this for later!
(This post may contain affiliate links. If you click one and make a purchase, I may receive a small commission at no extra cost to you. Read the disclaimer here. Thank you for your support!)
The full pattern is free below, and there’s a complete video tutorial that walks you through every round, including the heel.
This is my first stocking pattern and it’s been so much fun making these guys!
I picked the name Emberglen in honor of the cozy vibes of crocheting on the couch next to the lit up Christmas tree, handmade mug full of hot coffee steaming nearby, and my favorite Skyrim music playing in the background.
That’s my go to mode during the holiday season. So relaxing!
If you’d like to crochet away from the screen, the ad-free, printable PDF of the Emberglen Crochet Stocking is available in my shop.

Buy the PRINTABLE copy
Emberglen Crochet Stocking: Printable PDF Pattern!
Includes the full pattern laid out neatly for printing, plus a QR code that takes you straight to the video tutorial.
Buying the PDF is a great way to support the free patterns and videos I make, but you’re more than welcome to stick with the free version below!
Pattern Information
- Skill level: Intermediate
- Pattern written in US terms
- Finished size: About 22″ from the top of the cuff to the toe, and 7.5″ across the ankle section
Don’t let the intermediate label scare you off. If you can make an hdc and a dc, the video will walk you through everything else, one round at a time.
Supplies & Materials
- Yarn: Premier Anti-Pilling Everyday Worsted, worsted weight (size 4), in 2 colors
- Color A (toe, heel, cuff and hanging loop): 1 skein, about 75 g/135 yds
- Color B (foot and leg): 2 skeins, about 150 g/270 yds
- Hook: 5.5 mm (I) crochet hook
- Yarn needle (linked ones are nickel free and include a bunch of needle sizes!)
- Scissors
- Stitch marker
Gauge
- Body: 14 sts and 8 rounds (2 pattern repeats) = 4″ wide x 3.5″ tall, measured in the leg
- Toe check: Rounds 1-6 = about 4.5″ across, laid flat. In the plain hdc rounds of the toe, 16 sts = 4″.
The toe check is the easy one. Measure after Round 6, and if yours is much bigger or smaller, try a different hook size before you go any further.
Abbreviations
- ch(s): chain(s)
- st(s): stitch(es)
- sl st: slip stitch
- sc: single crochet
- hdc: half double crochet
- dc: double crochet
- hdc2tog: half double crochet 2 together (decrease)
- BLO: back loop only
- FO: fasten off
- sp. join: special join (see Special Stitches)
- rep: repeat
- sk: skip
Video Tutorial
If you want to watch the video tutorial for this stocking, check it out below, and be sure to subscribe to my YouTube channel so you don’t miss any new videos!
How This Stocking Is Built
This stocking is worked from the toe up, which means no seaming the whole thing together at the end.
Here’s the order you’ll work in:
- Toe: Start with a magic ring and increase in hdc rounds until you have 54 stitches.
- Foot: Switch colors and work the textured pattern of hdc, raised dc ridges and puff stitches in joined rounds.
- Heel: Work back and forth in rows of sc, decreasing and then increasing, then fold it and slip stitch the sides closed.
- Leg: Pick back up in the round and keep going with the same texture pattern up the leg.
- Cuff: Add a ribbed cuff in sc through the back loop, joining it to the stocking as you go.
- Hanging loop: Make a short strip, fold it in half, and sew it inside the cuff.
The right side always faces you in the rounds, so the texture stays consistent all the way up.
Choose Which Way the Toe Points
Worked as written, the toe points to the right. You can also make it point left.
You’ll need to decide before you start the heel, because it changes just two spots in the pattern: whether you turn the stocking before Heel Row 1, and which Round 16 you follow after the heel.
Making a pair for a mantel? Make one of each so they face each other.
Special Stitches and Techniques
Standing dc: This lets you join a new color right into a dc without a slip stitch and chain.
Holding the yarn tail against the handle of your crochet hook, wrap the working yarn around the hook twice, coming up and over the top of the hook toward you, hold the loops in place by resting your finger on top of them, insert hook into indicated stitch…
…yarn over and pull up a loop (still holding the loops with your finger)…
…yarn over and pull through 2 loops, yarn over and pull through last 2 loops.
If you’d rather skip it, there’s an alternate join written into the pattern.
▶ Watch the standing dc in the video (7:31)
▶ Watch the alternate join (8:55)
Dc in 3rd loop: On the back of an hdc, just below the top two loops, there’s a horizontal bar.
That’s the 3rd loop. Work your dc into that bar instead of the top loops. This is what makes the raised ridge.
▶ Watch the dc in 3rd loop in the video (11:43)
Puff: *Yarn over, insert hook in st, pull up a loop*…
…rep from * to * 3 more times in the same st (9 loops on hook)…
…yarn over and pull through 8 loops…
…yarn over and pull through last 2 loops. Counts as 1 st.
▶ Watch the puff stitch in the video (13:17)
Special join: After the last st of the round, drop the loop off your hook, insert your hook into the first st of the round from back to front…
…put the loop back on your hook and pull it through to the back.
This join keeps your seam neat and tucked on the back of the stocking.
▶ Watch the special join in the video (2:54)
The join is a little different on the first round of the foot, because you’re joining into a standing dc. ▶ Watch that join here (9:50)
Pattern Notes
- The starting ch never counts as a st. The first st of every round goes in the same st you joined into.
- The toe, foot and leg are worked in joined rounds with the right side facing you.
- The heel is worked in turned rows.
- The cuff is made of join-as-you-go rows of sc in the BLO to form ribbing.
Emberglen Crochet Stocking Free Pattern
Toe
Worked in Color A.
▶ Watch the toe in the video (1:43)
Round 1: Make a magic ring, ch 2 (does not count as a st here and throughout), 9 hdc in the ring, pull the ring closed, sp. join. (9 sts)
Here’s how to do the magic ring:
Hold your yarn tail pointing down and pinching it with your finger and ring finger, and wrap the yarn around your pointer and middle finger going from front to back, bring it up around back to the front and cross the yarn to form an X.
Flip your fingers over, and insert the hook under the loop closest to your fingertips.
Hook the second loop and pull it under the first loop. Then twist your hook around clockwise to secure the loop on your hook.
Insert your hook under the loop closest to your knuckle, then pull that loop through the loop on your hook.
Remove the ring from your fingers and your magic ring is ready to go!
▶ New to the magic ring? Watch it in the video (0:53)
(If that version of the magic ring is confusing to you, I have another tutorial here where I do it a different way.)
Round 2: Ch 2, 2 hdc in each st around, sp. join. (18 sts)
Round 3: Ch 2, *2 hdc in next st, hdc in next st*, rep from * to * 8 more times, sp. join. (27 sts)
Round 4: Ch 2, *hdc in next st, 2 hdc in next st, hdc in next st*, rep from * to * 8 more times, sp. join. (36 sts)
Round 5: Ch 2, *2 hdc in next st, hdc in next 3 sts*, rep from * to * 8 more times, sp. join. (45 sts)
Round 6: Ch 2, *hdc in next 2 sts, 2 hdc in next st, hdc in next 2 sts*, rep from * to * 8 more times, sp. join. (54 sts)
Rounds 7-10: Ch 2, hdc in same st and each st around, sp. join. (54 sts)
FO Color A.
Foot
Worked in Color B.
▶ Watch the foot in the video (9:18)
Round 1: Join Color B in any st with a standing dc, dc in each st around, sp. join. (54 sts)
If you’d rather not do a standing dc: make a slip knot, sl st in any st, ch 3, dc in same st and each st around, sp. join.
Round 2: Ch 2, hdc in same st and each st around, sp. join. (54 sts)
Round 3: Ch 3, dc in 3rd loop of same st and each st around, sp. join. (54 sts)
Round 4: Ch 2, hdc in same st and each st around, sp. join. (54 sts)
Round 5: Ch 2, *hdc in next st, puff in next st, hdc in next st*, rep from * to * 17 more times, sp. join. (54 sts)
Rounds 6-13: Rep Rounds 2-5 two more times. (54 sts)
Round 14: Rep Round 2. (54 sts)
Round 15: Rep Round 3. (54 sts)
Do not cut Color B. Remove your hook and place the working loop on a stitch marker so it can’t unravel.
Heel
First up, decide which way you want the toe to point.
For a right-pointing toe, turn the stocking so the wrong side is facing you before Row 1.
For a left-pointing toe, don’t turn it.
Row 1 is worked the same way either way. Remember which one you picked, because you’ll need to pick the matching Round 16 after the heel.
▶ Watch me join the heel color and pick the toe direction (16:17)
▶ Jump to the heel rows (17:42)
Row 1: Make a slip knot with Color A and place it on your hook. With the stocking held the way you have it now (turned or not), find the st the marked loop is coming out of, and sl st in the st just to the left of it, sc in same st, sc in next 23 sts, ch 1, turn. (24 sts)
Rows 2-13: Sk first st of the row, sc in each remaining st, ch 1, turn. (23 sts in Row 2, decreasing down to 12 sts in Row 13.)
Rows 14-25: 2 sc in first st, sc in each remaining st, ch 1, turn. (13 sts in Row 14, increasing up to 24 sts in Row 25.)
Fold the heel in half with the wrong side facing out, so the decrease rows line up with the increase rows.
Starting at the corner where your hook is (next to the stocking), sl st through both layers along the row ends toward the point of the heel, FO.
Make a slip knot with Color A and place it on your hook, then sl st the other side of the heel closed the same way, starting at the corner next to the stocking and working toward the point, FO.
Turn the heel right side out.
Leg
Back to Color B. Put the marked loop back on your hook and remove the stitch marker.
Pick the correct Round 16 for whichever way your stocking is pointing. Don’t do both.
▶ Watch Round 16 for a right-pointing toe in the video (26:03)
Round 16 (for right-pointing toe): Ch 2, hdc in same st, hdc in next 29 foot sts, hdc2tog (one leg in the heel corner where it meets the foot, one leg in the first heel st), hdc in next 22 heel sts, hdc2tog (one leg in the last heel st, one leg in the other heel corner where it meets the foot), sp. join. (54 sts)
Round 16 (for left-pointing toe): Ch 2, hdc in same st, hdc2tog (one leg in the heel corner where it meets the foot, one leg in the first heel st), hdc in next 22 heel sts, hdc2tog (one leg in the last heel st, one leg in the other heel corner where it meets the foot), hdc in remaining 29 foot sts, sp. join. (54 sts)
Rounds 17-38: Rep Rounds 5, 2, 3 and 4, in that order, ending on a rep of Round 2. (54 sts)
FO Color B.
Cuff
Make a slip knot with Color A and place it on your hook, sl st in the first st of the previous round (the st you finished off on).
▶ Watch the cuff in the video (30:20)
Row 1: Ch 21, sc in 2nd ch from hook and next 19 chs, sl st in next 2 sts on edge of stocking, turn. (20 sts)
Row 2: Sk 2 sl sts, sc in BLO of next 20 cuff sts, ch 1, turn. (20 sts)
Row 3: Sc in BLO of all 20 cuff sts, sl st in next 2 sts on edge of stocking, turn. (20 sts)
Rows 4-54: Rep Rows 2-3, ending on a rep of Row 2. (20 sts)
On Row 53, your 2 sl sts go into the last available st on the edge of the stocking AND the st you joined Color A to at the start. Your last row is worked going away from the stocking.
Joining the cuff edge: After Row 54, ch 1 and turn. Hold the two short edges of the cuff together. Insert hook into BLO of the first st on the side closest to you and the remaining loop of the first ch of the starting chain, sl st. Sl st into the remaining 19 sts the same way. FO.
Hanging Loop
Worked separately in Color A, then sewn on. Leave about a 7 to 8″ tail at the start and the end for sewing.
▶ Watch the hanging loop in the video (40:39)
Make a slip knot with Color A and place it on your hook. Ch 26.
Row 1: Sc in 2nd ch from hook and rest of chs, ch 1, turn. (25 sts)
Row 2: Sl st in each st across. FO. (25 sts)
Fold the strip in half so the ends meet. The two tails will be on opposite edges.
Thread one tail onto your yarn needle, sew it through to the facing side, then whip stitch back around. Do the same with the other tail, going the other way.
Fold the cuff down. On the inside of the stocking where the cuff folds (on the same folded edge as the heel), sew the loop in place about 1/2″ down from the top of the folded edge.
Sew it on securely, being careful not to sew through both layers of the cuff. Tie a good knot or two (remember, this stocking has to hold gifts!) and weave in the tails.
Finishing
Thread the starting tail from the toe onto your yarn needle and sew it through all of the sts around the magic ring. Pull good and tight, tie a couple knots to secure it, and weave in the tail.
This keeps the ring from loosening over time.
▶ Watch how to secure the magic ring (38:00)
Weave in all remaining tails, and you’re done!
Caring for Your Stocking
Premier Anti-Pilling Everyday Worsted is an acrylic yarn, so it holds up well to being handled year after year.
If it ever needs a wash, follow the care instructions on your yarn label. Laying it flat to dry helps it keep its shape.
Between seasons, store it folded neatly or laid out flat in a tote.
Tips for Success
Pick your toe direction before you get to the heel. It’s the only spot in the pattern where the two versions are different. If you have other stockings already, make sure this one is the same as those.
Check your toe size first. Measure after Round 6 so you’re not ripping out a whole foot later.
Want the Printable Version?
Want the Emberglen Crochet Stocking pattern in an easy-to-print, ad-free format?
The PDF has the full pattern laid out cleanly, plus a QR code that links right to the video tutorial.
In Conclusion
I hope you love making this stocking as much as I did.
If you make one, I’d love to see it! Tag me on Instagram at @marchingnorth so I can cheer you on.
And if you have any questions while you’re working on it, leave a comment below and I’ll do my best to help.
Looking for more crochet patterns? Check out these ones!