How to Add a Crystal or Stone to Your Macrame Designs
Are you a fan of macrame and crystals? If so, you’re in luck because today, I’m going to show you how to attach crystals to your macrame projects using wire!
Want to remember this? Post this How to Add Crystals to Macrame tutorial to your favorite DIY Pinterest board!
(This post may contain affiliate links. If you click one and make a purchase, I may receive a small commission at no extra cost to you. Read the disclaimer here. Thank you for your support!)
With just a few simple steps, you can add some beautiful sparkle and energy to your macrame wall hangings, plant hangers, and more.
So grab your favorite crystals and a macrame project and let’s get started!
Learn how to make this beautifully textured macrame plant hanger with this step by step, easy to follow printable PDF pattern and video tutorial!
I'll show you how to do the square crown knot, how to tie braided square knot sennits, and how to attach crystals, tassels or beads to the little diamond windows on each arm.
This is a show stopper of a plant hanger, plus it's nice and sturdy and can hold some weight.

Ways to Add Crystals to Macrame Projects
There are several different techniques you can use to incorporate crystals and stones to your macrame. You can drill a small hole in the stone and thread fishing line through it, or you can even glue your crystals on.
Another way is with a mesh or net made of fine cotton cord. I made these crystal pendants with cotton thread in a previous tutorial, and you could do something like that and attach it to your macrame as well.
But if you want easier access to your crystals, attaching with wire is the way to go.
I feel like attaching them with craft wire is one of the best ways and to attach them. There’s something about hot gluing crystals that just feels wrong to me. But no judgement if you do it!
I know sometimes glue is easier and maybe wire wouldn’t work with the design so I get it.
Luckily, the kind of wire we’ll be using is fairly cheap at your local craft store, so you won’t end up with a lot of extra cost.
I know that the wire used to make a wire wrap stone pendant can be a little more pricey, but we’re going for the cheap stuff here!
Learn the Basic Macrame Knots
Are you just getting started with macrame and not sure where to start? I can help you out with that!
Check out this post where you can learn all the basic macrame knots (like lark’s head knots, square knots, the half knot spiral and more) and I even have a free printable guide to get you on the right track!
Free Macrame Tutorials
Are you looking for another free macrame pattern or step-by-step tutorial? Check out these ones from my site!
- 19 Cute Macrame Plant Hanger Patterns
- 21 Free Macrame Wall Hanging Patterns
- 3 Easy Macrame Earring Patterns to Try
Related Post: Want to make some macrame jewelry? Check out this Macrame Crystal Pendant Necklace tutorial and make a beautiful macrame necklace today!
How to Attach Crystals to Macrame
Supplies You’ll Need
- Bendable craft wire in whatever color you prefer:(I used 2 pieces that were 8″ long, but if you have a larger stone you may need to go longer)
- Needle nosed jewelry pliers
- Crystal or stone
- A macrame project to attach it to!
Video Tutorial
Check out the video tutorial over on my YouTube channel, and don’t forget to subscribe!
Written Tutorial
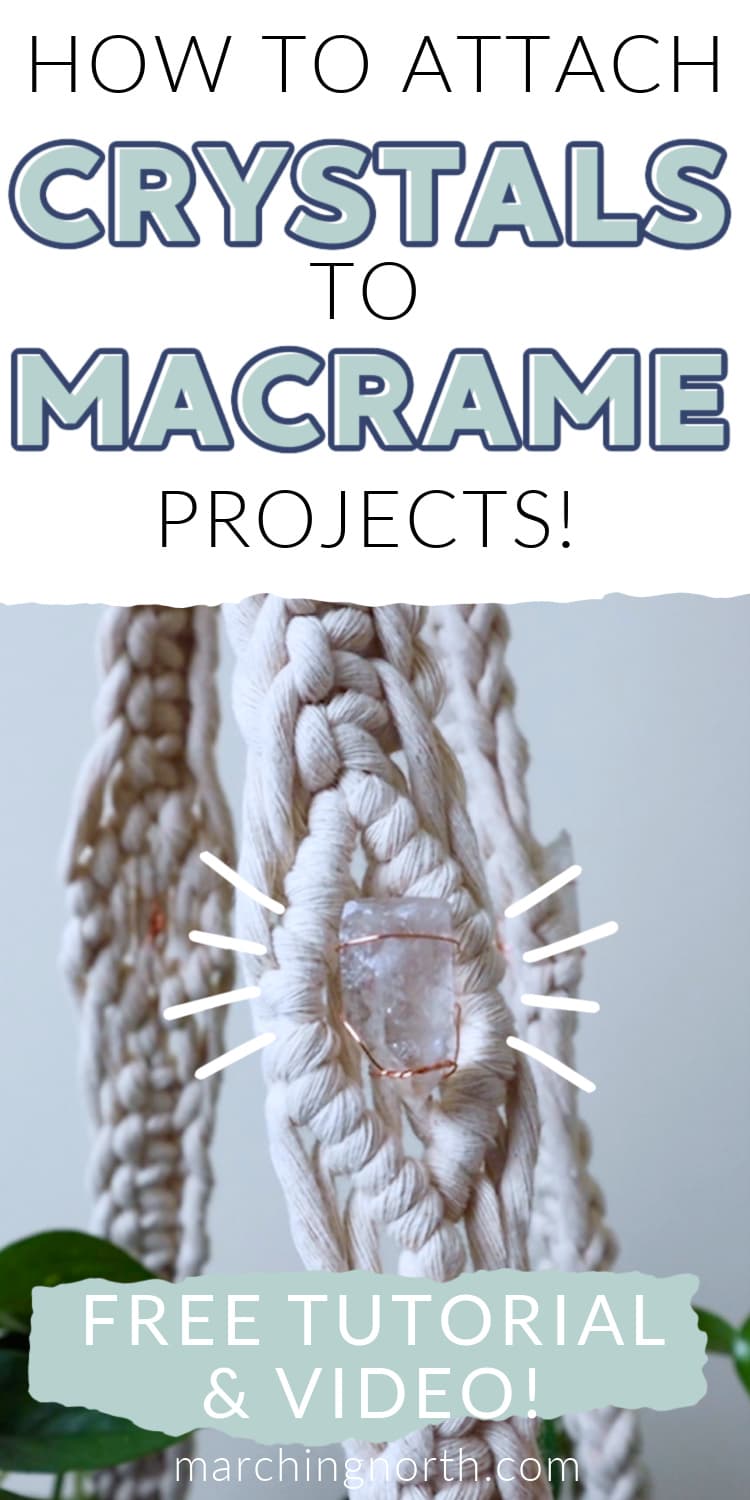
For this tutorial, I’ll be attaching a piece of quartz, and the piece I’m using is about 1 1/4″ or about 3.5 centimeters long. I’m using some basic bendable wire from the craft store.
I don’t think the gauge really matters too much, but this is 26 gauge. Make sure it’s the bendable kind of wire and not the kind of doesn’t hold its shape.
Take 2 pieces of wire that are about 8″ long.
Hold the two pieces, cross them in the center and twist them together three or four times so they’re nice and attached.
The amount of twists will depend on the size of your crystal. You just want the wire to sit nicely on the front of your crystal.
Then take the bottom two wires and bring them around to the back of your stone.
Twist them together a few times and make sure the wire comes down under where your stone starts to narrow there so that it holds the crystal in place and it won’t just slide out.
Now grab the two top pieces of wire, and you’re going to do the same thing, but closer to the top. Twist the wires together 3 or 4 times to secure.
Take one of the top wires and wrap it all the way around the top of your crystal to give it a little bit more support, and then twist those wires together to secure that in place.
Straighten out the pieces of wire on the back so they’ll be easier to attach to your macrame piece.
Now you’ll want to grab your macrame piece and locate the cords you want to attach the crystal to.
Carefully thread the wires through your macrame cord, and you’re going to turn it around to the back and locate the bottom two pairs of wires and the top two pairs of wires.
Twist the bottom pair of wires together, and then twist the top pair of wires together.
Now, grab all the wires and twist them together.
Get a pair of jewelry wire cutters, and you want to cut the wire just past where you twisted it all together, leaving about an inch of wire or so.
Take the needle nose jewelry pliers and twist the wire into a small loop, so there’s nothing dangerous sticking out and no one gets poked with it.
Then you can just tuck it all down so that it’s not in the way and it’s not sticking out of your project.
Repeat that process for all the rest of the crystals you want to attach!
The way you wrap the wire around may be slightly different depending on the shape and size of crystals or stones you’ll be working with.
This technique works for a macrame wall hanging or a plant hanger or really any project that you want to attach crystals to!
Another Way to Add Crystals
When you’re making macrame jewelry, there are times when you really want the stone or crystal to stand out and not have macrame netting or wire covering it.
Here’s a tutorial for how to macrame around a cabochon to make a beautiful necklace pendant!
In Summary
I hope you enjoyed this tutorial showing how to attach crystals to your macrame projects!
I also hope you feel inspired to add some sparkle and energy to your macrame wall hangings, plant hangers, dream catchers, and more using crystals and stones.
This technique would also work with other accessories, like shells or pieces of sea glass, feel free to get creative!
Thanks again for all your guidance in this new adventure. I am having so much fun and letting go of anxiety. You are an angel