Super Sweet Heart Macrame Wall Hanging | Free Pattern & Tutorial!
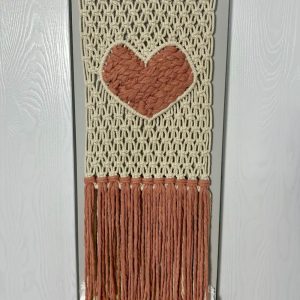
Learn how to make this adorable heart macrame wall hanging in this step by step macraweave tutorial!
It’s perfect for Valentine’s Day or any time you’re looking for a lovey-dovey macrame project!
Don’t forget to pin this for later!

(This post may contain affiliate links. If you click one and make a purchase, I may receive a small commission at no extra cost to you. Read the disclaimer here. Thank you for your support!)
Have you tried macraweaving yet? It’s a combo of macrame and weaving techniques and I just love the different textures and pops of color you can create!
Since Valentine’s Day is coming up, I wanted to make something heart related. This idea popped in my head and I really love (pun) how it turned out.
The macrame part of this project is pretty simple, it’s mainly square knots and diagonal double half hitch knots.
As for the weaving, it’s all soumak stitches. I know they aren’t technically stitches, but I don’t know what else to call them! My old crochet habits are really stuck in my brain.
You’ll find the written tutorial down below along with some pictures to guide you along. I recommend that you watch the video as well, so you can really see it step by step.
Join the Macrame for Beginners and Beyond Facebook Group!
If you’re new to macrame or if you’ve been knotting for a while, connecting with other macrame lovers is always a great idea!
Come check out our Facebook group, Macrame for Beginners and Beyond. It’s a friendly community where you can ask questions, get inspiration, and share your awesome work with other macrame lovers! Come join the conversation today!
Looking for More Free Macrame Wall Hanging Patterns?
Check out this list of 16 free macrame wall hanging patterns with video tutorials and written instructions!
Supplies You’ll Need to Make this Heart Macraweave Wall Hanging
- 4 mm 3 strand twisted cotton rope
- 22 pieces @ 132″ long
- 5 mm single strand cotton string
- approx. 42 feet cut in pieces about two arm lengths long (for heart weaving)
- 22 pieces @ 32″ long (for fringe)
- 7/8″ diameter wooden dowel
- Sharp scissors
- Craft glue
Related: Must-Have Macrame Supplies (and Where to Find Them!)
Heart Macraweave Wall Hanging Tutorial
Step 1: Attach the cords to the dowel with Lark’s Head Knots
Step 2: Tie the first half of the Square Knots
Below is a chart that shows where the square knots go for each row if you’re more of a visual person (like me).
Only do rows 1-9 before we do the heart double half hitch part.
Here’s how rows 1-6 will look.
The first five rows are full rows of alternating square knots.
Row six: skip 2, tie 2 square knots, skip 8, tie 2 square knots, skip 8, tie 2 square knots, skip 2.
And here’s all the way through row 9. I accidentally did row 10 (which I’m cover with my hands here) and had to undo it later. Whoops!
Row 7: Tie 2 square knots, skip 12, tie 2 square knots.
Row 8: Skip 2, tie 1 square knot, skip 34, tie 1 square knot, skip 2.
Row 9: Tie 1 square knot on the left and 1 square knot all the way on the right.
Step 3: Making the heart shape
OK, this part seems a little complicated, but it’s actually not. Just bare with me.
Skip the first 12 ropes, then grab the next four cords. They’ll be right in the center of the left side of the heart.
Take the two outer cords and cross them in front of the center two cords.
You’re going to tie a double half hitch knot with the left center cord that goes to the left, and a double half hitch knot with the right center cord that goes to the right. Both of those knots will be wrapped around the crossed over cords, which will act as the filler cords.
Doing this will make it so the curved top parts of the heart looks nice and smooth. It’ll all make sense in a minute!
Here’s how it looks after I tied the double half hitch knot going to the left over the two crossed over cords.
And here’s how it looks after I tied the double half hitch knot with the right cord going to the right.
After you get the knots tied, adjust them so the knots are right under the square knots above them.
If you pull the two filler cords it’ll cinch them up and then just adjust the double half hitch knots so it’s all neat and and tidy.
Repeat that process on the right side of the heart. You’ll skip 12 cords from the right and use the next four cords.
Step 4: Finishing the heart shape
Starting on the left side of the heart, make six diagonal double half hitch knots going down and to the right. You’ll be using the right filler cord coming out of the double half hitches we made previously.
On the right side of the heart, make seven diagonal double half hitch knots going down and to the left. The last knot will connect the two side of the heart.
For the rest of the heart, you’ll be using those same two filler cords for the double half hitch knots.
On the left side of the heart, make eight diagonal double half hitch knots going down and to the left.
Do the same thing on the right side of the heart, but make eight diagonal double half hitch knots going down and to the right.
Make 17 diagonal double half hitch knots going down and to the right.
Then, make 18 diagonal double half hitch knots going down and to the left. The last knot will connect the two sides of the heart.
Step 5: Tying the second half of the Square Knots
Now, tie rows 10-17 of square knots.
Row 10: Skip 2, tie 1 square knot, skip 34, tie 1 square knot, skip 2.
Row 11: Tie 3 square knots on the left, skip over the heart, tie 3 square knots on the right.
Row 12: Skip 2 , tie 4 square knots, skip over the heart, tie 4 square knots, skip 2.
Row 13-17: Regular rows of alternating square knots.
About an inch down from the last row of square knots, tie a row of double half hitch knots using the far left cord as your filler cord. These will hold your fringe in place.
Step 6: Weaving the heart
The weaving section of the wall hanging is all done with the soumak stitch. (Technically I don’t think it’s called a stitch, but you know what I mean.)
To get started, cut a piece of the pink rope (or whatever color you’re using) that’s two arm lengths long.
Fold it in half and secure it to one of the vertical cords inside the heart shape using a cow hitch knot.
The pattern will be going diagonally across the heart, starting down in the bottom corner, going up to the right and back down to the left until the whole heart is filled in.
(If this is confusing, be sure to check out the video.)
To do the soumak pattern, you’ll go in front of three ropes with the pink cord, and then wrap around the third cord. Then go over three more, and around the third one again.
Repeat that until you get to the right edge of the heart. Then you’ll wrap around the last cord twice and head back down toward where you started.
For this row, you’ll want to wrap around a different cord than you did in the first row so the braid is staggered.
You’ll do justlike before, going over three and wrapping around the third, except now you’ll be going down and to the left.
Once you get back to the bottom of the heart, wrap around the last cord twice and repeat rows one and two again.
Keep weaving until you have the whole heart filled in.
This part is very loose and freeform, there’s really no right or wrong way to do it.
If you think it looks good, go for it!
Once you get the heart filled in, flip your wall hanging around and tuck all the loose ends under the vertical ropes on the back. Then trim off the excess rope.
Step 7: Rya knots
Now it’s time to make the Rya knots at the bottom, in the space between the last row of square knots and the row of double half hitch knots.
To do a Rya knot, take two pieces of the pink cord that we cut for the fringe and fold them in half so you can find the center.
You’re going to wrap each Rya knot around four cords. Insert the right side of the cords around the right of the four cords, and the left side around the left of the four cords. Then bring the ends back through in the center of the four cords, under the loop formed by the pink cord.
Tighten it up and you’ve completed one Rya knot!
Make 11 Rya knots going across the bottom of the wall hanging.
Now you just need to trim the fringe however you like.
I decided to cut the pink fringe unevenly and shorter than the white fringe. For the white fringe I cut it straight across and untwisted it so it was nice and wavy.
My favorite way to attach a hanger to macrame wall hangings is with the constrictor knot, that link will take you to a tutorial that shows you exactly how to do it!
Done!
I really hope you enjoyed this heart macrame wall hanging tutorial!
If you make one of these, please share a pic over on Instagram and tag me @marchingnorth so I can see. I love seeing your creations, it makes my day!
Want more macrame tutorials? Check out these ones below!
- DIY Cowrie Shell Macrame Bracelet (Free Pattern + Video Tutorial)
- Easy Beaded Macrame Bracelet with Sliding Knot (Beginner Tutorial + Video)
- 35 Free Step-By-Step Macrame Plant Hanger Patterns (with Tutorials & Video!)
- How to Make a Boho Fall Floral Macramé Wreath for Your Front Door (+ Video!)
- Macrame Bookmark Tutorial | Cute DIY Paperclip Bookmarks (Great for Gifts!)
- Dip Dye Macrame Plant Hangers = Instant Joy (Tutorial + Video!)