Simple Macrame Mandala Wall Hanging // Tutorial & Video!
Learn how to make a beautiful and simple macrame mandala wall hanging in this step by step tutorial and video!
(This post may contain affiliate links. If you click one and make a purchase, I may receive a small commission at no extra cost to you. Read the disclaimer here. Thank you for your support!)
I’m so excited to share this DIY macrame mandala tutorial with you today! This project was so much fun to make and easy enough for a beginner.
Circular macrame wall hangings are very popular right now. They can be made in lots of different sizes, you can add in crystals or a mirror, they’re really versatile and add loads of boho style to your room decor.
You can use them as a wall hanging or even as a centerpiece on your table. I hung mine over my fireplace mantle and I just love how it turned out!
Want to remember this? Post this Macrame Mandala Wall Hanging tutorial to your favorite DIY Pinterest board!

How Do You Hang a Macrame Ring on the Wall?
When I hung my mandala on the wall, I just used a clear push pin that’s centered just under the large outer ring.
Another option is to use two of the cords coming out at the top center and tie an overhand knot to form a loop the same length as the fringe.
Join the Macrame for Beginners and Beyond Facebook Group!
If you’re new to macrame or if you’ve been knotting for a while, connecting with other macrame lovers is always a great idea!
Come check out our Facebook group, Macrame for Beginners and Beyond. It’s a friendly community where you can ask questions, get inspiration, and share your awesome work with other macrame lovers! Come join the conversation today!
Looking for More Free Macrame Wall Hanging Patterns?
Check out this list of 16 free macrame wall hanging patterns with video tutorials and written instructions!
- Two Color Semi Circle Macrame Wall Hanging
- Large Boho Macrame Wall Hanging
- Simple Macraweave Wall Hanging
- Super Sweet Heart Shaped Macraweave Wall Hanging
Supplies You’ll Need to Make a Macrame Mandala Wall Hanging
- 4 mm single strand macrame string
- 64 pieces @ 60″ long
- 32 pieces @ 10″ long
- 7″ metal ring
- 19″ metal ring
- Craft glue
- Sharp scissors
- Measuring tape
Related: Must-Have Macrame Supplies (and Where to Find Them!)
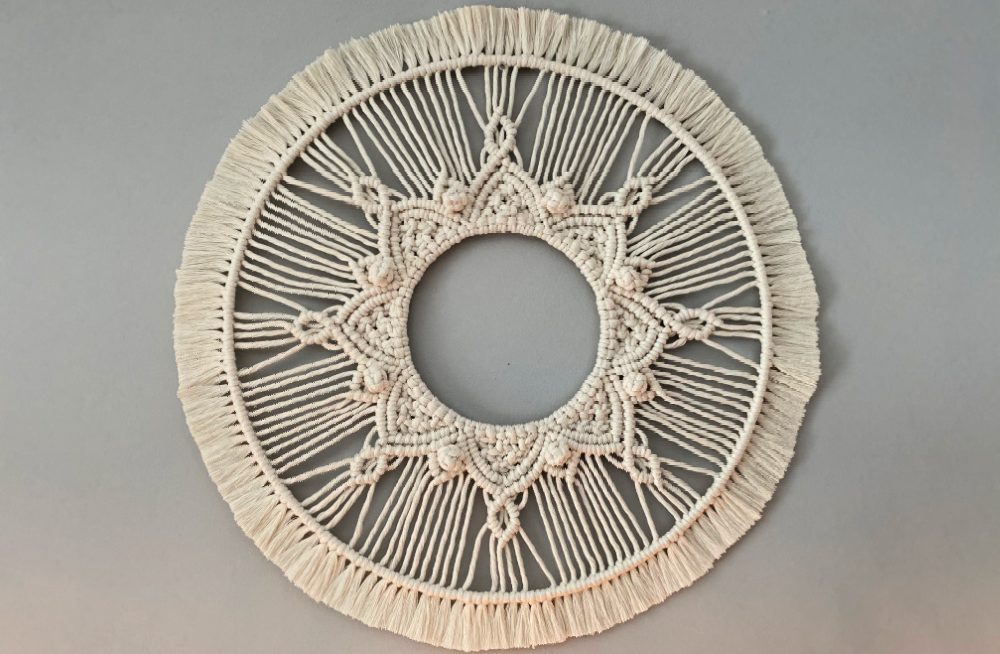
Macrame Mandala Wall Hanging Tutorial
Step 1: Attach string to small ring
First, attach your 64 main ropes to the small ring using lark’s head knots.
Step 2: Make main triangle sections
For each large triangle section, you’ll be using eight of the pieces of rope (so 16 actual cords since they’re doubled over).
Tie three square knots for the first row right in the center of the section. Then tie two square knots in between the first three for the second row. Tie one last square knot in the center.
This will make the inverted triangle shape like in the picture above.
Starting on the left of the square knots, tie a row of six diagonal double half hitch knots going down and to the right.
Then starting on the right of the square knots, tie a row of seven diagonal double half hitch knots going down and to the left.
Continue that pattern all the way around the ring, making eight triangles all together.
There will be two cords in between each triangle that you won’t use for this part. We’ll get to them in a minute.
Now for the next row of diagonal double half hitch knots you’ll use the unworked cords as filler cords.
First, cross them over each other (left over right) and then starting on the left side of the triangle tie seven diagonal double half hitch knots going down and to the right.
Then on the right side of the triangle make a row of eight diagonal double half hitch knots going down and to the left.
Repeat that all the way around the circle, remembering to cross the filler cords left over right before you tie the knots.
Step 3: Make small triangle sections
Now we’re going to tie a berry knot in between each triangle section.
To do that, tie three square knots stacked on top of each other. Then take the filler cords and flip them up and poke them through the center of the filler cords above the square knots.
Pull them through and then tie another square knot under the berry knot to secure it.
Now using the cord to the left of the berry knot as the filler cord, tie two diagonal double half hitch knots going down and to the right.
Using the cord to the right of the berry knot as the filler cord, tie three diagonal double half hitch knots going down and to the left.
Repeat that pattern in between each of the large triangles to make eight all together.
Step 4: Make diamonds at points of main triangles
Last, we need to make the small diamond shape at the end of each large triangle.
Using the cord that was the filler cord for the last double half hitch knot in the large triangle, tie two double half hitch knots going down and to the left.
Then using that same cord, tie two double half hitch knots going down and to the right.
To complete the diamond, use the cord to the right as the filler cord and tie two double half hitch knots going down and to the right, then three going down and to the left.
Make one of those small diamonds at the tip of each of the large triangles.
Step 5: Attach strings to outer ring
Now we need to attach the cords to the outer ring using double half hitch knots.
First, lay the large ring on top of the cords, centering it as best you can.
Then tie one cord on each of the four sides of the ring and adjust it so it’s centered. It’s a good idea to use a measuring tape and see that it’s the same on each side. It’s a lot easier to adjust it now than it is with all the cords attached!
Once you’re happy with the placement, continue tying all the rest of the cords to the outer ring. Make sure you’re going the same direction for all the knots. I went to the right.
Once you get all the cords attached you’ll see there are gaps. Now we’re going to attach 32 pieces of fringe to fill them in.
You can see how I pushed the cords together in the picture above and then I put two pieces of fringe in each gap. I attached the fringe using a cow hitch knot.
Step 6: Trim and brush out fringe
In the picture above I’m showing how you can make an optional hanger using two of the center cords at the top. I didn’t do that for mine, but it’s an option.
To try and keep the knots from loosening up over time, I put some tacky glue on the back and spread it out with my finger. This is also optional.
If you decide to add glue, let it dry several hours or overnight before you cut the fringe.
Next, it’s time to cut the fringe! I measured mine out about two inches and cut all the way around.
Then brush the fringe out with your pet brush, and give it one more final trim.
Done!
I really hope you enjoyed this free pattern for a macrame mandala wall hanging!
If you make one of these, please share a pic over on Instagram and tag me @marchingnorth so I can see. I love seeing your creations, it makes my day!
Want more macrame tutorials? Check out these ones below!
- DIY Cowrie Shell Macrame Bracelet (Free Pattern + Video Tutorial)
- Easy Beaded Macrame Bracelet with Sliding Knot (Beginner Tutorial + Video)
- 35 Free Step-By-Step Macrame Plant Hanger Patterns (with Tutorials & Video!)
- How to Make a Boho Fall Floral Macramé Wreath for Your Front Door (+ Video!)
- Macrame Bookmark Tutorial | Cute DIY Paperclip Bookmarks (Great for Gifts!)
- Dip Dye Macrame Plant Hangers = Instant Joy (Tutorial + Video!)
What a great tutorial!! Very easy to follow! I finally got the double hitch knot!!! Thank you so much!
Is there a tutorial on how to do the diamond? I have tied and untied this part so many times, it just doesn’t look right
This turned out great, thanks!
Love your tutorials. So clear & easy to understand & follow. I have done a similar wall hanging but finding that the fringe on the top half is floppy. How do get it to stand up so beautifully like yours ?
Sue
Beautiful project. If only I felt confident enough to try it. Could this pattern be adjusted for smaller rings? I don’t have the space for something this large.
Thanks for the tutorial, it was very inspiring.
I think it could be adjusted for smaller rings, but you’d need to reduce the number of cords and possibly use a thinner rope. You just have to figure out the pattern for one segment and repeat it around. They’re really satisfying to make once you get the number of cords figured out! Thanks for stopping by!
Your pinterest link button is not working for me, on this and other tutorials of yours. Also, do you have any printable patterns? I love your designs.
Thank you for the heads up! I’m looking into why it’s not working. I’m working on converting my patterns into printable versions that’ll be available in my shop (both the one on my site and my Etsy shop). I have one macrame pattern listed now for a large macrame flower, but I plan on having several more of my popular patterns listed too. Thanks so much!!