Easy Large DIY Macrame Wall Hanging (with Video!)
Learn how to make some beautiful boho wall art with this easy large macrame wall hanging tutorial!

Not only is it gorgeous, but it’s really simple (and surprisingly fast!)
I finished this wall hanging in a few hours. If I wasn’t fiddling with my camera and trying to get the lighting right, it would of gone even faster.
You’ll only need a few simple knots for this macrame wall hanging: the lark’s head knot, square knot, double half hitch knot, and the rya knot.
This project is totally doable for beginners and beyond!
(This post may contain affiliate links. If you click one and make a purchase, I may receive a small commission at no extra cost to you. Read the disclaimer here. Thank you for your support!)
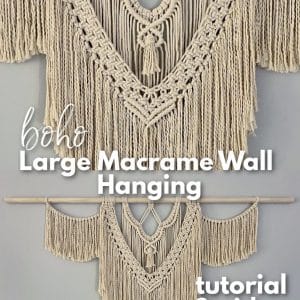
How Big is this Macrame Wall Hanging?
The dowel is 48″ long, and the actual macrame part is about 36″ wide and 29″ tall from the top to the bottom of the fringe.
For reference, it fits nicely on the wall behind our king sized bed with some room left over on each side.
How Much Cord Will You Need for this Large DIY Macrame Wall Hanging?
All together, you’ll need *about* 404 feet of 4 mm cotton macrame rope for this wall hanging.
The exact number came out to 403.something, so I rounded up. (Have I mentioned that I hate math?)
I’m more of an eyeballer when it comes to measurements, but I do my best to be accurate when I create these tutorials. That being said, I recommend having a little extra rope laying around, just in case.
You’ll find a cut list for all the different cord lengths required under the supply list below.
What Cord Should I Use for a Macrame Wall Hanging?
For this wall hanging, I used 4 mm three-strand twisted cotton rope.
You could also use single strand cotton, but it’s a little more delicate and takes a little more effort to keep the knots looking even. It would still work though!
Another option is braided cord, but you wouldn’t get the nice fringe at the end.
I like the three-strand twisted for this because it holds up well for knotting, and the fringe is really pretty when you untwist it at the end. You don’t have to brush it out (I didn’t for this project) and it’s all wavy and just looks cool without much effort.
This is my FAVORITE three strand twisted cotton. Pretty much everything in this shop is my favorite.
Join the Macrame for Beginners and Beyond Facebook Group!
If you’re new to macrame or if you’ve been knotting for a while, connecting with other macrame lovers is always a great idea!
Come check out our Facebook group, Macrame for Beginners and Beyond. It’s a friendly community where you can ask questions, get inspiration, and share your awesome work with other macrame lovers! Come join the conversation today!
What Else is Needed for this Macrame Wall Hanging?
Besides the macrame rope, you’ll also need a 48″ wooden dowel (mine is 3/4″ in diameter) and a rack of some sort to hold your work while you’re knotting.
I use a basic IKEA clothing rack and it works really well.
You’ll just need something that holds the dowel still while you’re working and is high enough off the floor so you have room for the cords.
You’ll also want a sharp pair of scissors to cut the fringe. I love my Gingher scissors and I highly recommend a pair for anyone who’s serious about macrame. They’re so sharp! (Be careful though, I keep these FAR AWAY from my children!)
Now that we have all of that out of the way, let’s get down to knotting!
Looking for More Free Macrame Wall Hanging Patterns?
Check out this list of 16 free macrame wall hanging patterns with video tutorials and written instructions!
Supplies You’ll Need to Make a Large DIY Macrame Wall Hanging
- 404 feet of 4 mm three-strand twisted cotton macrame rope (see cut list below)
- 48″ long wooden dowel (3/4″ diameter)
- scissors
Related: Ultimate List of Must-Have Macrame Supplies
Macrame Rope Cut List
- 4 pieces @ 70” long (beginning part)
- 2 pieces @ 64” long (filler cords for double half hitch knots on the first section)
- 8 pieces @ 128” long (for alternating square knot bands)
- 24 pieces @ 40″ long (for first fringe layer)
- 3 pieces @ 20” long (for rya knot)
- 46 pieces @ 34” long (for second fringe layer)
- 2 pieces @ 47” long (outer fringe hangers)
- 46 pieces @ 16” long (for outer fringe)
Large DIY Macrame Wall Hanging Tutorial
Related: Macrame Mandala Wall Hanging Tutorial
Step 1: Make the center section
Fold the four 70″ long pieces of rope in half and attach them to the dowel with lark’s head knots.
Space them out with the two center cords right next to each other in the the middle, and the two outer cords about four inches away on either side.
Then, tie a square knot with the center cords right under the lark’s head knots.
Tie a square knot on the left side and the right side about four inches down from the first square knot.
Finally, tie the last square knot in the center about four inches under the last two square knots.
Step 2: Add the first layer of fringe
Add the 24 pieces of 40″ fringe. The upper sections will each get seven pieces each, and the two lower sections will get five pieces of fringe each.
Related: Macra-Weave Wall Hanging Tutorial
Step 3: Tie a row of double half hitch knots
Add one of the 64″ pieces onto each side with a lark’s head knot.
You’ll need to adjust it so the outer cord (the one on the left in this photo) is even with the fringe pieces, and the inner cord (which will be the filler cord) is way longer.
Do the same thing on the right side of the wall hanging, but the opposite way.
Tie a row of double half hitch knots using the long cord as the filler cord.
Only use the fringe we added before this for the knots, don’t use the cords hanging behind the fringe from the square knots in the first section, it’ll get too crowded and lay weird.
For the last double half hitch knot, cross the two filler cords and use the filler cord from the left side as the working cord.
Step 4: Tie the alternating square knot bands
Attach four of the 128″ long ropes on the left and four on the right by folding them in half and using lark’s head knots to secure them.
Tie 23 rows of alternating square knots on each band. Start with two square knots, then one on the next row, two on the next, and continue that pattern for all 23 rows.
Related Post: 12 Free Macrame Wall Hanging Patterns
Step 5: Make the diamond
Go back to the center section where we tied the double half hitch knots, and now we’re going to add a diamond shape.
Only use the cords from the fringe we added for this part, ignore the four cords hanging behind them in the center from the square knot we tied in the first section.
Grab the left center cord and tie three double half hitch knots going down and to the left.
Then grab the right center cord and tie three double half hitch knots going down and to the right.
On the left side, tie three more double half hitch knots going down and to the right.
On the right, tie three more double half hitch knots going down and to the left.
Cross the two filler cords and tie one last double half hitch knot in the center using the right filler cord as the filler.
Step 6: Attach the alternating square knot bands together
First, bring the two alternating square knot bands together and tie a square knot using the two right cords form the left band and the two left cords from the right band. (1st photo)
Then, tie a square knot between the two square knots on the left. You’ll skip the first two cords on the left. (2nd photo)
Tie a square knot between the two square knots on the right. You’ll skip the last two cords on the right. (3rd photo)
Go back to the left side and tie a square knot between the knot you tied a minute ago (the one from the 2nd photo) and the center knot. (4th photo)
Tie a square knot between the other square knot you tied a minute ago (from the 3rd photo) and the center knot. (5th photo)
Tie one last square knot in the middle to finish the “V” shape (6th photo)
If my explanation of this was confusing, check out the video! (It’s kind of hard to explain this in words without it being super confusing, at least for me. I’m a visual person.)
Step 7: Tie two rows of double half hitch knots under the “V”
Using the farthest cord to the left of the front section as the filler cord, tie a row of double half hitch knots down to the bottom of the “V”.
Repeat that on the right side, but using the farthest cord on the right as the filler cord. Join the filler cords together for the last double half hitch knot.
Make one more row of double half hitch knots, repeating the same steps from the first row.
Step 8: Add the second layer of fringe
Add the 34″ long pieces of fringe to the loops on the sides of the alternating square knot bands. Attach them using lark’s head knots.
There are 23 pieces on each side. Two pieces fit in each loop and you can fit one piece at the top
under the larks head knot (I hadn’t added that one yet in the photo above.)
Step 9: Attach the outer fringe hangers
Attach the 47″ long pieces of rope on each side to hold the outer fringe.
Starting on the left, attach one of the ropes with a lark’s head knot about 9 1/2″ away from the alternating square knot band.
Adjust the rope so the left side is about 8″ long and the right rope is much longer.
To attach the other side, bring the right cord between the alternating square knot band and the center section and loop it in front of and over the dowel.
Bring it from the left of the rope around the front, and then loop the end behind and over the dowel.
Thread the end down through the loop formed to complete the lark’s head knot. Tighten it up a bit (however low you want the fringe hanger to hang down).
Repeat that process on the right side of the wall hanging, but in reverse.
Step 10: Attach the outer fringe
Attach 23 pieces of 16″ fringe using larks head knots on both fringe hangers that we just attached.
Step 11: Add the Rya Knot
Untwist the three strands of 20″ long rope and hold it all together.
You’re going to thread the ends through the diamond on either side of the two center cords (where I’m poking my fingers out in the first picture).
Put the ends of the untwisted rope through on the left of the center cords, and then thread the other end through on the right of the center cords.
Then, push all of the ends out through the center under the loop you just formed.
Pull it tight and adjust it so it looks nice, and then trim the ends, leaving them about three inches long.
Step 12: Untwist the fringe
Untwist the fringe hanging from the two sides and the front.
I left the back fringe alone, but you can untwist it too if you want.
Once you get all the fringe untwisted, give it a trim to even everything up. I didn’t cut mine very exact, I just cut off the long scraggly pieces.
Done!
I hope you enjoyed this DIY Macrame Wall Hanging tutorial! If you make one of these lovely macrame wall hangings, please post a pic on Instagram and tag me @marchingnorth so I can see it. I love to see your creations!
Check out the links below for some more fun macrame projects…
Get your copy of 60 Macrame Knots & Knot Patterns eBook today!
Click here to find out more about this helpful macrame knot book that features step by step photo tutorials for 60 different macrame knots and knot patterns!
It’s a perfect resource to help you take your macrame creations to the next level.
Related Posts
- Must-Have Macrame Supplies | The Ultimate Guide
- DIY Hexagon Macrame Coasters // Tutorial + Video!
- DIY Macrame Market Bag // Tutorial + Video!
- DIY Cowrie Shell Macrame Bracelet (Free Pattern + Video Tutorial)
- Easy Beaded Macrame Bracelet with Sliding Knot (Beginner Tutorial + Video)
- 35 Free Step-By-Step Macrame Plant Hanger Patterns (with Tutorials & Video!)
- How to Make a Boho Fall Floral Macramé Wreath for Your Front Door (+ Video!)
- Macrame Bookmark Tutorial | Cute DIY Paperclip Bookmarks (Great for Gifts!)
- Dip Dye Macrame Plant Hangers = Instant Joy (Tutorial + Video!)
- Macrame Troubleshooting (No More Running Out of Cord!)
- Double Macrame Hat Hanger | Free Pattern & Video!
- Macrame Half Circle Mini Wall Hanging | Free Pattern + Video!
How would I use 2 different colors?
Loved making this! I used 6 mm cord so had to lengthen cuttings by x1.5. My piece looks different. I wasn’t sure how to account for spacing when using larger thread but I’m very happy with the results. Thank you so much for sharing this pattern.
I’m so glad to hear that! It’s amazing the different results you can get just by changing the cord type and thickness- it sounds like you did a good job estimating your cord lengths and making it your own. Thanks for stopping by!
I’m curious how you attached it to the wall?!
How wide would it be if you left the side fringe off? And how much cord would you need?
I made this wall hanging on a long piece of driftwood. It came out great but it does not lay flush against the wall, in fact its very uneven.
I am wondering if you can advise on how to hang it on the wall.
I starte doing macrame in the 80ish. I have gone back to it. I have made one wall hangar already. And nearly finished another one. Ones going to my daughter. The other one going to my neighbour. I have enjoyed making them.
Hi! I am currently attempting this and it is my first time with macrame… I know, I’m a bit overzealous, but this is too beautiful not to attempt it. 😉 i just have a little issue: when I am doing the alternating square knot bands, my strands get so short that I don’t have enough length to do the whole V. Do you have any idea what might be happening here? I am sure I measured the length right. Also, there are four strands that are wayyyy longer than the others. Thanks!
I’m having the same problem. Did you ever get an answer?
I have just finished making my own, for my daughter’s room, and it turned out amazing. I couldn’t have done it without your awesome tutorial, Crystal. Thank you!
I’m so happy to hear that!! Yay! You’re so welcome 🙂
Thank you for your wonderful tutorial. It was my first time in decades! When I encountered a knot I didn’t understand, I googled it, practiced it and then returned to your tutorial. Even with all that, I finished in an evening! I would not have thought that possible. I even added beads cuz I’m a little bit extra!!
I had not done macrame in so many years, like back in the 70’s!! I apparently forgot how to do most of the knots so I did not find this easy. Just asking if you could slow down a little and maybe show the knot before you do it, it would be helpful! Thank you for sharing the pattern though, I had to take it apart a few times because I had things wrong but I was determined and have now completed the hanging! The only thing I couldn’t do like you is unravel because I apparently used different cord than you. My cord was like a 1000 strands of string twisted together to make a cord!! I improvised however on the middle knot and left the extra fringe just as is.
I found YouTube videos to tie the knots I had trouble with. It worked out really well as I could go back and forth to see if my end result looked like this one. I’m about half way done, I will say it does get easier with repetition! I taught myself to macrame and this is my third project so don’t get discouraged, it’s advanced for me-I work on it off and on, I’d encourage you to keep trying! 🙂
I’m so grateful for your tutorial, I was looking for exactly the same makrame like yours❤️? It us wonderfull amazing, thank you very much!!!