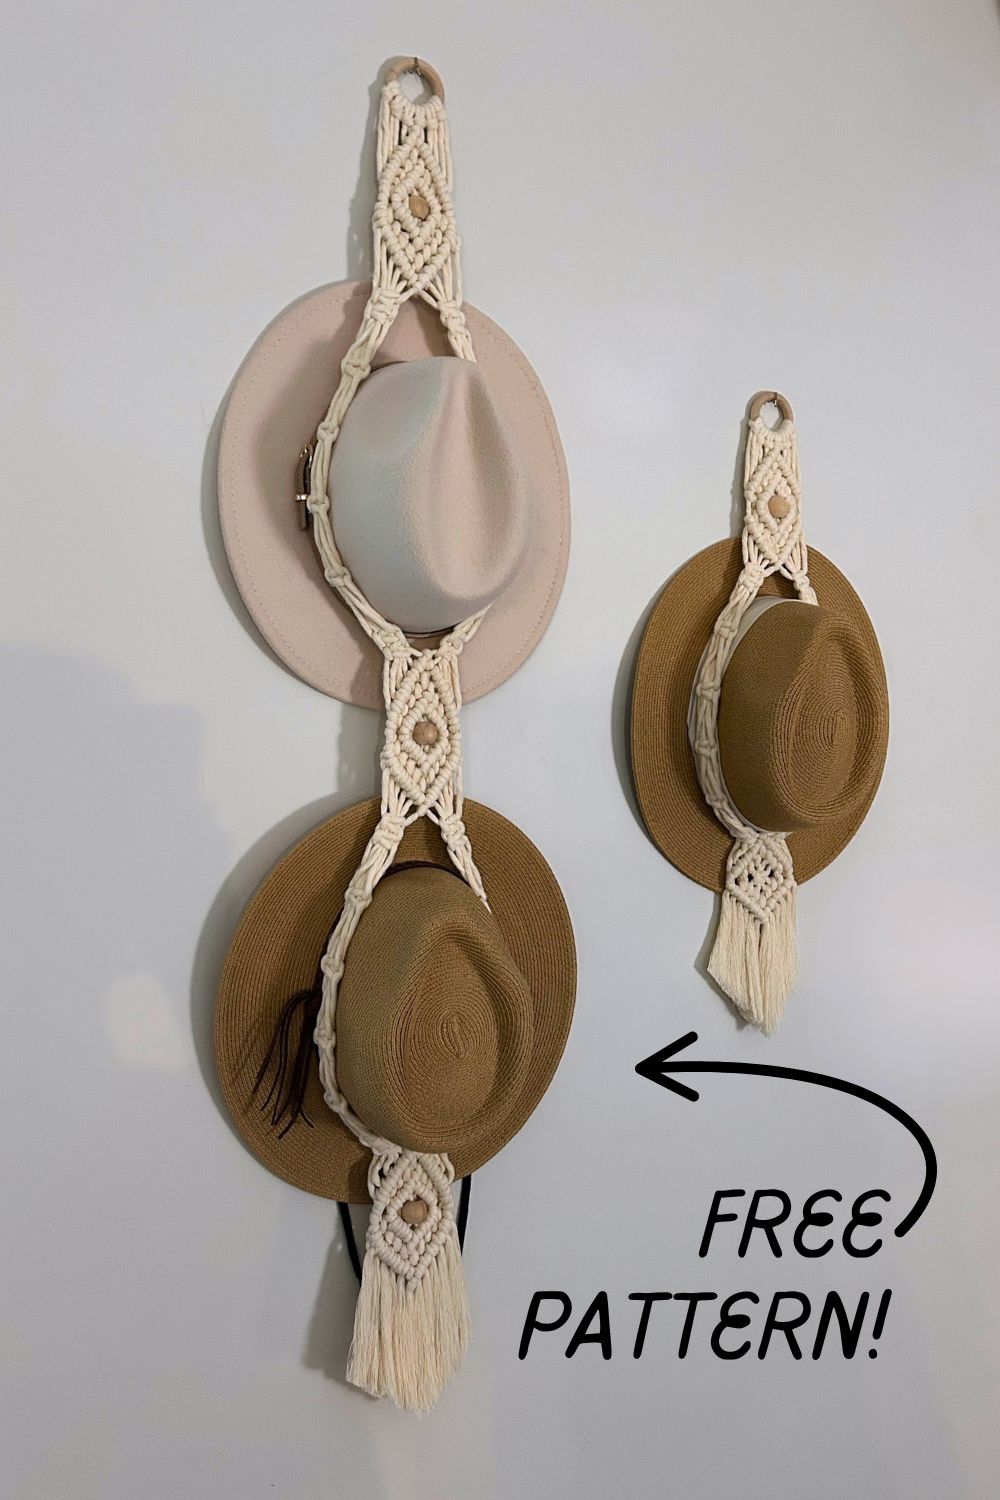
Double Macrame Hat Hanger | Free Pattern & Video!
Create a beautiful, boho-style hat hanger that holds two hats with this step-by-step macrame tutorial.
This pattern includes diamonds, beads, switch knots, and a bit of lovely fringe to top it all off.
Don’t forget to pin this for later!

(This post may contain affiliate links. If you click one and make a purchase, I may receive a small commission at no extra cost to you. Read the disclaimer here. Thank you for your support!)
Ever since I made my first macrame hat hanger pattern, I’ve had requests for a double version.
And I totally get it, let’s use that vertical wall space!
If you want to add one more hat to this guy and make it a triple, I’ve included my recommendations for the cord lengths to do that, too.
Below, you’ll find the free pattern and the video tutorial.
If you’re new to macrame and want to learn the basic knots, I can help you with that!
Also, be sure to sign up below for my free printable PDF knot guide so you can keep it handy while you’re working on your projects!
More Free and Useful Macrame Patterns
Love making useful and cute items? I’ve got lots of them to choose from! Here’s a few to get you started:
- Woven Diamonds Macrame Plant Hanger
- Macrame Hanging Storage Basket (DIY Makeover!)
- DIY Macrame Toy Hammock
- DIY Macrame Fruit Hammock
Double Macrame Hat Hanger Tutorial
Supplies You’ll Need
- 5 mm single strand cotton string
- 2″ Wooden ring
- 3 Large hole wooden beads
- Sharp Scissors
- Measuring tape
- Brush or comb for fringe
Cut List
- 6 cords @ each 217 inches long (551 cm)
Video Tutorial
Check out the tutorial video for this macrame ornament on my YouTube channel, and don’t forget to subscribe!
Step 1: Attach Cords to Ring
Fold each cord in half and attach all 6 cords to the wooden ring using lark’s head knots.
You’ll have 12 working strands hanging down.

Step 2: Making the Diamond
Row 1: Top of the Diamond
Find the center 2 cords.

Use the right middle cord as the filler cord and tie 6 DHHKs down and to the left.

Now go back to the working cord you used to tie the first DHHK and use it as the filler cord to tie 5 DHHKs down and to the right.


Row 2: Reverse DHHKs (Back Side of Diamond)
Flip your hat hanger around to the back.

Take the two center cords, cross the right one over the left and use it as the filler cord to tie 5 DHHKs going down and to the left. There will be one cord left over that we’re skipping.

Use the working cord you used to the tie the first DHHK of that row as the filler cord and tie 4 DHHKs going down and to the right. There will be a leftover cord that we’re skipping on this side, too.

Row 3: Front Side (Finishing the top of the Diamond)
Flip your hat hanger back around to the front side.
Grab the two center cords, cross the right one over the left and use it as the filler cord to tie 4 DHHKs going down and to the left.
Use the working cord you used to the tie the first DHHK of that row as the filler cord and tie 3 DHHKs going down and to the right.

Filling in the Side Gaps:
Grab the 2 cords on the far right side, and use the right most one as the filler cord and the left most one as the working cord to tie 1 DHHK going down and to the right.


Grab the 2 cords on the far left side, and use the left most one as the filler cord and the right most one as the working cord to tie 1 DHHK going down and to the left.

Add a Bead (Optional):
Thread a wooden bead onto the 2 center cords.

Row 4: Bottom of the Diamond
Use the 3rd cord from the left as the filler cord and tie 3 DHHKs down and to the right.
Use the 3rd cord from the right as the filler cord and tie 4 DHHKs down and to the left. The last knot will close the diamond.

Row 5: Reverse Side
Flip your hat hanger to the back side.
Use the 2nd cord from the left to tie 4 DHHKs going down and to the right.
Use the 2nd cord from the right to tie 5 DHHKs going down and to the left. The last knot will close the diamond.

Row 6: Final Row of the Diamond
Flip to the front side again.
On the left side, use the far left cord as the filler cord and tie 1 DHHK going down and to the right. Then you’re going to use the same working cord and tie another DHHK in the same way. This fills in the gap.

Using the same filler cord, tie 4 more DHHKs going down and to the right.

On the right side, use the far right cord as the filler cord and tie 1 DHHK going down and to the left. Then you’re going to use the same working cord and tie another DHHK in the same way to fill in the gap like we did on the other side.

Using the same filler cord, tie 4 more DHHKs going down and to the left.

First diamond complete!
Step 3: Hat Strap Section (Right and Left)
We’re going to make 2 straps that will go on either side of your hat to hold it in place.
Split the cords into two sections with 6 cords on the right and 6 cords on the left.
Starting on the Right Side:
Tie 2 square knots using the 2 outer cords as the working cords and the remaining 4 cords will be filler cords.

The first square knot should line up with the bottom point of the diamond.
Now do the Left Side:
Do the same thing on the left side, and make sure the knots line up with the right side.

Switch Knots (You’ll do the same thing on both sides):
Find the middle 2 cords of each 6-cord section.
Bring them to the outside, crossing in front of the other cords, and use them as the working cords to tie a square knot about 1.5 inches (3.81 cm) down.

Repeat to make 4 more switch knots (5 total knots per side). With each knot, you’ll be taking the 2 center cords and bringing them to the outside before tying the knot.

Bring the middle 2 cords to the outside one last time and use them to tie 2 more square knots stacked on top of each other 1.5 inches (3.81 cm) down from the last knot you tied.

First hat holder complete!
Step 4: Second Diamond
Repeat the exact same steps as in Step 2 to make the second diamond below the first hat holder.
You’ll connect the two straps back together with the first DHHK.

Step 5: Second Hat Strap Section
Repeat the hat strap steps from Step 3 for this second holder:
- 2 stacked square knots on each side, lined up with the bottom point of the diamond
- 5 switch knots per side with 1.5 inches (3.81 cm) space in between
- Switch the center cords again and tie 2 stacked square knots at the base per side
Second hat holder complete!
Step 6: Final (Third) Diamond
Repeat the diamond pattern from Step 2 one final time, exactly as you did before.
Step 7: Trim and Finish
Trim your fringe so that it mirrors the point of the bottom diamond.

Brush out the fringe. Trim again until it looks nice and neat.

Optional: Want a 3-Hat Hanger?
Want to hold even more hats? We can make that happen!
To make a 3 hat hanger, you’ll need to add an additional hat strap section and diamond.
And to do that, you’ll need to start with longer cords. I recommend cutting your cords at 320” long (812.8 cm).
Then just repeat steps 2 and 3 an extra time!
In Conclusion
I hope you enjoyed this double macrame hat hanger pattern and will make one or two (or 10) of them!

Looking for more macrame patterns to try?

I am looking forward to this project! Thanks