Macrame Plant Hanger DIY Wall Hanging // Tutorial + Video!
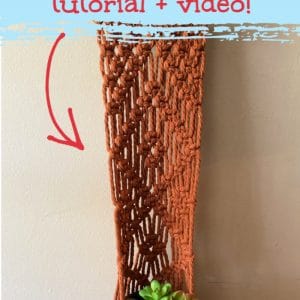
Are you looking for an easy macrame plant hanger DIY that still looks fancy? This wall hanging plant holder is a perfect project for a beginner or more advanced knotter!

The whole design is made using square knots, so it’s nice and simple, but still decorative and boho chic.
I’ll walk you through the whole process, including the diamond square knot pattern, the plant basket, cutting down the dowel, and attaching the hanger!
Join the Macrame for Beginners and Beyond Facebook Group!
If you’re new to macrame or if you’ve been knotting for a while, connecting with other macrame lovers is always a great idea!
Come check out our Facebook group, Macrame for Beginners and Beyond. It’s a friendly community where you can ask questions, get inspiration, and share your awesome work with other macrame lovers! Come join the conversation today!
Plant hangers are a great beginner macrame project!
They’re usually on the smaller side, so they don’t take too long to finish. Plus, they’re a great way to practice different knots. And once you’re done, you have a beautiful piece of DIY home decor!
You’ll find some other macrame plant hanger tutorials on my site as well. Be sure to check out my Macrame Terrarium Hanger tutorial and this Crazy Easy Macrame Plant Hanger with Fringe.
The macrame rope I used in this tutorial is a gorgeous rust color. I don’t know about you, but I am in love with all things rust, mustard, and teal at the moment. You’ll find a link to the exact cord I used in the supply list below, it’s so luxurious!
If you are looking for more macrame tutorials, be sure to subscribe to my YouTube channel. I share macrame, punch needle, and other DIY tutorials every week!
WANT TO REMEMBER THIS? SAVE HOW TO MAKE A MACRAME PLANT HANGER TUTORIAL TO YOUR FAVORITE DIY PINTEREST BOARD!
(This post may contain affiliate links. If you click one and make a purchase, I may receive a small commission at no extra cost to you. Read the disclaimer here. Thank you for your support!)
Looking for More Free Macrame Wall Hanging Patterns?
Check out this list of 16 free macrame wall hanging patterns with video tutorials and written instructions!
Supplies You’ll Need to Make this Macrame Plant Hanger DIY
- 4 mm twisted cotton macrame rope (12 pieces @ 165 inches long)
- wooden dowel (1″ diameter, mine is 36 inches long and I will show you how to cut it down)
- Craft glue
- Sharp scissors
- 6″ Flowerpot and a plant
Related: Ultimate List of Must-Have Macrame Supplies
Macrame Plant Hanger DIY Wall Hanging Tutorial
Step 1: Attach the Cords to the Dowel
Fold each cord in half and attach it to the dowel using larks head knots.
Step 2: Tie Square Knot Diamond Pattern
The diamond pattern on this macrame plant hanger is done with square knots (so easy, right?) Follow along with the pictures below (or watch the video, slow it down to .5 speed if it’s too fast).
Step 3: Make the Plant Holder Section
First, grab the two outside cord on either side, flip them so the outside cord goes over the inside cord (left over right on the left side, right over left on the right side), and tie a square knot about seven inches from the previous outermost square knots.
Now, grab the next two cords on either side and flip them like before. Then, measure about seven inches from the back square knots, and three inches from the front square knot we just tied, and tie another square knot. Do this on each side.
Step 4: Tie a Wrapping Knot to Finish
Tie a wrapping knot about three inches down from the last two square knots. I did five wraps for mine, you can do more if you want. Trim the ends and tuck them in.
Cut the fringe however long you like, and now it’s time to cut down the dowel and add a hanger!
Step 5: Cut Down the Dowel & Sand it
This is a hacksaw. I like to use this to cut my dowels down to size. Power tools would be faster and easier, but I’d rather just use this and not have to go out into the garage and plug things in.
Prop your macrame dowel up on something to protect your work surface (in this case I’m using another dowel).
Mark where you want to cut, and then carefully and lightly start sawing on the mark. It’s easier to cut accurately if you don’t push down too hard. These craft dowels are pretty easy to cut, so it doesn’t take too much muscle.
After you’ve sawed about halfway through on one side, rotate the dowel and repeat. Continue that all the way around the dowel until its cut all the way through. Repeat on the other side (if necessary).
Use some sandpaper (I used 220 grit) and sand down the ends and smooth the edges.
Step 6: Attach the Hanger
To attach the hanger, I like to use a constrictor knot. I’m not going to try to explain it in words here, but I do show you how to do this knot in the video. (Skip to 18:20 for this specific part.) It’s secure and looks nice and neat.
Glue the excess cord from the hanger to the back of the dowel.
Finished!
Now you just have to pop your plant into the hanger and it’s ready to adorn your wall!
In Summary
I hope you enjoyed this Macrame Plant Hanger DIY Wall Hanging tutorial! Plant hangers are such a fun project, and they’re great for beginners.
Down below you’ll find links to some other macrame tutorials available on my site. Be sure to check them out!
WANT TO REMEMBER THIS? SAVE HOW TO MAKE A MACRAME PLANT HANGER TUTORIAL TO YOUR FAVORITE DIY PINTEREST BOARD!
Related Posts
- DIY Macrame Terrarium Plant Hanger // Tutorial + Video
- Crazy Easy Macrame Plant Hanger with Fringe // Tutorial + Video
- The Ultimate List of Must-Have Macrame Supplies!
Beautiful pattern. Thank you for sharing this. Can you please tell me how long this hanger is?
If I wanted to make this to fit a 10 inch pot would I just add more strands at the beginning?
This pattern is beautiful!
Hello! I think (and I haven’t tried this yet so I’m not 100% sure) that you could make this fit a larger pot by making the strands longer and spacing the knots out farther and possibly adding another row of alternating knots depending on how deep the pot is. Does that make sense? I’ll have to give that a try when I get a 10 flower pot to test it in. Let me know if you try it and how it goes! Thanks for stopping by!