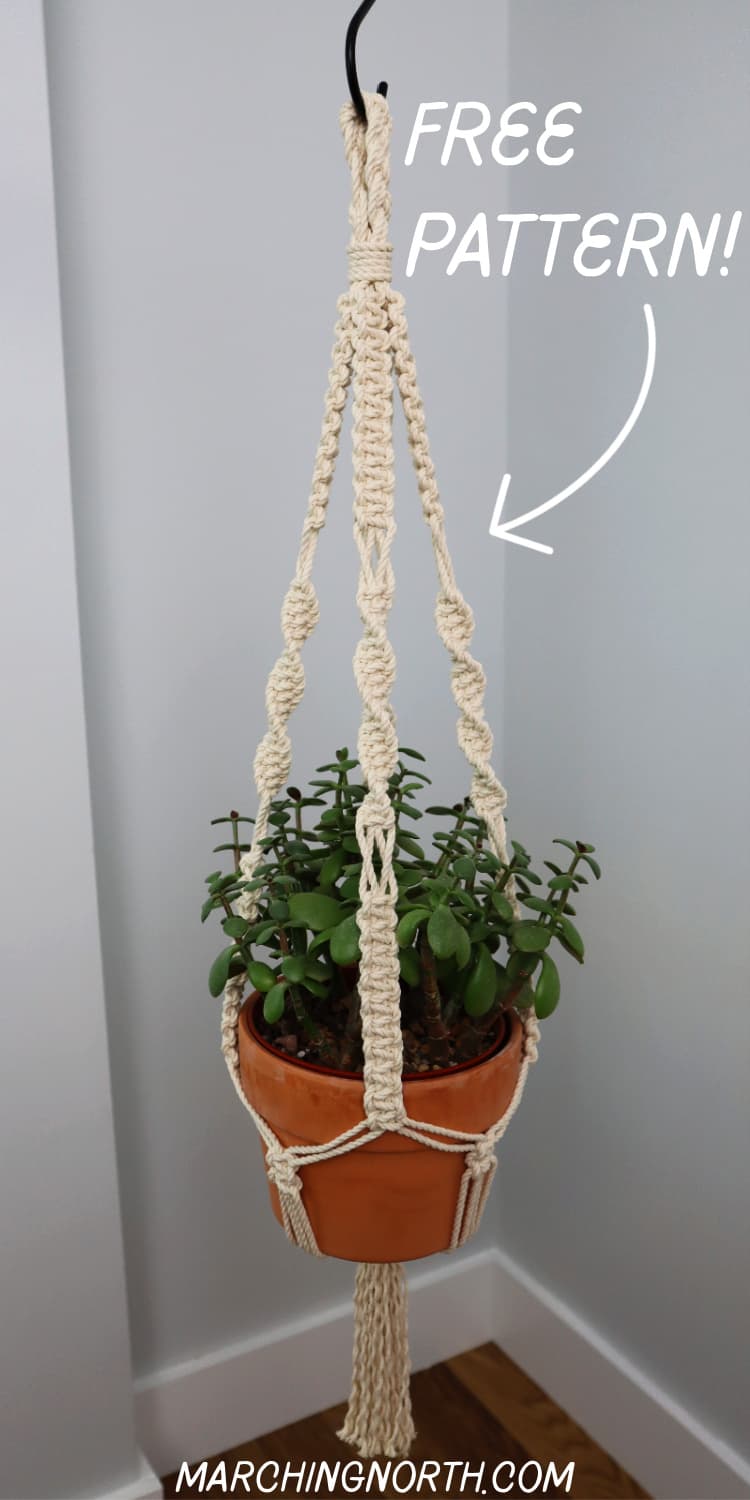
How to Make a Simple Macrame Plant Hanger (Easy Tutorial!)
Learn how to make a simple but beautiful macrame plant hanger in this step by step tutorial for macrame beginners and beyond!
Don’t forget to pin this for later!
(This post may contain affiliate links. If you click one and make a purchase, I may receive a small commission at no extra cost to you. Read the disclaimer here. Thank you for your support!)
There’s just something about a simple macrame plant hanger that is so enjoyable to make.
It’s a great way to practice the basic macrame knots, and you also end up with a useful plant hanger that adds some boho charm to your decor and gets your plants up off the window ledge. Win win!
Get the Printable Pattern!
Below, you’ll find the free pattern and the video to go along with it.
If you want to grab the printable, ad free PDF pattern that includes a visual chart, you can get it in my shop!

Grab your PRINTABLE copy
Class Macrame Plant Hanger – Printable PDF Pattern!
Reference this pattern any time you want with the printable PDF version! It’s ad free, and includes the written pattern, plus the step-by-step photo tutorial!
If you’re new to macrame, a simple project like this is a great way to get started. After that, you can move on to more complicated macrame wall hangings and other macrame projects.
Before we get started you’ll want to have a grasp of a few simple knots, like the square knot, spiral knot (or half-square knot), and wrapping knot (sometimes called a gathering knot).
Also, be sure to sign up below for my free printable PDF knot guide for you to have handy while you’re working on your projects!
I also made a video to go along with this macramé plant hanger and in that video I walk you through the process of how I came up with this pattern and why I did what I did.
Plus, I mention a few ways you can customize this pattern and make it your own!
The great thing about a simple DIY macrame plant hanger like this is once you get the basic technique down, you can easy change it up and customize it.
You could add wooden beads, maybe in a few different sizes and colors.
You could use a smaller pot for one and a larger pot for another, or you could try different colors of cotton cord to get a different look.
Cord lengths and customizing
Let’s talk a minute about how to customize this pattern, and also how to come up with your own simple macrame plant hanger designs.
If you just want to make the pattern as shown, keep scrolling down and you’ll see the full macrame pattern below.
The main issue most people run into when making their own macrame designs is figuring out the cord lengths.
So real quick, I’m going to explain how I start with a new macrame plant hanger pattern.
In my experience, it’s easier to measure cord lengths using arm spans instead of a tape measure.
To find your arm span length, hold a piece of cord with your arms outstretched and measure the length between your hands.
I’ve found that 2.5 arm lengths works well for a basic macrame plant hanger using 4 mm cord, and that results in about 168″ of cord.
You’ll want to adjust the number of arm lengths based on your own arm span to achieve around 160″ to 170″ of cord, so you might do 2.5 to 3 arm spans.
So, now you might be wondering how I came up with 150″ starting cords that you’ll see in the supply list below.
I made the plant hanger (starting with 2.5 arms lengths of cord), then I measured the shortest piece of waste cord at the end.
I doubled that (since we folded our cords in half at the beginning) and subtracted that number from the starting length to come up with 150″ for the starting cord lengths.
So, if you just want to make the plant hanger exactly like I did, you can start with the 150″ lengths and have a little less waste cord.
But if you want to play around with the design and there’s a chance you might space your knots out more or add more knots, I would go with the 2.5 to 3 arms lengths just so you have a little extra cord length to work with.
It’s better to start off with a little too much cord so you don’t run out if you want to play around with the design a bit.
For a simple plant hanger like this, the arm length estimating method works just fine.
But once you start making more complex designs, you’ll want to be a little more precise with your estimations.
When you really want to start creating your own macrame patterns and projects, be sure to check out my Macrame Project Planning Bundle.
Grab all three of these super helpful macrame project planning tools for an awesome 40% off discount with the Macrame Project Planning Bundle!
It includes 3 super helpful macrame project planning tools all for a discounted price:
- Printable Macrame Project Planner (with 41 macrame specific planning pages!)
- Macrame Cord Size Calculator (easily figure out cord lengths if you want to change the cord size for macrame patterns)
- Macrame Cord Length Estimator (ACCURATELY estimate macrame cord lengths ahead of time for your designs!)
Macrame Cord and Supplies
For this plant hanger, I used 4 mm cotton rope from Niroma Studio. It’s a 3 ply rope and it’s in the color natural.
I recommend sticking to a plied rope like I’m using for this project because it works really well for plant hangers.
Also, if you switch to a different type of cord (like braided or single strand string) the measurements won’t be right for the supply list below.
Check out this post to see my favorite places to buy macrame cord and supplies!
Supply List
- 4 mm twisted cotton rope (3 ply) in the following lengths:
- 8 pieces @ 150″ long (381 cm)
- 2 pieces @ 30″ long (76 cm)
- sharp scissors
- tape measure
- plant pot that’s around 5″ to 7″ wide and tall
Simple Plant Hanger Video Tutorial
Check out the video tutorial for this plant hanger that’s over on my YouTube channel, and don’t forget to subscribe so you don’t miss any new video tutorials!
I go into a lot more detail in the video, so if you get stuck be sure to check it out.
Step 1: Making the hanging loop
The first thing to do is make the 4 strand braided hanging loop.
First, fold all the cords in half evenly and find the center point.
Then I measured (really I just eyeballed it) 3″ on either side of the center and that is where the braided section needs to start and finish.
Use your hand to mark the starting point for the braid, and bring the cords over to your desk. I tied a piece of string in that spot (tape would also work) and taped the whole thing down to my desk.
To do the 4 strand braid, divide the cords into 4 sections with 2 cords in each one.
Lay them out so you can see what’s what, and we’re going to mentally number them 1, 2, 3 and 4 going from left to right. This is the pattern:
- 4 over 3
- 2 over 1
- 2 over 3
Or you could say, right over left (2 right most sections), right over left (2 left most sections), left over right (2 middle sections).
Repeat that until your braid measures about 6 inches long.
Then tie another piece of string at the base (or tape it) so the braid doesn’t come undone while we transfer it over to our hanging rack.
Over on the rack, hang the cords on your hook with the braid folded right in the middle. Make sure the ends of the braid are matched up.
Grab one of your 30″ pieces of cord and tie a wrapping knot at the base of the braids. I did about 5 wraps.
Cut the excess wrapping knot cord and push the ends underneath the wraps with the tip of your scissors.
Note: You could also start with a wooden ring if you prefer and skip this step.
You would just thread all the cords through the wooden ring evenly and do a wrapping knot at the base to hold it in place.
Step 2: Plant hanger arms
Divide the cords into 4 sections with 4 cords in each section.
First we’re going to do a square knot section at the top.
Take one of the sections and tie 10 square knots.
Now you’re going to switch the 2 center cords from the inside to the outside and leave about an inch or two of space.
The next section under the space will be a spiral knot section.
Tie the first knot about an inch under the last square knot, and then tie 19 more spiral knots (spiral half knot) under the space.
Switch the cords back again, leaving the same amount of space that you left a minute ago, and now tie 10 more square knots.
Repeat all of that with the other 3 arms of the plant hanger, making sure to keep them all even.
Step 3: Making the basket
Grab two of the plant hanger arms that are next to each other.
You’re going to use the 2 left cords of the right most arm and the 2 right cords of the left most arm to tie 2 square knots about 2.5″ down from the last row of knots.
Repeat that around until all the arms are connected together.
Test fit your plant pot to make sure it fits well with this spacing configuration.
If you need to adjust it, just untie the square knots and space them further down to make the hole larger, or place them further up to make it smaller.
Once you’re happy with the placement, use the last 30″ long piece of cord to tie a wrapping knot about 5″ down from the last row of square knots.
That will be the final knot of this plant hanger.
Cut off the excess from the wrapping knot cord and tuck in the ends.
Step 4: Finishing up
Now all that’s left to do is cut the excess cord off, leaving a tassel that’s about 5″ long, or whatever you prefer.
Then you can untwist the cord ends if you want or just leave them as they are. It’s up to you!
Done!
I hope you enjoyed this macrame plant hanger pattern and you’ll try your hand at making one of your own!
If you do make one, please share a pic over on Instagram and tag me @marchingnorth so I can take a look. I love seeing all of your awesome creations!
Get the Printable Pattern!
Below, you’ll find the free pattern and the video to go along with it.
If you want to grab the printable, ad free PDF pattern that includes a visual chart, you can get it in my shop!
Grab your PRINTABLE copy
Class Macrame Plant Hanger – Printable PDF Pattern!
Reference this pattern any time you want with the printable PDF version! It’s ad free, and includes the written pattern, plus the step-by-step photo tutorial!
Excellent. Throughly enjoyed making this pattern. Thank you. Xxx
What adjustments would you recommend to make this for a 10” pot? I’ve got a green thumb, and having a heck of a time trying to find a pattern for a much larger pot.
How long is finished product?
Hi Chrystal
I have a problem with the basket part of a plant hanger. Can you give me any ideas to have it come out straight?
Thank you so much for another macrame project! I have many cords over ordered then in hiatus of everything hobby-wise due to life taking over has put me from doing this ìn the back burner! Looking forward to this one for sure!
Hi Crysta!, What an exciting throwback to my college days in the 70s! We were all making macrame back then. This refresher is most helpful. however, I can’t tell if the cord measurements will be long enough because I don’t know the size of your pot or the total length of the completed project. If you could give me those, I’ll adjust accordingly. Thanks very much!
Supply List
(3 ply) in the following lengths:
8 pieces @ 150″ long (381 cm)
2 pieces @ 30″ long (76 cm)
tape measure
plant pot that’s around 5″ to 7″ wide and tall
Simple Plant Pot
What’s the length of the final project?