Beginner Ribbed Crochet Hat Pattern (Easy and Fast!)
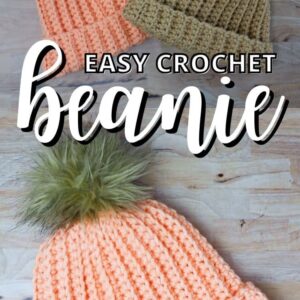
New to crochet? Looking for a fun and easy project? This beginner ribbed crochet hat pattern is a perfect cozy project that you can finish in an evening!
The crochet ribbing for this hat has makes it stretchy and warm, so it’s great for those cold winter days.
I’m even including links for two pom pom tutorials, one for yarn pom poms and one for faux fur pom poms!
Don’t forget to pin this for later!

(This post may contain affiliate links. If you click one and make a purchase, I may receive a small commission at no extra cost to you. Read the disclaimer here. Thank you for your support!)
If you’re a visual learner you came to the right place because there’s a step by step photo tutorial plus a video, win win!
Before we dive into this free crochet hat pattern, let’s talk about a few important things you need to know.
Crochet Hat Sizes
This crochet pattern is VERY easy to adapt to any size you need!
All you need to do is measure your recipients’ head with a measuring tape and you can easily add or remove chains and rows for a perfect fit.
You can make crochet beanies for the whole family all with this same pattern! Here’s how to get a custom fit with this pattern.
You’ll want to measure the circumference of their head at the widest point to determine the width of the rectangle.
Then you’ll measure the distance from the crown of their head down to where you want the brim to fall to figure out the height of the hat.
If you want the hat to have a brim (like the one I’m making below), you’ll need to add 3″ or so to that last measurement.
One more thing to take into account is the ease of the hat. To get a snug fitting beanie, you’ll want to make it a few inches smaller than the circumference of your head, so you’ll want 3″ of negative ease.
You can read more about the difference between positive and negative ease in garment making here.
How to Calculate Your Hat Size
OK, so let me explain exactly what I mean based on the hat I’ll be making down below.
I have a 23″ head circumference and I wanted my hat height to be about 9″ long. I want 3″ of negative ease so my hat fits nice and snug and I want a brim a couple inches wide.
So, I subtracted 3″ from my head circumference to get the finished rectangle length of 20″, and I added 3″ to my hat length of 9″ to account for the brim, which brings me to a height of 12″.
Let me just mention that math and I are not pals by any means so if I can do this, you can do this!
Don’t know what size your future hat model has? That’s OK! Check out this chart with general hat sizes by age.
Keep in mind these measurements are averages and won’t work for everyone. For instance, my 3 year old falls under the “Child” category, and is edging in on “Teen”. If in doubt, take a measurement if at all possible.
In the tutorial below we’ll be making the largest version of the two adult sizes.
Best Chunky Yarn for Hats
Crocheting with chunky weight yarn is really fun because everything works up super quick. If you’re impatient and just want to get something done fast, chunky or bulky yarn is perfect for you.
There are lots of chunky yarns out there and it can be really overwhelming trying to pick the right one!
The yarn I used for this pattern is called Paintbox Yarns Simply Chunky. It’s soft, comes in lots of beautiful colors, and is very reasonably priced.
Some other great chunky yarn options are:
What Size Crochet Hook for Chunky Yarn?
It’s really important to use the correct size of crochet hook for whatever weight yarn you’re using.
The size of the hook affects the finished size of your project, and using the right size of hook makes the crocheting process easier as well.
Crochet hooks come in so many sizes, from 1.5 mm all the way up to 25 mm. Talk about options!
So what size hook works best with chunky weight yarn?
Generally, you can use a crochet hook size 7 mm to 9 mm for bulky or chunky weight yarn. For this pattern we’ll be using a size J 6.0 mm hook.
Luckily, most yarn will have the correct hook size listed on the label, right next to the proper knitting needle size.
When you’re out shopping for yarn, check out the label and pick up the right size hook if you don’t already have it in your stash. Or pick up a set of comfy ergonomic hooks online with all the sizes!
How to Substitute Yarn for this Pattern
Do you have a ton of worsted weight yarn laying around but you still want to make this hat? We can work with that!
One method is to double up and use two strands of worsted weight with the same size hook that’s listed in the tutorial below.
You can use two strands of the same color, or mix it up for a fun variegated look.
Another option is to use one strand of worsted weight yarn and the appropriate size of hook for whatever yarn you’re using (usually its 5.5 mm to 6.5 mm for worsted).
When you’re making the starting chain, you’ll just need to chain enough times to achieve the correct chain length from the crochet hat size chart above. Also, you’ll need to crochet more rows to get the right width.
It’s totally doable to make this hat with different sizes of yarn, just be sure to keep your tape measure close by!
How to Crochet Ribbing
There are two ways that you can get a ribbed look with crochet. One is with alternating front post and back post stitches, and the other is by working in the back loop only of every row.
The ribbing we’ll be doing for this hat uses the second method.
If you’re new to crochet and I totally lost you there, let me explain! Crochet stitches have two loops on the top of them that form a “V” shape.
The loop closest to you is called the front loop, and the one farthest from you is the back loop.
Normally when you’re stitching along, you’ll insert your crochet hook under both of those loops to make a new stitch.
But when you’re working in the back loop only (BLO is the abbreviation) you’ll skip the first loop and insert your hook under the back loop.
Doing this leaves a ridge along each row that will be the ribbing pattern. Pretty cool, huh?
It’s very easy and makes a nice, stretchy fabric that’s perfect for a winter hat.
Now, you can use different stitches for your ribbed hat pattern for a different look. We’ll be using single crochet stitches, but you can also use slip stitches, half double crochet or double crochet.
Changing the stitch will change how many rows you’ll need to make and it’ll also change how long the turning chain needs to be, so keep that in mind.
I really like how the single crochet rib looks, plus single crochet makes a cozy warm beanie.
More from Marching North
- Macrame for Beginners (the Ultimate Guide!)
- Awesome Modern Punch Needle Kits
- The Best Scissors for Fabric, Yarn and Macrame Cord TESTED!
Supplies You’ll Need
- 1 skein of chunky weight yarn (I used Paintbox Yarns Simply Chunky in color #354)
- Size J 6 mm hook
- tapestry needle (or yarn needle)
- scissors
- tape measure
- pom pom for the top (optional)
Easy Ribbed Crochet Hat Tutorial
Makes 1 Large Adult Sized Beanie
Abbreviations (US terms):
- ch – chain
- sc – single crochet
- BLO – back loop only
- sl st – slip stitch
Be sure to check out the video tutorial over on my YouTube channel!
Making the Crochet Rectangle
Foundation Chain: ch 33
Row 1: Make once sc in each ch starting with the 2nd ch from your hook until you have four chains left. Sl st in to the four remaining chains. At the end of the row ch one and turn.
Row 2: Sl st into the BLO of the first four stitches, then sc into the BLO of the remaining stitches. When you reach the last stitch, you’ll sc under BOTH loops. Ch one and turn.
Row 3: Sc under BOTH loops of the first stitch, then continue sc in the BLO of the remaining sc stitches. When you reach the last four stitches, sl st into the BLO. Chain one and turn.
Repeat row 2 and 3 until your rectangle measures 20″ wide. I made 51 rows for my beanie.
Seaming
After you finish the last row, fold the rectangle in half right sides facing. You’ll be holding the two short sides together.
Insert your hook into the BLO of the first stitch on the side closest to you, then insert the hook under both loops of the first foundation chain stitch on the other side.
Yarn over and pull it through all the loops to make a sl st.
Continue that all the way down the row until you reach the last stitch. You’ll insert your hook under both loops of the last single crochet and the last foundation chain and complete the last slip stitch.
Cut your yarn leaving bit of a tail and finish off. Thread the tail onto a large eye tapestry needle, tie a knot and weave in the end.
Gathering the Top
Thread a piece of yarn approx. 20″ long onto your tapestry needle. With hat still turned inside out, make a running stitch back and fourth all along the top of the hat.
(This will is on the end with the 4 slip stitches.)
Once you get all the way around the opening, bring the needle out one stitch away from where you started and pull the two ends of the yarn to gather up the opening.
You’ll have to pull pretty tight and then tie a knot to secure it.
If you still have a hole showing after you cinch it up, make a stitch going across the hole, then in each side of the hole (3 stitches total) forming a cross. Then pull the ends again and tie another knot.
Use the needle to weave in the ends from the top of the hat and trim off the excess.
Now turn your hat right side out, fold up the brim, and it’s ready to wear!
Attaching a Pom Pom to Your Hat
Now you can attach a pom pom to the top of your hat if you wish or just leave it the way it is.
I made a faux fur pom pom for mine and a yarn pom pom for my son’s hat and I love them both!
To attach a pom pom to the hat, use your tapestry needle to thread the pom pom strings down through the top of the beanie, and make sure to put one string slightly to the left of the center and one slightly to the right.
If you thread them straight down through the center your pom pom will fall off eventually.
Here are tutorials for a faux fur pom pom and a yarn pom pom:
Beginner Ribbed Crochet Hat Pattern (Easy and Fast!)
Learn how to make a simple and cozy ribbed crochet beanie hat in this easy step by step tutorial!
Materials
Tools
- Size J 6 mm crochet hook
- Tapestry Needle (or Yarn Needle)
- Scissors
- Tape Measure
- Pom Pom for the top (optional)
Instructions
- Chain 33.
- Make one sc in each ch starting with the 2nd ch from hook until you have four chains left. Sl st in to the four remaining chains. At the end of the row ch one and turn.
- Sl st into the BLO of the first four stitches, then sc into the BLO of the remaining stitches. When you reach the last stitch, you'll sc under BOTH loops. Ch one and turn.
- Sc under BOTH loops of the first stitch, then continue sc in the BLO of the remaining sc stitches. When you reach the last four stitches, sl st into the BLO. Chain one and turn.
- Repeat row 2 and 3 until your rectangle measures 20" wide. I made 51 rows for my beanie.
- Seaming: After you finish the last row, fold the rectangle in half right sides facing. You'll be holding the two short sides together.
Insert your hook into the BLO of the first stitch on the side closest to you, then insert the hook under both loops of the first foundation chain stitch on the other side.
Yarn over and pull it through all the loops to make a sl st.
Continue that all the way down the row until you reach the last stitch. You'll insert your hook under both loops of the last single crochet and the last foundation chain and complete the last slip stitch.
Cut your yarn leaving bit of a tail and finish off. Thread the tail onto a large eye tapestry needle, tie a knot and weave in the end. - Gathering the Top: Thread a piece of yarn approx. 20" long onto your tapestry needle. With hat still turned inside out, make a running stitch back and fourth all along the top of the hat.
Once you get all the way around the opening, bring the needle out one stitch away from where you started and pull the two ends of the yarn to gather up the opening.
You'll have to pull pretty tight and then tie a knot to secure it.
If you still have a hole showing after you cinch it up, make a stitch going across the hole, then in each side of the hole (3 stitches total) forming a cross. Then pull the ends again and tie another knot.
Use the needle to weave in the ends from the top of the hat and trim off the excess.
Recommended Products
As an Amazon Associate and member of other affiliate programs, I earn from qualifying purchases.
In Conclusion
I hope you enjoyed this ribbed crochet beanie pattern!
If you make one of these using my free pattern, please share a picture on Instagram and tag me @marchingnorth so I can take a look. It seriously makes my day!
Thank you for sharing the size chart! It is exactly what I was looking for.
In the chart you have pictured. Does the height already include a brim or do I need to make it longer for the brim
Yes, it includes the brim. Thanks for stopping by!
Isn’t this an extended sc stitch you used. The instructions say a sc so I’m confused. Thank you.
No, it’s just a regular single crochet. Sorry for the confusion! It’s in American terms FYI.
Crystal, I stumbled on this in the wee hours before b-b-sitting with my grands! After 50+ years of crocheting, this has to be the most complete instruction plus photos, I have ever come across! You have missed nothing! Thank you for all of the hours and thought put into this post! With 14 grandchildren and one great grand, I needed something to take the guesswork out of the project! Ease of just making these beanies and enjoying the process, stress-free is wonderful!
Thank you so much!
Grandma Michelle