How to Make a Coiled Basket Tray | Easy DIY Oval Rope Tray Tutorial
If you’ve been wanting to try coiled basket weaving, this colorful coiled basket tray is such a fun project to make!
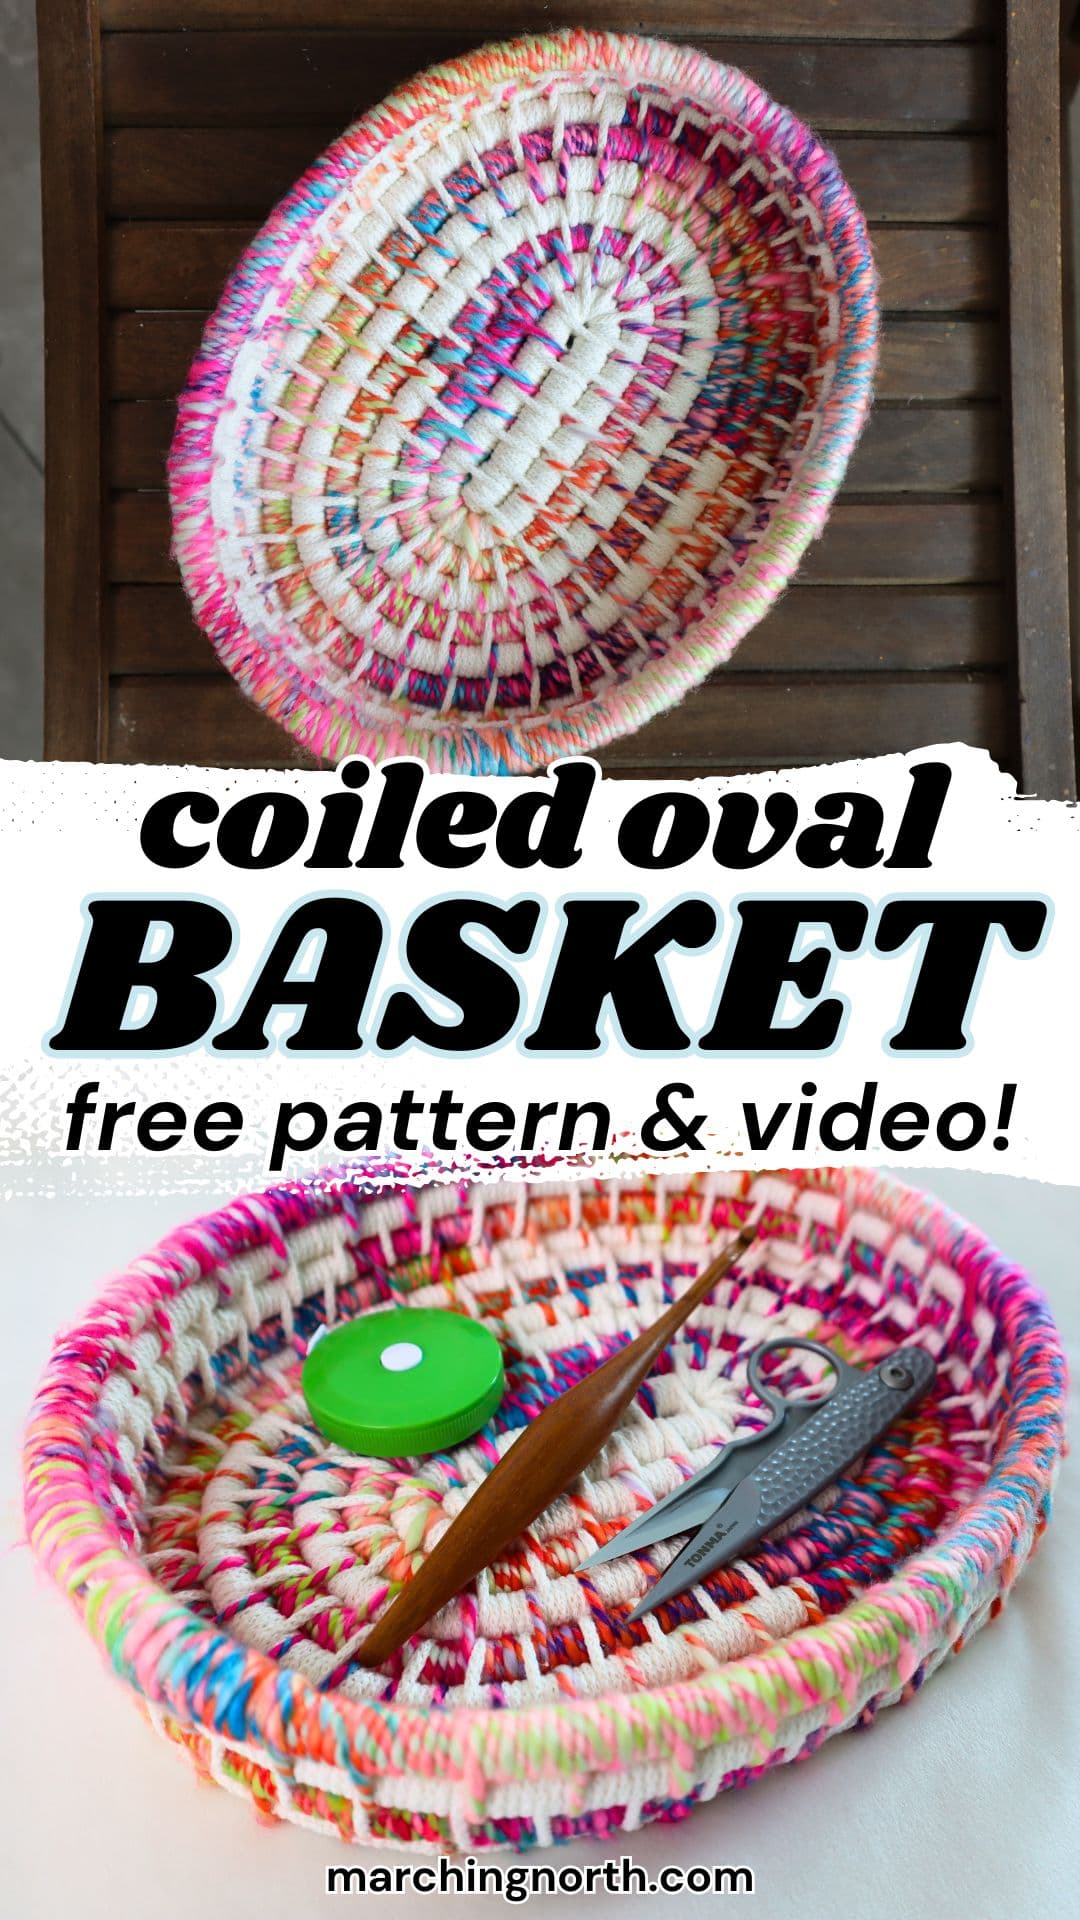
It’s made by wrapping yarn around cotton rope and stitching the coils together, so you end up with a sturdy little oval tray that’s perfect for holding craft supplies, keys, jewelry, or whatever random treasures are currently living on your table.
(No judgment, every table in my house is a random object magnet. Right now I’m looking at a Lego man, a tiny pinecone, and a half made tin-foil ball thanks to my son. On my work desk. lol)
Don’t forget to pin this for later!
(This post may contain affiliate links. If you click one and make a purchase, I may receive a small commission at no extra cost to you. Read the disclaimer here. Thank you for your support!)
This easy DIY coiled basket tray tutorial is beginner-friendly, and I’ll walk you through the whole process step by step, including starting the coil, shaping the oval base, building up the sides (which are nice and short for this guy), and finishing it off neatly.
Below, you’ll find the free written tutorial, and I’ve also got a video over on YouTube if you prefer to learn that way. It’s all linked down below!
I’ve also got a printable version of the pattern in my shop that’s ad-free, and you’ll see a link for that below as well. But don’t worry, the free pattern is below that, just keep scrolling.
Once you get the basic coiling technique down, it’s honestly pretty relaxing and mindless. Just keep wrapping, stitching, and watching the basket slowly take shape.
I used a FANTASTIC colorful yarn for this tray, paired with a white braided cord, which gives it a really fun, scrappy, happy look, but you can use any yarn or cord colors you like.
Keep it bright and playful, go soft and neutral, or use up leftover yarn from your stash. It’s truly up to you, and you can make these baskets with just about anything! Yarn, macrame cord, fabric strips, you name it.
This finished basket tray measures about 10″ x 7.5″ and is about 2″ tall, making it a great little catchall tray for your desk, dresser, craft room, or coffee table.
Alright, let’s get started!

Buy the PRINTABLE copy
Oval Coiled Basket Tray – Printable PDF Pattern!
Reference this pattern any time you want with the printable PDF version!
It’s ad-free, and includes the written pattern with step by step photo tutorial!
Why is my yarn/cord coming untwisted while I make this basket?!
Ah yes, the mystery of how the heck do you use twisted macrame string, or twisted yarn in this case, to make a coiled basket without it untwisting and getting all ridiculous on you.
It’s all about the direction you wrap.
For this basket, when I’m wrapping the cord up and over, I’m wrapping toward myself.
When I made my last basket tutorial, we were wrapping in the other direction, and when I came up and over the filler cord, I was wrapping away from myself.
This matters because for the twisted yarn I used this time around, if I were to wrap it going away from myself like I did before, the yarn would untwist as I go. Which is no fun.
And this yarn is so pretty, it would be such a shame if I didn’t do it justice!
Luckily, that’s easily fixed by wrapping the other direction. And that works for single strand macrame cord, too!
If you’ve ever tried to make a coiled basket with a twisted cord or yarn, and got frustrated because it kept untwisting on you, this is the answer, my friend.
Now which way you need to wrap sort of depends on the direction your yarn or cord twists.
You can do a little test before you start your basket and figure out which direction works for your cord or yarn.
Then just remember to wrap that way when you’re making your basket and you’re golden!
More Free Patterns!
Looking for more DIY ideas? I’ve got lots of them to choose from! Here’s a few to get you started:
- How to Make a Coiled Rope Basket (a Round one with a Handle!)
- Free DIY Macrame Plant Hanger Pattern (Low Key & Tassel Free!)
- How to Finger Knit a Chunky Blanket Fast! (for Beginners)
- DIY Colorful Wrapped Tassel Keychain
- Super Easy Ribbed Crochet Beanie Hat (in 8 Sizes!) | Free Pattern
- DIY Macrame Diamond Keychain (Free Pattern & Video!)
- 3 Easy Tie Dye Patterns for Making Cool Tie Dye Shirts!
Step-by-Step: How to Make a Coiled Oval Basket Tray
Here’s a list of everything you’ll need to make one of these cute coiled trays.
Supplies You’ll Need
- 3/8″ cotton braided rope (I ordered 100 ft to save on shipping a bit, but 25 ft should be plenty to make this basket)
- 3 mm braided macrame cord in colors of your choice (I used Bobbiny cord in the color Natural)
- Bulky wool yarn (I used this GORGEOUS Lovebird yarn in the color Candy Shop)
- NOTE: This is just what I used for this project, but honestly you can use just about anything you have on hand to wrap these baskets. Yarn, macrame cord, fabric strips… there are so many possibilities!
- Large eye tapestry needle
- Sharp scissors
- Scotch tape
Video Tutorial
Check out the tutorial video for this macrame bookmark on my YouTube channel, and don’t forget to subscribe!
Starting the Oval Coil
Find the end of your 3/8″ filler cord and wrap a piece of scotch tape around it.
You don’t need to cut the filler cord to a certain length or anything, instead just keep it attached to the main spool and that way you’ll use the perfect amount to make your basket without running out or wasting any cord.
Cut a piece of your wrapping cord that’s about 3 arm spans long (like with your arms spread out on either side of your body).
It’s up to you what color you start with, I decided to start with the white Bobbiny cord.
Lay the end of the wrapping cord over the pointy end of the filler cord so they’re facing in opposite directions but are overlapped by about 8 inches or so.
Then start wrapping over the end of the wrapping cord and the filler cord. This will secure the end of the wrapping cord and hide it.
Make sure to leave just a smidge of the filler cord sticking out so your loops don’t slip off. We’ll trim it down later on.
NOTE: I’m wrapping toward myself because that’s the direction I need to wrap so my yarn (the colorful yarn I’ll be using in a few minutes) doesn’t come untwisted.
Wrap until it’s about 6 inches or so. It doesn’t have to be exact, basically the longer you make it, the more oval it’ll be.
Carefully bend the coiled section right by the most recently wrapped end. The rest of the wrapped section will be straight across.
If there are any gaps showing in your corner wraps, take a minute to sort of squish those wraps together and then try bending it again.
Once you’re happy with how everything looks, you’re going to wrap the cord around both sides to hold it in place.
Then, go back to just wrapping around the unwrapped side for 5 wraps, and then wrap around both sides again.
Continue wrapping until you make it all the way to the starting end.
Now you’re going to wrap around the filler cord about 20 or so times without wrapping around the other side. This will form the corner of this side of the basket.
Before we actually start going around the corner, you can trim down the filler cord if it’s sticking out very far.
Be careful that you don’t accidentally knock any loops off the end.
Now you’re going to wrap the wrapped section around the corner.
You may need to wrap a couple more times or remove some wraps to get it lined up right, but you want to be able to sew across the previous row without overlapping the last stitch you did on the other side.
Once you get it lined up nicely, thread the end of your wrapping cord onto your tapestry needle, and sew down across the inner starting round.
Pull it through, then wrap it back up and around, and do 5 more wraps around the filler cord.
Then you’re going to sew around the previous row again in the same way.
Continue that all the way across the row.
Once you get to the other end, you may notice a gap from where we originally folded the starting end and started stitching it together.
Let’s tighten that up a bit real quick.
First, go ahead and sew down through like you’ve been doing to sew it to the previous row.
Now, instead of just going back up and around and back to wrapping, we’re going to bring the cord up and around from the bottom.
Now insert the needle back into the same spot (where the gap is).
And now go ahead and give it a good pull to tighten up the gap a bit, and go back to wrapping it up and over the top like we were doing before.
Do 5 more wraps around the filler cord, and then we’ll do that same process again for the next stitch.
(BTW: If your basket doesn’t have a gap here, you can skip the extra part and just wrap it like normal.)
This won’t necessarily get rid of the gap 100%, but it does help a bunch.
Making the Bottom of the Basket
Now that we got the base set up, the rest of the bottom is easy.
You’re just going to continue doing 5 (or however many you prefer) wraps around the filler cord, and then making a stitch through the previous row.
First we gotta get around the corner, and for this first one you’ll be stitching into the same corner a few times.
Once you get around the corner, you’ll just stitch into the previous row for the rest of the basket.
Soon, you’re going to run out of your piece of wrapping cord. So let’s add on a new piece!
I decided to add on a piece of my colorful yarn at this point, so I cut a piece that was 3 arm spans long.
Make 2 or 3 wraps with your previous piece of cord, and make sure to leave a decent tail so you can wrap over it plenty of times to keep it nice and secure.
Lay the new piece of cord or yarn next to the tail of the previous piece. The tails will be facing the same direction.
Hold it in place, and then start wrapping just like you were before, but wrap over both tails as you go.
Go ahead and finish however many wraps you want to make in between stitches. (I was doing 5 still, so I needed to do 2.)
Go ahead and thread the end of your new piece of cord or yarn onto your tapestry needle, and continue coiling like you were. You’ll be working over those tails until they’re covered.
And just keep going until you need to add on another piece of wrapping cord. You’ll do the same process to add one on every time.
So basically, just keep coiling until the base of your basket or tray is as big as you want!
I switched back and forth from colorful yarn to the white Bobbiny cord and just sort of played it by ear.
Alright, now that we got the bottom figured out, it’s time to start building up the sides.
Building Up the Sides of the Basket
I wanted the edges of my basket to go pretty straight up and down. But if you want your sides to slope more gradually, you can do that too.
It’s all determined by where you hold the filler cord when you’re making the sides.
I held mine directly on top of the previous row.
But if you hold yours out a little bit, it’ll slope up more gradually.
Or, if you hold it in further toward the center of the basket, it’ll slope more inward.
The wrapping process is still basically the same, you’re just holding the filler cord on top of the previous row instead of next to it.
And just keep going, sewing into the previous row like you were, but you’ll just be holding the filler cord on top now.
Here’s a side view of what it looks like when I first started doing the side.
And then here’s how it looks once you get more of the side done.
Since I’m making this more of a tray, I didn’t want the sides to be too tall. So I just did about 3 or 4 rounds for the sides.
Continue coiling for the sides, switching colors however you see fit, until it’s as tall as you like.
Once you’re happy with how the sides look, it’s time to finish this basket off!
Finishing Your Basket
I decided I didn’t want to do a handle or anything for this one. I just wanted a nice, simple tray.
Once I felt like the sides looked good and I was ready to finish off, I taped my filler cord a few inches away from where I was wrapping.
Then I used a nice, sharp pair of scissors to cut the filler cord at a pretty good angle.
That way it’ll slope and be less noticeable when we bind off our basket.
You’ll go ahead and wrap and stitch a bit more, until you get right next to the cut portion of the filler cord.
Then, you’re going to just stitch into the previous row each time, and wrap around the cut end and the previous row until the end is totally covered.
Take your time and don’t pull the yarn TOO tight. You want it to be snug, but if you pull too tight the filler cord will show through.
Wrap until the whole filler cord is covered, and then I wrapped one more time just past that to be 100% sure it was good.
Now you’re going to thread the needle under the wraps going back in the other direction on the INSIDE of the basket.
Pull the needle through to weave in the tail. It might be a little tricky, but just take your time.
Cut the yarn right next to where it’s coming out.
If you end up having parts where you can see the filler cord showing after you weave in the yarn tail, just poke the loops back into place with the end of your needle.
Here’s how the finish looks on my basket.
All that’s left to do is trim off any “fuzzies” you might have if you used wool yarn like I did, and your basket is done!
In Conclusion
I hope you enjoyed making this colorful coiled basket tray!
Once you get the hang of starting the coil and shaping the oval base, this project becomes such a relaxing little rhythm of wrapping, stitching, and watching the tray come together.
You can keep yours bright and scrappy like mine, use softer neutral colors, or experiment with different yarn textures to make it your own.
These little trays are so handy for holding craft supplies, keys, jewelry, or all those tiny mystery items that somehow end up scattered everywhere.
(Tiny clutter containment… we all need more of that!)
If you make one, I’d love to see it! Snap a picture and tag me over on Instagram @marchingnorth!
Want to check out some more free DIY patterns?