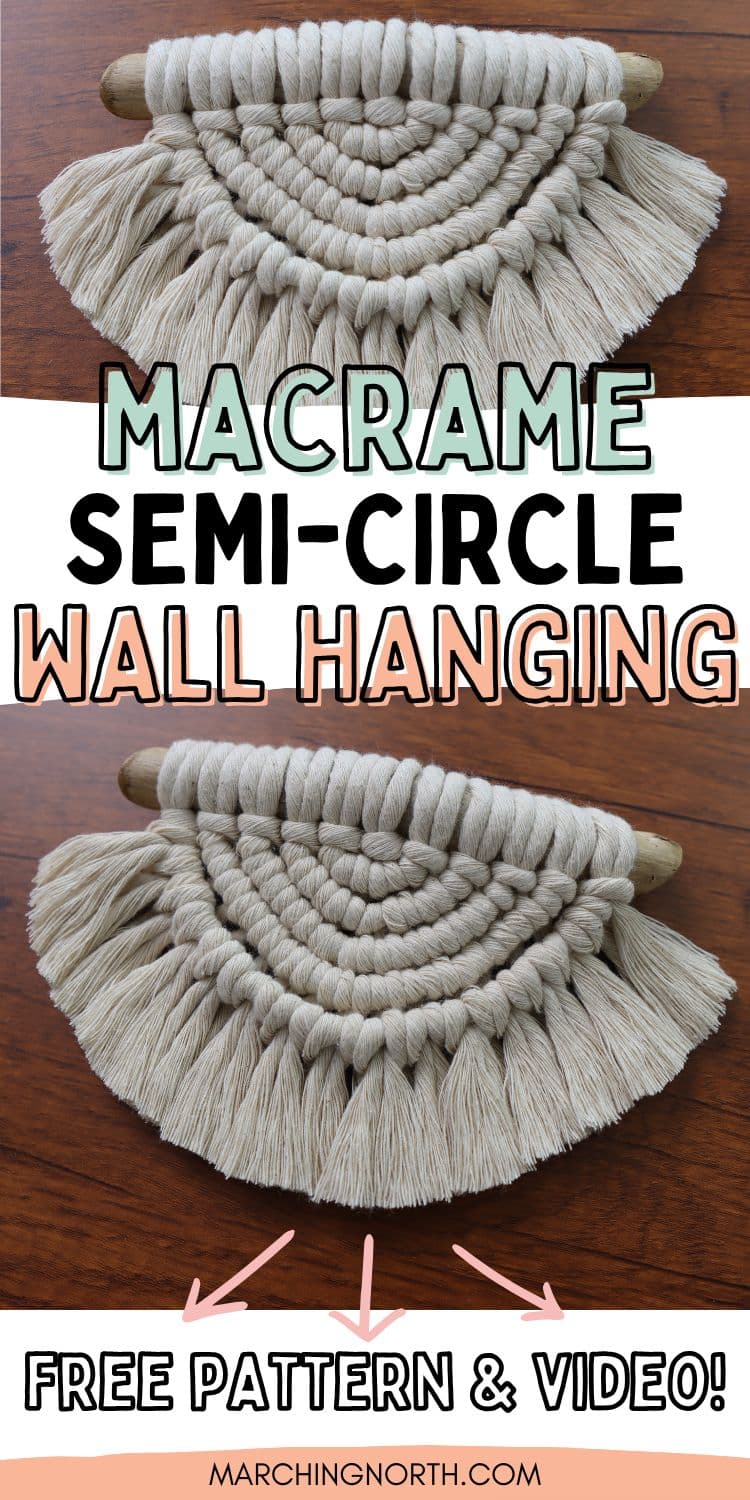
Macrame Half Circle Mini Wall Hanging | Free Pattern + Video!
Learn how to make this beautiful small half circle macrame wall hanging with this free pattern and step by step tutorial!
Don’t forget to pin this for later!
(This post may contain affiliate links. If you click one and make a purchase, I may receive a small commission at no extra cost to you. Read the disclaimer here. Thank you for your support!)
This little wall hanging is easy and quick to make. It’s the perfect addition to that empty spot on your gallery wall.
I made one of these a few years ago and I’ve always loved it on my wall. But for some reason I didn’t make a tutorial for it back then, so I figured that needed to change!
Sometimes you’ll see these half circle designs called “semi lunar” also, I guess because they look like a half moon?
Either way, let’s dive in and get started with this sweet mini wall hanging!
Below, you’ll find the free pattern and the video tutorial.
If you’re new to macrame and want to learn the basic knots, I can help you with that!
Also, be sure to sign up below for my free printable PDF knot guide so you can keep it handy while you’re working on your projects!
More Small Macrame Wall Hanging Patterns
Check out all the other free small macrame wall hanging patterns available on my website:
- DIY Mini Checkered Macrame Wall Hanging
- DIY Boho Macrame Wall Hanging with Tassels
- How to Make a Macrame Feather Wall Hanging
- Easy & Colorful Macrame Wall Hanging
- DIY Macrame Sunflower Wall Hanging
- Free Macrame Owl Pattern
- Adorable Small Macrame Wall Hanging (DIY)
Macrame Half Circle Wall Hanging Tutorial
Supplies You’ll Need
- 6″ wooden dowel or stick, (mine was about 3/4″ in diameter)
- 5 mm single strand cotton macrame string
- sharp scissors
- comb
- tape to hold your work
Cut List
- 5 pieces @ 50 inches long (127 cm)
- 3 pieces @ 30 inches long (76.2 cm)
- 1 piece @ 15 inches long (38.1 cm)
Video Tutorial
Check out the tutorial video for this macrame ornament on my YouTube channel, and don’t forget to subscribe!
Getting Started
Take 2 of your 50 inch long cords, fold them in half evenly to find the center and attach them to the center of the dowel using larks head knots.

Row 1:
Use the left most cord as the filler cord and tie 3 double half hitch knots going to the right. They’ll be right up next to the lark’s head knots.
Now we’re going to attach the filler cord to the dowel on the right side with a one sided larks head knot.
Hold the cord up in front of the dowel in sort of a reversed “L” shape.
Bring the end of the cord over the dowel and then pull the end through the loop. Tighten it up.
Now, hold the cord up behind the dowel, bring it over the dowel to the front, and bring the end through the loop. Tighten it up again.
Row 2:
Attach another one of your 50″ long cords on the left side with a larks head knot.
Use the left most cord as the filler cord and start tying double half hitches to the right. But stop once you get to a gap. I stopped after 3 knots.
Take one of your 30″ long cords, and you’re going to attach it to the filler cord with a cow hitch knot.
A cow hitch knot is the same as a larks head, but you bring the loop up behind and pull the ends through instead of looping it over from the front.
Slide it up so it seamlessly blends in with the double half hitch knots, and then continue tying the rest of the knots to the right.
Attach the filler cord to the right side of the dowel the same way we did in row 1.
Rows 3 & 4:
These rows are done the same way as row 2, you’ll just have more double half hitch knots for each row.
For row 3, you’ll attach another 30 inch long cord to the filler cord with a cow hitch knot when you reach a gap (I reached a gap after 4 knots).
For row 4, you’ll attach the 15 inch long cord when you reach the gap (I reached the gap in row 4 after 5 knots.)
Cutting the Leftover Cord
Smooth the excess cord so it’s somewhat organized, and cut it so the remaining fringe is about 2 inches long or so.
Don’t toss that excess cord! We’re going to use it to fill out the fringe.
Making the Fringe Swag
Grab the last 30″ long cord and lay it on your desk in front of you.
Now take the fringe off-cuts and you want to keep any that are about 7 inches long or longer.
For the really long ones, cut them in half as long as the 2 pieces you end up with are around 7 inches. (A tiny bit shorter will also work.)
You’ll want about 15 pieces of fringe. You should have enough from the pieces we cut off, but if you don’t you can always cut however many extras you need at about 7″ long.
Attach each piece to the 30 inch long holding cord using larks head knots.
Attaching the Fringe Swag
Decide if you like the front side of the swag or the back side better.
I went with the back side because it looked neater, but either way is fine.
Attach it to the ends of your dowel using the one sided larks head knot just like we did at the end of each row.
The one on the left is the same, you’re just going to the left instead of to the right, so it’s sort of mirrored.
Tighten it up and make sure everything looks right.
If there’s a gap between the last row of your wall hanging and the fringe swag, you might need to remove a piece of fringe or two and then tighten it up a bit more.
Finishing Up
Give the fringe a rough trim about how long you want it.
Grab your comb or brush and carefully brush out the fringe on both sides. Hold the fringe swag with your hand so it doesn’t come loose.
Now give it a final trim to make it all pretty.
Done!
Optional: Adding a Hanging Cord
I didn’t add a hanging cord for mine because I plan to put two pins in the wall to hold it up.
If you want to do a hanging cord instead, I have a tutorial right here that shows how to do the constrictor knot to attach a hanging cord on the ends.
It’s my favorite way to add a hanging cord because it blends in with the other knots nicely.
In Conclusion
I hope you enjoyed this mini macrame half circle wall hanging pattern!
Looking for more macrame patterns to try?