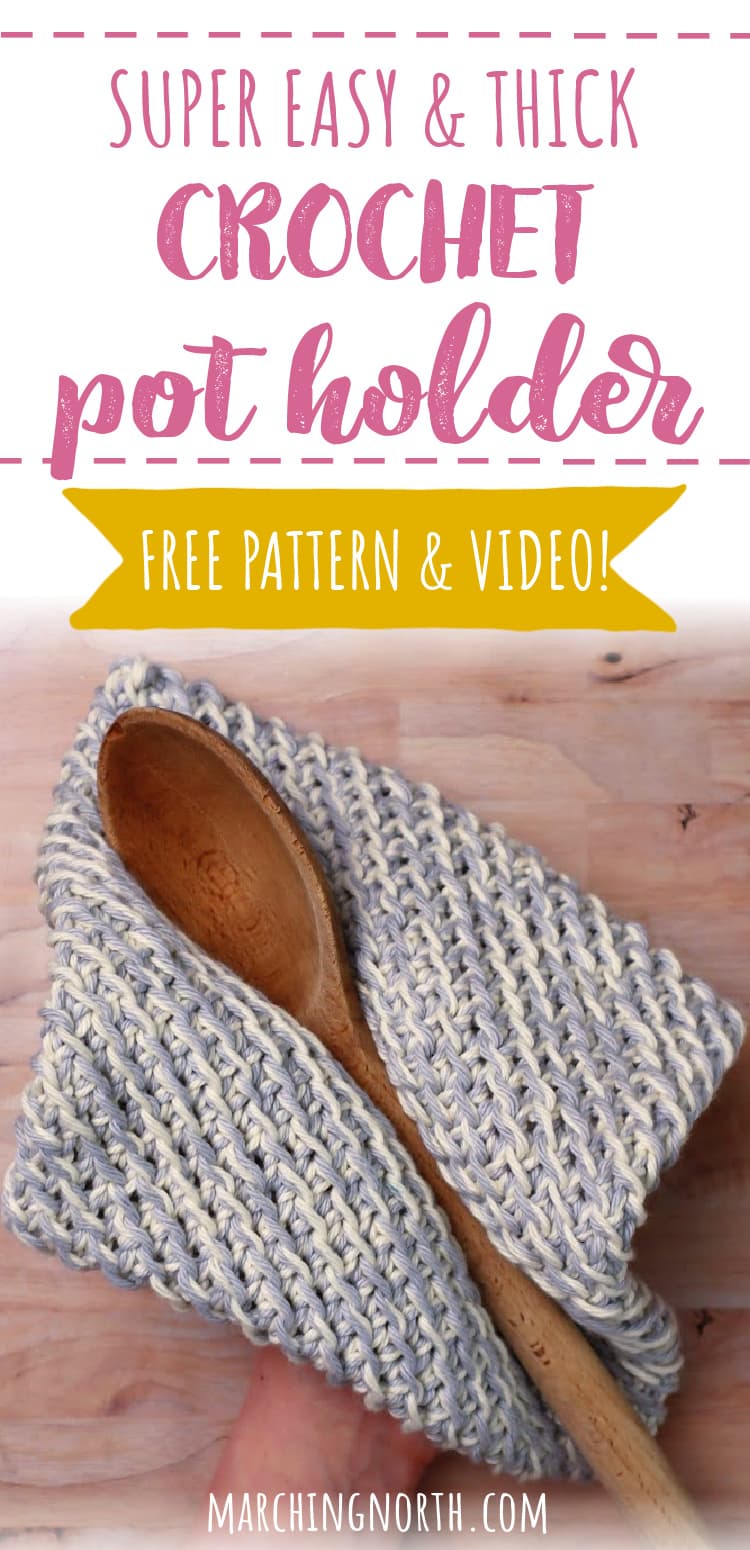
Magic Crochet Pot Holder (Double Thick!) Free Pattern
If you’re looking for a super thick and easy crochet potholder pattern, you found it!
This simple double thick pot holder pattern uses beginner friendly basic stitches and you can have it ready to use in your kitchen in about an hour by following this free pattern and video tutorial.
It doesn’t get much better than that!
Want to remember this? Post this Magic Crochet Pot Holder tutorial to your favorite DIY Pinterest board!
(This post may contain affiliate links. If you click one and make a purchase, I may receive a small commission at no extra cost to you. Read the disclaimer here. Thank you for your support!)
This is a classic crochet pattern and you’ll sometimes see it called a magic potholder.
The magic is because of the way you fold it together at the end to create the super thick diagonal design. Don’t worry, it’s not complicated!
To make these hot pads even thicker, I used two strands of worsted weight cotton yarn held together.
Doing that also has the added bonus of making these crochet potholders super fast and easy to work up.
Don’t you just love a great project like that?

Crochet potholders are the perfect project for warmer weather and they also make a great gift.
You can make them whatever color you want, and the diagonal design of this pattern gives it a cool modern look.
If you’re looking for more free crochet potholder patterns, be sure to check out this free pattern for a thermal stitch version that’s also easy enough for a beginner crocheter.
I’ve been using the one I made for that tutorial for over a year now and it’s still going strong!
Different Ways to Make This Crochet Potholder
This free crochet pattern is made with single crochet and we’ll be working in the back loop of each stitch.
If you wanted to change things up a bit, you could use a half double crochet stitch, or possibly even a double crochet.
You’ll need less rows to complete your potholder, and the texture won’t be quite as dense as the single crochet version.
If you want to make your potholder larger, just add more chains to your starting chain and you’ll need to make a few more rows. If you want it to be a bit smaller, reduce the amount of starting chains and do a few less rows.
You can also use a larger hook and get a less dense pot holder, but one of the best parts of this pattern is how nice and thick it is, so I don’t really recommend that.
If you want to add a hanging loop to your potholder, I’ll explain how to add one using a chain stitch when we get to that part. I didn’t add one to mine, but it’s easy to do.
Best Yarn for Crochet Potholders
It’s really important to use cotton or wool yarn when you make anything that’ll come into contact with hot pans. If you use acrylic, the yarn will melt if you put hot pots on top, and we don’t want that!
I don’t recommend wool for this pot holder because it shrinks in the wash.
You might be able to get away with a super wash wool, but I recommend sticking to cotton yarn. That way, when your hot pad eventually gets dirty you can just through it in the wash and not worry about it!
The yarn I’m using in this pattern is “I Love This Cotton” from Hobby Lobby. I like it because it’s really soft, and a lot of cotton yarns tend to be scratchy.
You can also use Lily Sugar’n Cream cotton yarn or any other worsted weight size 4 cotton yarn.
Another yarn I really like is Dishie by Knit Picks. That’s the yarn I’m linking to in the description, it comes in lots of different colors and is super affordable!
You can use two different colors of yarn like I did, or you can just use the same color for both.
I used light gray and cream for mine, but you can change things up with a different color combination as well!
Supplies You’ll Need for this Project
- 2 skeins of cotton worsted weight yarn (size 4) in colors of your choice
- Size J (6.0 mm) crochet hook
- Sharp scissors
- Yarn Needle
- Stitch marker
- Tape measure
Magic Folded Crocheted Potholders Tutorial
Skill Level: Beginner
Finished size: Approx. 8.5″ x 8.75″
Abbreviations
- sc – single crochet
- BLO – back loop only
- sl st – slip stitch
Foundation Row: Attach both strands of yarn to the hook as one with a sl st. Chain 35.
Round 1: Sc into the back bump of the second ch from your hook. Repeat that to the end of the row.
At the end of the row, rotate your work and sc into the BLO of the first stitch on the other side.
Place a stitch marker in the first stitch you just made. Make a tally mark on a piece of paper, and each time you get to the stitch marker, add another mark.
That way you can keep up with how many rows you’ve completed without having to remember.
Round 2-17: Sc in the BLO of each stitch to the end of the row, turn your work and sc in the BLO of each stitch on the other side of the row.
When you reach the stitch marker, remove it, make a sc in the BLO of the stitch the marker was previously in, and replace the stitch marker in the new stitch.
You’ll continue going around making continuous rounds until you have 17 all together.
Finishing the Pot Holder
Place the corners of the pot holder flat on your work surface and fold the sides down so they meet and form a diagonal seam.
If the sides don’t quite meet up yet, you’ll want to do another row or two so you end up with a nice mostly square potholder.
At this point, you’ll be in the center of the pot holder, so we need to crochet to the corner before we continue on.
For my pot holder, this took 18 stitches. Before I started crocheting, I placed my stitch marker in the 19th stitch. That way I could crochet along without having to count.
Optional Hanging Loop
Once you get to the corner, you can add a hanging loop if you want.
I didn’t do this for mine, but here’s what you do.
Chain 10, then slip stitch into the base of the chain. Now just continue along with the rest of the pattern!
Sewing the Diagonal Seam
Measure out enough yarn to go across the diagonal seam twice, plus a little extra. Cut the yarn at that mark and pull the loop on your crochet hook to finish off the last stitch.
Thread the yarn ends on your yarn needle. Now we’re going to whip stitch in the front loop of the side farthest from you and the back loop of the side closest to you.
Insert the needle into the back loop of the stitch to the right of the stitch where the yarn is coming out.
Pull the yarn through, and then insert the needle under and through the front loop of the stitch straight across on the other side.
Repeat that all the way down the potholder.
When you get all the way to the corner, make a knot and thread the needle through the center of the potholder for a few inches.
Hold the corner of the potholder with one hand and pull the yarn to pop the knot through to the inside. Cut the excess yarn and you’re done!
Now you can sit back and admire your beautiful crochet potholder!
Magic Crochet Pot Holder (Double Thick!)
If you're looking for a super thick and easy crochet potholder pattern, you found it!
This simple double thick pot holder pattern uses beginner friendly basic stitches and you can have it ready to use in your kitchen in about an hour by following this free pattern and video tutorial.
Tools
- Size J (6.0 mm) crochet hook
- Sharp scissors
- Yarn Needle
- Stitch marker
- Tape measure
Instructions
- Attach both strands of yarn to the hook as one with a sl st. Chain 35.
- Sc into the back bump of the second ch from your hook. Repeat that to the end of the row.
At the end of the row, rotate your work and sc into the BLO of the first stitch on the other side. Place a stitch marker in the first stitch you just made. - Sc in the BLO of each stitch to the end of the row, turn your work and sc in the BLO of each stitch on the other side of the row.
When you reach the stitch marker, remove it, make a sc in the BLO of the stitch the marker was previously in, and replace the stitch marker in the new stitch. You'll continue going around making continuous rounds until you have 17 all together. - Make 18 more single crochet stitches in the BLO to finish the row.
- Lay the finished pot holder out and fold it to form the diagonal seam.
Cut the yarn leaving a long tail. Thread it onto a yarn needle and whip stitch the opening closed. - Knot the yarn at the end and weave in the ends. Cut the excess yarn.
Notes
Finished size of potholder is approx. 8.5" x 8.75".
In Conclusion
I hope you enjoyed this free double-thick potholder pattern! It’s the perfect addition to your kitchen decor and they come in super handy.
If you make one of these, please share a picture over on Instagram and tag me @marchingnorth so I can see! I love seeing all of your awesome creations!
I just loved making this potholder. The step by step tutorial made it so much easier than trying to just read the instructions. Thank you for sharing.
Yes, I also thank you Crystal as I appreciate all your hard work work, the key ring, I will adapt for curtain loops to hold them back on a wall hook and I am in need of the pot holder too. These will be my first attempts at macrame with your clear explanations of the methods. Will be alone this Christmas, with my cat, so no pressures just enjoy myself learning, and doing exactly what I want to do when I want. AHHH, lovely.
Best regards, stay well.
Valeria UK Devon.
Thank you for the video on the pot holders, I think I’ll be trying that one . Instructions were very clear. Cheers karen
I’d really love to make this. Is there a link to the printable pattern without all the pictures?